
Easy & Beautiful Pumpkin Crochet Blanket for Beginners
I show you how to make a Pumpkin Crochet Blanket for beginners with clear steps, simple stitches, and helpful tips for a cozy handmade fall project at home.
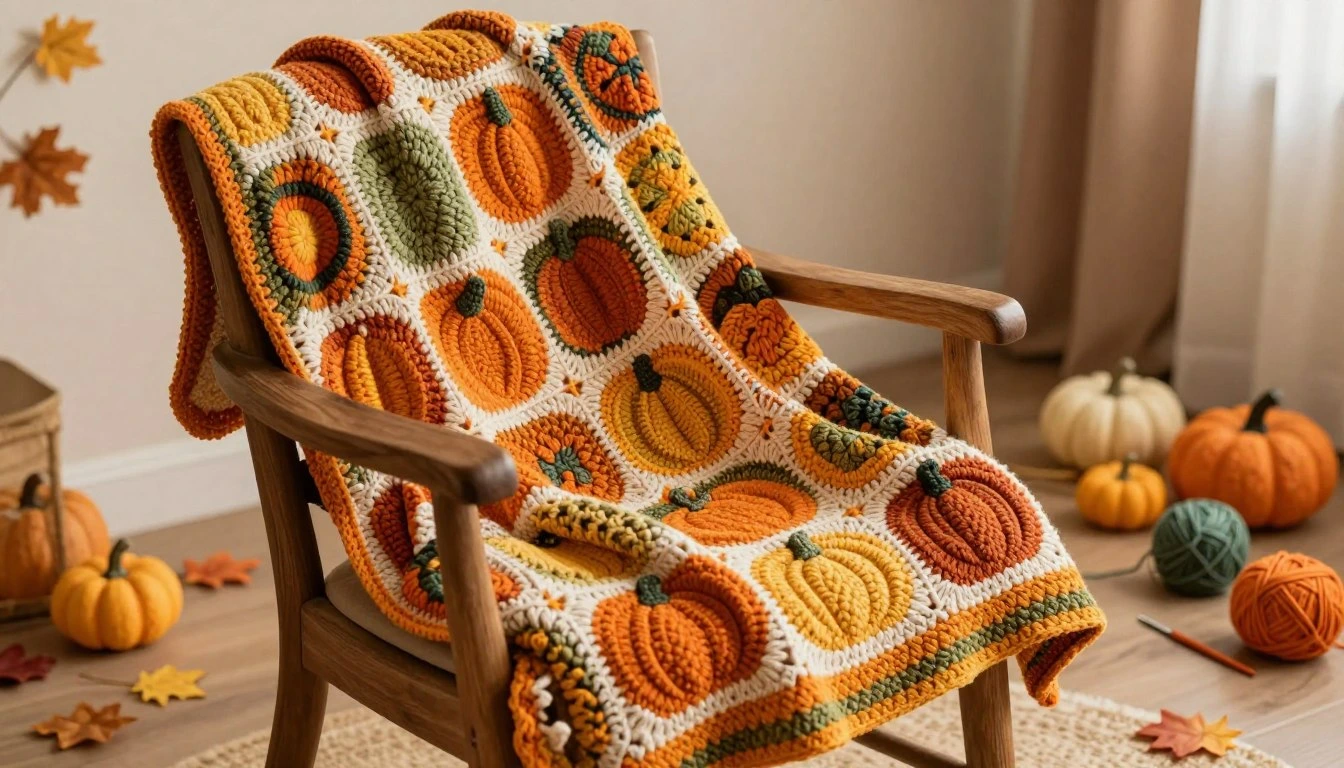
Table of Contents
Have you ever wondered if you could create a cozy masterpiece for your home without years of experience? I believe that anyone can master the art of yarn crafts with the right guidance.
My latest project is a charming pumpkin crochet blanket designed specifically for those just starting their journey. This pattern uses basic stitches and clear color transitions to ensure your success.
You will find that using medium-weight acrylic yarn and a 4.50 mm hook makes this fall crochet blanket an approachable foundation for your skills. I will walk you through every step, from selecting your materials to adding the final decorative touches. Let’s get started on this seasonal treasure together.
Gather Materials and Plan the Pumpkin Crochet Blanket
I always find that gathering my materials carefully makes the entire process much smoother. When you prepare your workspace, you set yourself up for success with your new pumpkin crochet blanket. Taking time to organize your supplies ensures that you can focus on the joy of creating rather than searching for missing items.
Choose Beginner-Friendly Yarn, Colors, and Hook Size
Select Soft Fall Colors for the Pumpkin, Background, and Border
Choosing the right palette is essential for a cozy aesthetic. I recommend selecting warm, earthy tones that capture the essence of the season. You might consider these classic combinations for your project:
- Burnt orange for the pumpkin body
- Deep forest green for stems and leaves
- Cream or soft beige for the background
- Dark chocolate brown for the border
Match the Yarn Weight to the Recommended Crochet Hook
Your choice of yarn weight dictates the final texture of your crochet pumpkin blanket. Most beginners find that medium-weight acrylic yarn is the easiest to handle. Please refer to the following guide to ensure your hook matches your yarn:
| Yarn Weight | Recommended Hook Size | Best For |
| Light (DK) | 3.5mm – 4.5mm | Lightweight baby blankets |
| Medium (Worsted) | 5.0mm – 6.0mm | Standard throws |
| Bulky | 6.5mm – 8.0mm | Extra cozy, fast projects |
Measure the Finished Blanket and Estimate Yarn Requirements
Decide Between a Baby Blanket, Throw, or Full-Size Fall Crochet Blanket
Before you start, determine the intended use for your fall crochet blanket. A baby blanket requires significantly less yarn than a full-size bed cover. I suggest measuring your space or the intended recipient to decide on the final dimensions.
A gauge swatch is a small sample square that helps you check your tension. By creating this square, you can verify if your stitches match the pattern requirements. This simple step prevents your finished project from being too small or too large.
Learn the Simple Stitches Used in the Pattern
Practice the Chain Stitch, Single Crochet, and Double Crochet
Mastering three basic stitches will allow you to complete almost any design. I recommend practicing these on a scrap piece of yarn until your movements feel natural. These stitches form the foundation of your entire project.
Understand Turning Chains, Stitch Counts, and Tension
Consistent tension is the secret to a professional-looking result. Always count your stitches at the end of every row to ensure your edges remain straight. Remember that the turning chain often counts as a stitch, so keep a close eye on your pattern instructions.
Make the Pumpkin Crochet Blanket Base Step by Step
I find that the best way to construct a beautiful pumpkin patch crochet blanket is to follow a clear, step-by-step process. By breaking the work into manageable phases, you ensure that your project remains consistent and professional from start to finish.
Step 1: Crochet the Foundation Chain
Count the Chains for the Desired Blanket Width
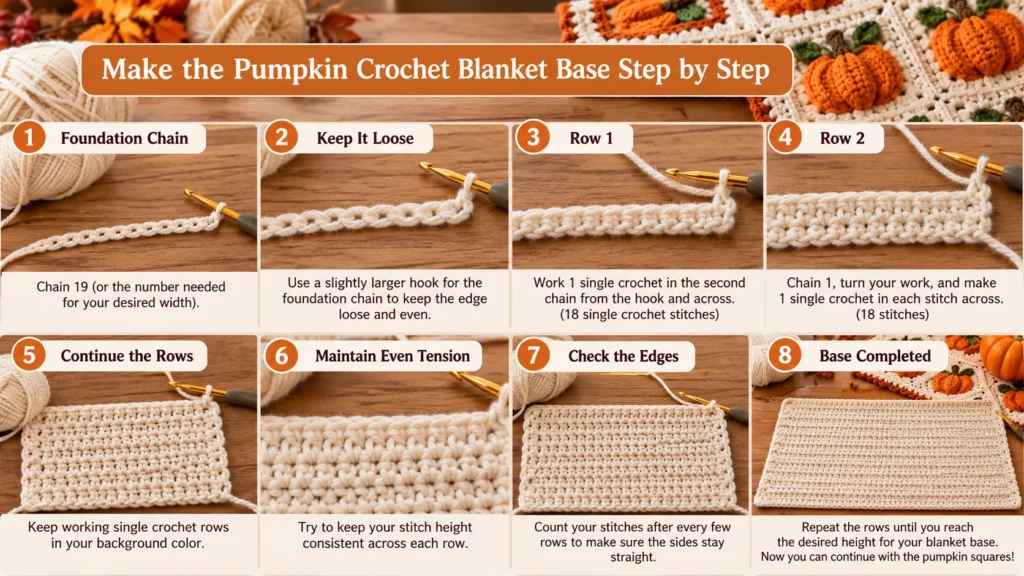
To begin your pumpkin crochet blanket, you must establish the correct width. For example, a chain of 19 will yield 18 single crochet stitches, which serves as a great starting point for a small swatch or a narrow section.
Keep the Foundation Edge Loose and Even
I always recommend using a slightly larger hook for your foundation chain to prevent the edge from pulling tight. Keeping this base loose ensures that your crochet pumpkin blanket lays flat and does not curl at the bottom.
Step 2: Work the First Rows in the Background Color
Maintain Consistent Stitch Height Across Each Row
Once your chain is ready, work your initial rows using your chosen background color. Focus on maintaining a steady tension so that every stitch height remains uniform throughout the entire piece.
Check the Edges for Straightness After Every Few Rows
I make it a habit to count my stitches at the end of every row to ensure I have not accidentally added or dropped any. This simple check keeps the sides of your pumpkin patch crochet blanket perfectly straight.
Step 3: Build the Pumpkin Patch Design
Use Color Changes to Form Pumpkin Shapes
When you reach the rows where the pumpkins appear, introduce your orange yarn. I prefer to switch colors on the final pull-through of the previous stitch to keep the transition clean and sharp.
Carry, Fasten Off, or Weave in Unused Yarn Correctly
You can carry the yarn across the back if the distance is short, but fastening off is better for longer gaps. Proper yarn management prevents bulky bumps on the back of your crochet pumpkin blanket.
Step 4: Crochet Pumpkin Stems and Leaves
Add Simple Brown Stems Without Complicating the Stitch Pattern
To add stems, I simply work a few stitches in brown yarn directly on top of the orange pumpkin shapes. Keeping these details small prevents the fabric from becoming too heavy or distorted.
Create Green Leaves With Basic Increases and Decreases
You can form leaves by adding a few extra stitches in green near the stem. Using basic increases and decreases allows you to shape the foliage without needing complex patterns.
Step 5: Repeat the Pattern Across the Blanket
Space Pumpkins Evenly for a Balanced Pumpkin Patch Crochet Blanket
Consistency is key when repeating your motifs across the fabric. I count the number of background stitches between each pumpkin to ensure they are perfectly centered and spaced.
Use a Row-by-Row Stitch Count to Prevent Design Shifts
Tracking your progress on a notepad helps prevent the design from shifting as you grow the blanket. This method ensures your pumpkin crochet blanket maintains its intended layout from the first row to the last.

Step 6: Finish the Final Rows
Secure the Last Stitch and Leave a Tail for Weaving
When you reach the final row, fasten off your yarn by pulling the tail through the last loop. Always leave a tail of at least six inches to make weaving in the ends much easier later.
Inspect the Blanket for Missed Stitches or Loose Color Changes
Before moving on, lay your work flat and inspect it for any errors. Checking for loose color changes now saves you time during the final finishing stages.
| Stitch Type | Best Use Case | Difficulty Level |
| Single Crochet | Base and Background | Beginner |
| Color Change | Pumpkin Shapes | Intermediate |
| Surface Slip Stitch | Adding Texture | Intermediate |
Add Shape, Texture, and Seasonal Details
I love how small details can completely change the look and feel of a cozy handmade item. By adding simple surface textures and thoughtful borders, you can elevate your project into a professional-looking piece. These finishing touches provide depth and character to your work without requiring complex construction techniques.
Define Pumpkin Ridges With Surface Crochet or Embroidery
Place the Lines Symmetrically From the Stem to the Base
To give your pumpkins a realistic look, I recommend adding vertical lines that mimic natural ridges. You should place these lines symmetrically, starting from the stem and working down to the base of each pumpkin. This simple technique adds instant dimension to your fall crochet blanket.
Choose a Contrasting Color That Keeps the Pumpkins Visible
Selecting the right yarn color for your ridges is essential for visibility. I suggest using a darker shade of orange or a deep brown to ensure the lines stand out against the pumpkin body. This contrast helps define the shape of your autumn crochet blanket motifs clearly.
Create a Border for a Polished Autumn Crochet Blanket
Work an Even Single-Crochet Border Around All Four Sides
A clean border provides a professional finish to any handmade item. I find that working a few rounds of single crochet around all four sides creates a sturdy and neat edge. This simple frame helps your blanket maintain its shape over time.
Add a Scalloped or Textured Edge for a Thanksgiving Crochet Blanket
If you want a more decorative look, consider adding a scalloped edge to your thanksgiving crochet blanket. You can easily create small shells or picot stitches to add a festive touch. This extra detail makes the piece feel special for holiday gatherings.
Adjust the Design for Halloween or Thanksgiving Décor
Use Black, Cream, and Orange for a Halloween Crochet Blanket
You can easily adapt your design to fit different holidays by changing your color palette. For a spooky halloween crochet blanket, I suggest using a bold combination of black, cream, and bright orange. These colors create a classic festive aesthetic that works perfectly for October.
Use Warm Neutrals and Golds for Thanksgiving Display
When preparing for a thanksgiving crochet blanket display, I prefer using warm neutrals and soft golds. Incorporating earthy tones like sage green for leaves and deep brown for stems creates a sophisticated look. These colors blend beautifully with traditional home decor during the harvest season.
Finish, Block, and Care for the Handmade Blanket
Once your project is off the hook, it is time to give your creation the professional touch it deserves. Proper finishing ensures that your pumpkin crochet blanket remains durable and beautiful for years to come. I always recommend taking these final steps before you display your work.
Weave In Ends and Correct Small Imperfections
Hide Yarn Tails Securely on the Wrong Side of the Blanket
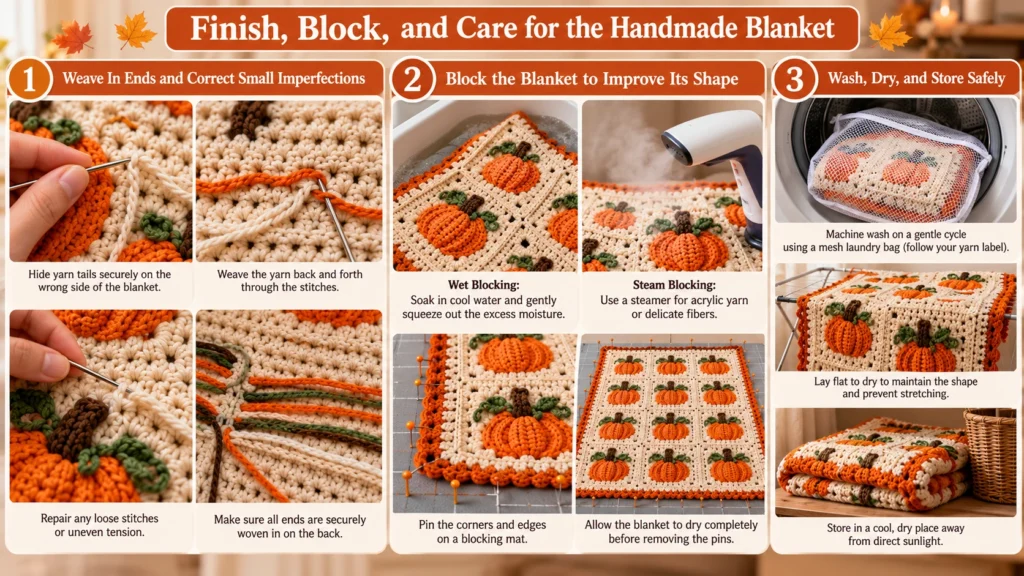
Use a yarn needle to weave your loose ends back and forth through the stitches on the back of the fabric. I suggest splitting the yarn ply slightly to lock the tail in place for extra security. This prevents the ends from popping out after repeated use.
Repair Loose Stitches Before Washing or Blocking
Inspect your work closely for any uneven tension or skipped loops. If you find a loose stitch, gently pull the yarn through to the back and secure it with a small knot or extra weaving. Fixing these minor issues now will make your autumn crochet blanket look much more polished.
Block the Blanket to Improve Its Shape
Choose Wet Blocking or Steam Blocking for the Yarn Fiber
Blocking helps even out your stitches and gives the fabric a professional drape. For acrylic fibers, steam blocking is often the safest and most effective method. If you prefer wet blocking, soak the item in cool water and gently squeeze out the excess moisture.
Pin the Corners and Edges Without Stretching the Fabric
Lay your project flat on a blocking mat or a clean towel. Use rust-proof pins to secure the corners and edges into a perfect rectangle. Be careful not to pull the fabric too tight, as this can distort the shape of your pumpkin crochet blanket.
Wash, Dry, and Store the Crochet Pumpkin Blanket Safely
Follow the Yarn Label for Washing and Drying Instructions
Always check the manufacturer’s label on your yarn skein for specific care requirements. Most acrylic yarns are machine washable, but I prefer using a gentle cycle with a mesh laundry bag. This protects the delicate texture of your autumn crochet blanket during the wash.
Fold the Blanket in a Dry Place Away From Direct Sunlight
Once the item is completely dry, fold it neatly to prevent creases. Store it in a cool, dark closet to keep the colors vibrant and fresh. Keeping your project away from direct sunlight will prevent the fibers from fading over time.
Conclusion
Creating a handmade pumpkin crochet blanket offers a rewarding way to celebrate the changing seasons. I find that careful planning of yarn yardage, which ranges from 55 to 175 yards per motif, ensures your project stays on track from the first chain to the final border.
You now possess the skills to customize your work for any festive occasion. A vibrant pumpkin crochet blanket serves as a cozy centerpiece for your living room during the crisp days of October. You can easily adapt the color palette to suit a sophisticated autumn crochet blanket aesthetic using warm oranges, deep browns, and soft creams.
These same construction techniques allow you to transition your home decor with ease. A festive halloween crochet blanket brings a playful touch to your space, while a muted thanksgiving crochet blanket adds warmth to your holiday gatherings. I encourage you to experiment with different yarn weights and textures to make each piece unique.
Share your finished projects with fellow crafters to inspire new designs. Your creativity turns simple stitches into cherished heirlooms that last for many years. Start your next project today and enjoy the process of crafting something beautiful for your home.
FAQ
Is this pumpkin crochet blanket pattern suitable for a total beginner?
Yes, I designed this project specifically for beginners by using basic stitches and manageable color changes. By following my guide, you can create a beautiful fall crochet blanket without needing to master complex techniques. I recommend starting with a small gauge swatch to get comfortable with the transition between the orange pumpkin body and the brown stem.
What type of yarn and hook should I use for my crochet pumpkin blanket?
I suggest using a medium-weight (worsted) acrylic yarn, such as Red Heart Super Saver or Lion Brand Vanna’s Choice, because they are durable and easy to work with. I find that a 4.50 mm crochet hook provides the perfect tension for these yarns, ensuring your pumpkin patch crochet blanket has a soft drape while keeping the stitches tight enough to define the shapes.
How can I customize this design to make a halloween crochet blanket?
To give your project a spooky twist, I recommend adjusting the color palette. Instead of traditional harvest tones, I often use a high-contrast mix of black, cream, and vibrant orange. You can even use surface crochet to add Jack-o’-lantern faces to some of the motifs, making it a perfect decorative piece for October.
What colors work best for a thanksgiving crochet blanket?
For a sophisticated Thanksgiving look, I prefer using warm neutrals, deep golds, and forest greens. Using a rich brown for the stems and a muted sage for the leaves helps the blanket blend seamlessly with autumn table settings. These earthy tones make the autumn crochet blanket feel cozy and timeless throughout the entire holiday season.
How do I ensure the pumpkins stay aligned across the blanket rows?
I maintain alignment by keeping a strict row count and using a consistent foundation chain. For example, if I start with a chain of 19 to get 18 single crochet stitches, I make sure every subsequent pumpkin motif follows that exact count. I also use stitch markers to signal where color changes occur, which prevents the “patch” from shifting as I build the rows.
How should I clean and store my handmade autumn crochet blanket?
Since I recommend acrylic yarn for this project, you can usually machine wash it on a gentle cycle with cool water. I always check the specific label on my Lion Brand yarn for drying instructions, but I generally prefer laying the blanket flat to dry to preserve its shape. For storage, I keep mine folded in a cool, dry place away from direct sunlight to prevent the vibrant orange and green dyes from fading.
Do I need to block my pumpkin crochet blanket once it is finished?
I highly recommend blocking your finished piece. Even if your stitches are neat, blocking helps settle the yarn and ensures the edges of your fall crochet blanket are perfectly straight. I use a measuring tape to check the dimensions and pinning mats to hold the shape while the fibers set, which gives the entire pumpkin patch crochet blanket a professional, polished finish.