
Easy Granny Square Pattern for Beginners to Crochet
Learn this easy granny square pattern for beginners with simple crochet steps, helpful tips, and beginner-friendly instructions to create beautiful squares.
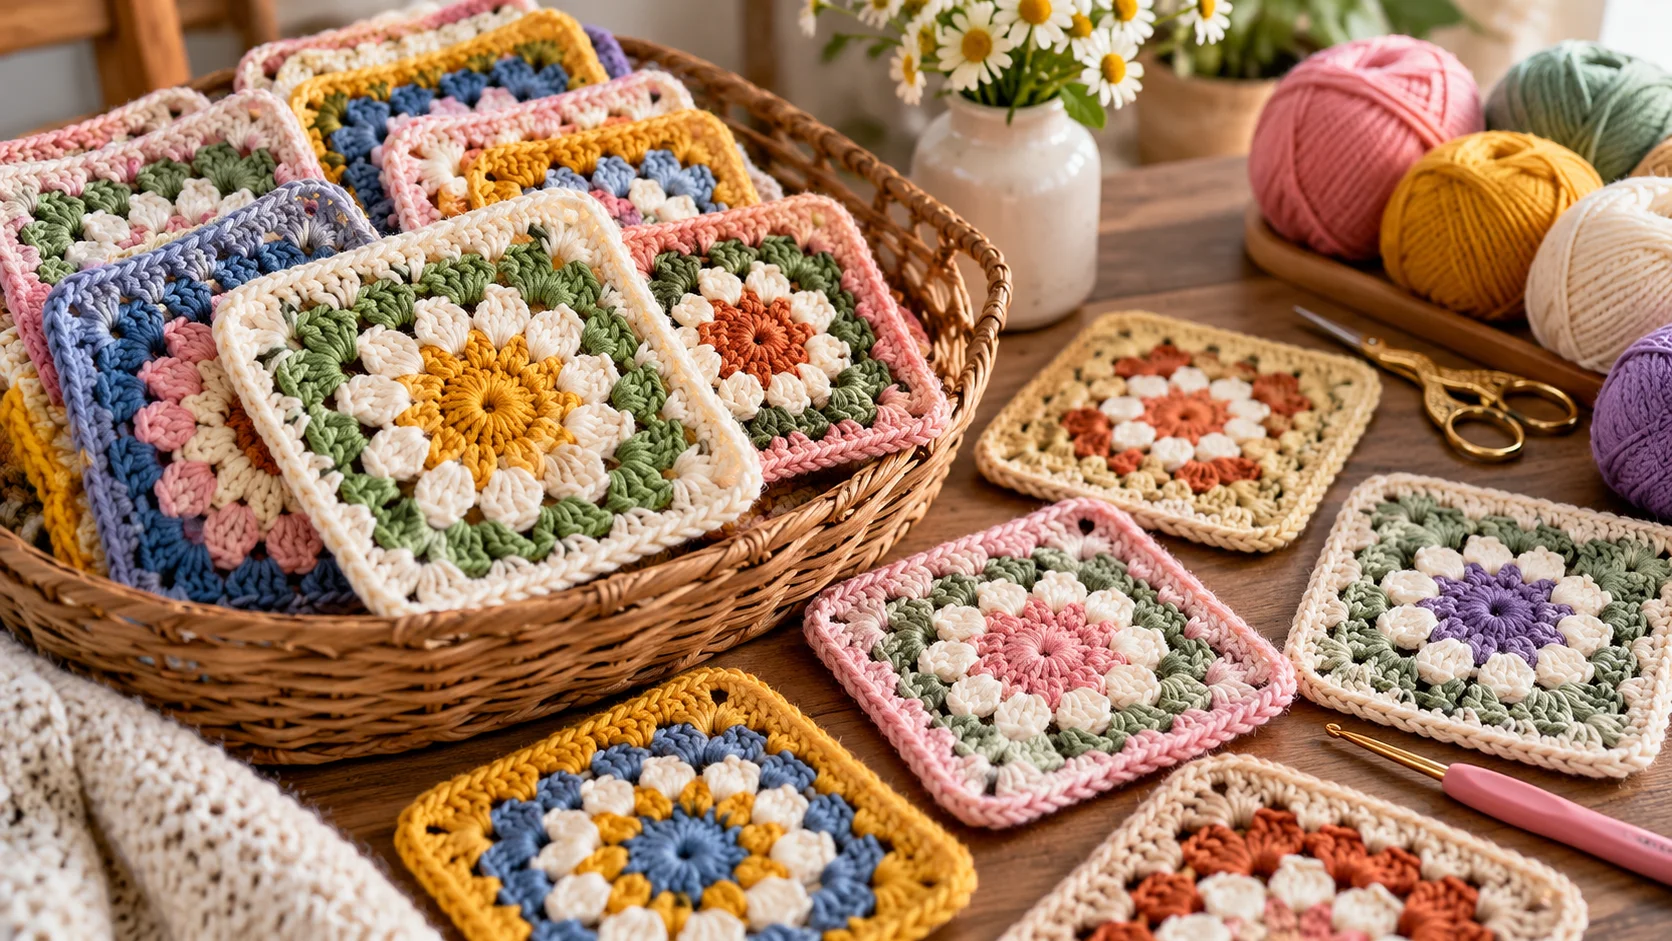
Table of Contents
Have you ever wondered how a simple loop of yarn transforms into a timeless piece of art? Many people believe that mastering crochet requires years of practice, but the truth is much simpler. You can start your creative journey today with a classic design that serves as the foundation for countless beautiful projects.
This iconic Granny Square Pattern introduces you to the essential structure of chain stitches and grouped double crochets. By using a practical and repeatable method, you will quickly gain confidence in your hook work. Whether you choose to expand your piece into one large afghan or join several motifs for a patchwork blanket, the possibilities are endless.
In this guide, we will walk you through everything you need to succeed. We cover the necessary materials, stitch preparation, and clear round-by-round instructions. You will also find helpful finishing techniques and troubleshooting advice to ensure your first Granny Square Pattern looks professional and polished.
Gather Yarn, Tools, and Basic Crochet Skills
Success with your granny square crochet begins with selecting the right yarn and tools. having the proper equipment makes the learning process much smoother and more enjoyable for benginners
Choose Beginner-Friendly Yarn and the Correct Hook
For your first project, choose a smooth, medium-weight yarn in a light color. Light colors make it much easier to see your stitches as you work.
How yarn weight, fiber, and color affect your crochet granny square
Yarn weight determines the thickness of your finished piece. A worsted weight yarn is ideal for a standard crochet granny square because it is easy to handle and works up quickly.
| Yarn Weight | Recommended Hook Size | Best Use |
| Light (DK) | 3.5mm – 4.5mm | Delicate squares |
| Medium (Worsted) | 5.0mm – 5.5mm | Classic blankets |
| Bulky | 6.0mm – 8.0mm | Quick, thick projects |
Prepare Scissors, a Tapestry Needle, and Stitch Markers
Keep a sharp pair of scissors nearby to trim your yarn ends cleanly. A tapestry needle is essential for weaving in those loose ends once you finish your work.
Stitch markers help you keep track of your corners or specific rounds. These small tools prevent mistakes and save you time during the assembly process.
Review the Chain Stitch, Slip Stitch, and Double Crochet
The classic design relies on three basic stitches. You will primarily use the chain stitch, the slip stitch, and the double crochet to build your motif.
Most patterns use groups of three double crochets to create the sides of the square. Mastering these three techniques will give you the confidence to complete any project.
How to hold the hook and maintain consistent tension
Hold your hook like a pencil or a knife, depending on what feels most natural to your hand. Experiment with both grips to see which one reduces strain during long sessions.
Consistent tension is the secret to a professional-looking crochet granny square. If your stitches feel too tight, try relaxing your grip on the yarn to allow it to flow more freely.
Understand the Granny Square Pattern Before You Begin
Every free granny square pattern relies on a few simple, repeating geometric principles. By learning how these shapes fit together, you can turn a basic loop of yarn into a perfect square with ease.
Recognize the Center Ring, Corners, and Side Clusters
To visualize your work, think of the square as a series of expanding layers. You start at the very middle and build outward, adding new stitches to the edges of the previous round.
Most designs consist of these primary elements:
- The center ring: The foundation where your first stitches live.
- Side clusters: Groups of double crochet stitches that create the solid parts of your square.
- Corners: The turning points that allow the work to grow into a square shape rather than a circle.
Read Chain Spaces and Double Crochet Groups in the Pattern
When you follow a free granny square pattern, you will notice that you rarely crochet into individual stitches after the first round. Instead, you work your clusters into the open gaps created by chain stitches in the round below.
Why each corner uses extra chain stitches
Corners require extra chain stitches to create a wider gap than the sides. This additional space provides the necessary room to fit multiple clusters into the same spot, which forces the fabric to turn a sharp corner. Without these extra chains, your square would quickly curl into a bowl shape.
Plan a Single-Color or Colorful Granny Square Design
Deciding on your color scheme is a fun part of the process. You can choose to use one solid color for a classic look or switch yarns every round to create a vibrant, multi-toned effect.
How contrasting colors make the square structure easier to see
Using contrasting colors is a great strategy for beginners. When each round is a different shade, it becomes much easier to identify exactly where the corners are and where the side clusters begin. This visual clarity helps you keep your stitch count accurate as you progress through your free granny square pattern.
Step One: Crochet the Center Ring and First Round
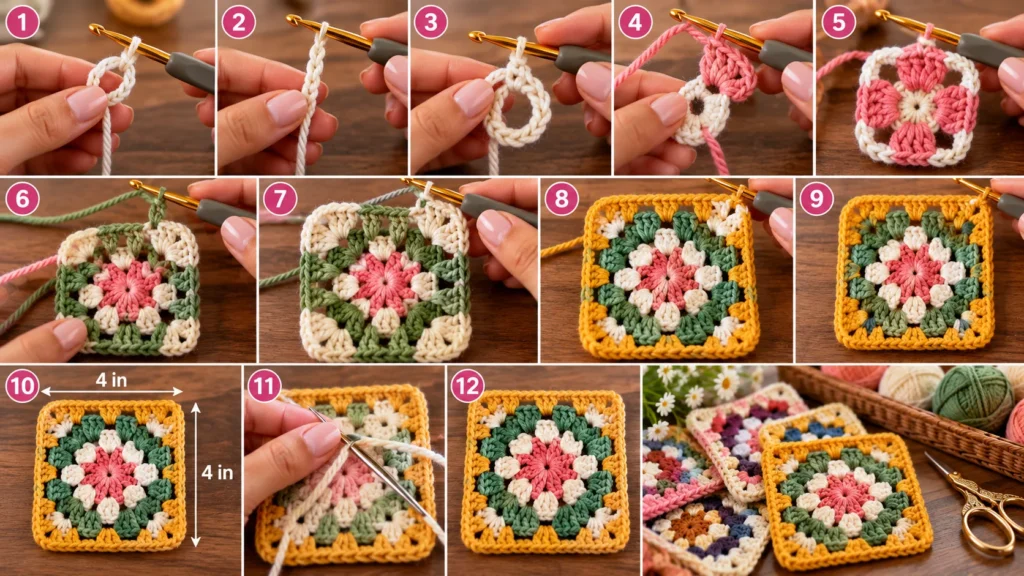
Mastering the first round is the most important step in this easy granny square pattern. By building a stable center, you ensure that your finished piece remains flat and symmetrical. This phase focuses on creating the initial ring and the first set of clusters that define the square shape.
Make a Slip Knot and Chain Four
Begin by creating a slip knot on your crochet hook. Tighten it gently so it slides easily along the shaft. Next, yarn over and pull through to create four chains in a row.
Join the Chain Into a Small Ring
Insert your hook into the very first chain you made. Yarn over and pull the yarn through both the chain and the loop on your hook to create a slip stitch. This action closes your chain into a small, circular center ring.
Work the First Four Double Crochet Clusters
To start the first cluster, chain three, which counts as your first double crochet. Work two more double crochets into the center of the ring. You now have your first group of three stitches.
How to form the first corner with chain-two spaces
After your first cluster, chain two to create the corner space. Continue by working three double crochets into the ring, followed by another chain-two space. Repeat this sequence until you have four clusters separated by four corner spaces.
Close the Round and Check the Square Shape
To finish, join the final chain-two space to the top of your starting chain-three with a slip stitch. Lay your work flat on a table to ensure it looks like a square rather than a circle. The corners should be distinct and the clusters should lie evenly around the center.
What to do if the center ring twists or looks too tight
If your ring feels too tight, you likely pulled your chains too firmly. If the center twists, ensure you are working into the ring and not accidentally catching the tail end of your yarn. Use the table below to troubleshoot common issues during this stage.
| Issue | Potential Cause | Recommended Fix |
| Tight Center | Tension too high | Use a larger hook for the chain |
| Twisted Ring | Incorrect insertion | Flatten work before joining |
| Uneven Clusters | Skipped stitches | Count stitches per cluster |
Following these steps carefully will guarantee success with your easy granny square tutorial. Once your first round is secure and flat, you are ready to expand your project.
Step Two: Add Rounds to Build the Granny Square
You can now transform your small center into a beautiful, growing motif by adding subsequent rounds. This process relies on identifying the gaps between your previous stitches to place new clusters of yarn.
Begin the Next Round in a Corner Space
To start a new round, join your yarn in any of the four corner spaces from the previous row. Pull up a loop and chain three to act as your first double crochet. Work two more double crochets into that same corner space to complete your first cluster.
Work Three Double Crochets Into Each Side Space
Move along the side of your square to the next available gap. Work three double crochets into this space to create a solid cluster.
Separate clusters with chain-one spaces
Always place a chain-one stitch between your side clusters. This creates the necessary room for the next round and keeps your fabric from bunching up or curling.
Form Four New Corners With Chain-Two Spaces
Corners are the secret to maintaining a square shape. When you reach a corner space, work three double crochets, chain two, and then work another three double crochets into the same gap. This chain-two space provides the extra length needed to turn the corner smoothly.
Repeat the Round Until Your Square Reaches the Desired Size
Continue working your clusters into every side space and your corner groups into every corner gap. Once you reach the beginning of the round, join with a slip stitch to the top of your starting chain.
How to count clusters and keep every side even
To ensure your square stays flat, count the number of clusters on each side. Every side should have the same number of clusters as you progress outward. If one side looks shorter, check that you have not skipped a space or accidentally added an extra cluster.
Change Colors Between Rounds for a Colorful Granny Square Design
If you want to create a vibrant look, you can switch yarn colors at the end of any round. Simply fasten off your current color, pull the new yarn through the corner space, and secure it with a knot. This simple technique allows you to experiment with a unique colorful granny square design that highlights your personal style.
Step Three: Finish, Weave In Ends, and Block the Square
Completing your crochet motif involves securing the yarn and shaping the fabric. Following these step-by-step granny square instructions will ensure your work remains durable and looks polished. Proper finishing is the secret to turning a simple piece of yarn into a professional-looking project.
Fasten Off Without Loosening the Final Stitch
When you reach the end of your final round, cut the yarn, leaving a tail of about six inches. Pull the cut end through the loop on your hook and tighten it gently. This simple action locks the stitch in place so your hard work does not unravel.
Weave Yarn Tails Securely With a Tapestry Needle
Thread your yarn tail onto a tapestry needle to begin securing the loose ends. Work the needle through the back of the stitches, moving in a zig-zag pattern to lock the yarn firmly. This prevents the tail from slipping out over time.
How to hide ends without creating bulky corners
To keep your work neat, weave the yarn along the path of the existing double crochet clusters. Avoid pulling the yarn too tightly, as this can distort the shape of your square. By following these step-by-step granny square instructions, you ensure that your corners remain flat and professional.
Block the Square for Straight Edges and Defined Corners
Blocking is a vital process that relaxes the fibers and evens out your tension. Pin your square to a foam mat, pulling the corners gently to create a perfect shape. This step transforms a slightly wavy piece into a crisp, square motif.
Wet-blocking and air-drying precautions for different yarn fibers
If you are using wool, mist the square with water and let it air dry completely. For acrylic yarns, you may need to use a steam iron held slightly above the fabric to set the shape. Always check your yarn label to see how the specific fiber reacts to heat and moisture.
Measure the Finished Square Before Making More Motifs
Before you start your next piece, use a ruler to measure the width and height of your square. Consistent measurements are essential if you plan to join multiple squares together later. Recording these dimensions now will help you maintain uniformity across your entire project.
Fix Common Problems and Use Your Finished Motif
Even the most experienced crocheters encounter occasional hiccups when crafting their motifs. Identifying these issues early helps you maintain a consistent shape and size across all your pieces.
Correct Wavy, Tight, or Uneven Edges
Adjust tension, chain spacing, and hook size
If your edges appear wavy, you are likely adding too many stitches or your tension is too loose. Conversely, tight or curling edges often indicate that your chain spaces are too small or your tension is too tight.
Try switching to a larger hook size if the square pulls inward. If the square ripples, consider tightening your yarn tension or reducing the number of chains in your corner spaces.
Repair Missing Stitches and Uneven Corners
When to unravel a round instead of forcing a correction
Small gaps or missing stitches can sometimes be hidden during the blocking process. However, if a corner is missing a cluster or the stitch count is off by more than one, it is usually best to unravel the round.
Forcing a correction by adding extra stitches often creates bulky spots that ruin the symmetry of the square. Unraveling allows you to maintain the clean, geometric look required for a high-quality finished piece.
Join Multiple Squares Into a Granny Square Blanket Pattern
Compare slip-stitch, single-crochet, and whipstitch joining
Once you have several motifs, you can combine them into a beautiful granny square blanket pattern. Choosing the right joining method depends on the texture and visibility you desire for your seams.
| Method | Visibility | Texture | Best Use |
| Slip Stitch | Low | Flat | Seamless look |
| Single Crochet | High | Raised ridge | Decorative borders |
| Whipstitch | Medium | Flexible | Soft blankets |
Explore Small Projects and Granny Square Motif Ideas
Make coasters, scarves, bags, pillows, and baby blankets
You do not always need to commit to a large granny square blanket pattern to enjoy your work. Single motifs make excellent coasters, while a collection of squares can be sewn into stylish tote bags or decorative throw pillows.
For larger accessories, try joining squares to create a warm scarf or a soft baby blanket. These versatile projects allow you to practice your skills while creating functional items for your home or as thoughtful gifts.
Conclusion
The classic granny square relies on a simple, repeatable rhythm of double crochet clusters, chain spaces, and four corner turns. You now possess the fundamental skills to create beautiful fabric with consistent tension and precise counting.
Your commitment to weaving in ends securely and blocking each piece ensures a professional finish for every project. These habits transform basic yarn into durable, high-quality textiles that stand the test of time.
You can now explore endless granny square motif ideas to expand your creative horizons. Whether you choose to work in a single solid color or experiment with vibrant, multi-colored rounds, the versatility of this pattern remains unmatched.
Use these squares to build cozy patchwork blankets, stylish tote bags, or intricate afghans. Your ability to join separate motifs or work in continuous rounds opens doors to countless design possibilities. Pick up your hook and start your next project today to see where your imagination leads.
FAQ
Where can I find a free granny square pattern for my first project?
Many reputable yarn brands, such as Red Heart and Lion Brand, offer a free granny square pattern on their official websites. These guides often include helpful charts and variations for different skill levels.
What is the best way to start a crochet granny square?
Most beginners find that starting with a chain-four joined into a ring is the easiest method. However, as you gain experience, you might also try the “magic ring” technique for a center with no visible hole.
How can I make my colorful granny square design look more professional?
To make your colorful granny square design stand out, ensure you change colors at the start of a new round and weave in your ends as you go. Blocking your finished squares is also essential for achieving crisp, sharp corners.
Is there an easy granny square tutorial for joining squares together?
Yes, many tutorials recommend using a simple slip stitch or a whipstitch to join motifs. If you are following a granny square blanket pattern, look for “join-as-you-go” methods to save time on sewing at the end.
What are some popular granny square motif ideas besides blankets?
You can use your squares to create a variety of items. Popular granny square motif ideas include bucket hats, cardigans, water bottle holders, and even decorative wall hangings.
Why does my square look more like a circle?
If your work is rounding out, you are likely missing the chain-two spaces in the corners. These extra chains are what allow the clusters to sit at a 90-degree angle, giving the piece its signature square shape.
How many rounds should a standard crochet granny square have?
There is no set rule! A standard motif for a patchwork blanket is usually 4 to 6 rounds, but you can follow step-by-step granny square instructions to make your project as small or as large as you like.