Crochet Sweater Patterns Free: Stylish Easy Designs
Discover crochet sweater patterns free for your next handmade project, with beginner-friendly styles, yarn advice, sizing tips, and helpful ideas.
Table of Contents
Finding a crochet sweater that looks beautiful, feels comfortable, and is actually enjoyable to make can take some searching. Sweaters are larger projects than hats or scarves, so choosing the right yarn, construction, size, and stitch pattern matters from the very beginning.
This collection of crochet sweater patterns free ideas is designed to give you practical options for handmade sweaters without making the process feel overwhelming. Along with several style ideas, you’ll find an original, beginner-friendly crochet sweater pattern with measurements, gauge, materials, stitch instructions, and simple ways to adjust the fit.
If this is your first crochet garment, don’t worry about getting everything perfect on the first try. A well-made gauge swatch, accurate measurements, and a little patience usually matter more than complicated stitches.
What Are Crochet Sweater Patterns?
Crochet sweater patterns are instructions for creating handmade tops using crochet stitches and garment construction techniques. Unlike a simple scarf, a sweater needs to fit around several areas of the body, including the shoulders, chest, arms, neckline, and waist or hips.
There are several common ways to construct a crocheted sweater:
- Flat panels joined together
- Top-down construction
- Bottom-up construction
- Raglan construction
- Granny-square construction
- Seamless or mostly seamless designs
For beginners, flat-panel sweaters are often easier to understand because each section can be measured separately before assembly.
Key Features of a Good Crochet Sweater Pattern
A good pattern should tell you more than which stitch to use.
Look for:
- Finished measurements
- Recommended yarn weight
- Hook size
- Gauge
- Skill level
- Abbreviations
- Stitch counts
- Construction instructions
- Assembly instructions
- Finishing details
Sizing information is especially important. A sweater can look beautiful in a photograph but still be uncomfortable if the finished measurements do not match the person wearing it.
Why Crocheters Love Handmade Sweaters
One of the best things about crocheting your own sweater is the ability to make small changes.
You can make the body longer, shorten the sleeves, change the neckline, use a different color, or add more room through the chest.
You also get to choose the yarn yourself. That makes it possible to create a sweater that suits your preferred softness, warmth, texture, and style rather than settling for whatever is available in a store.
Materials You May Need
Yarn
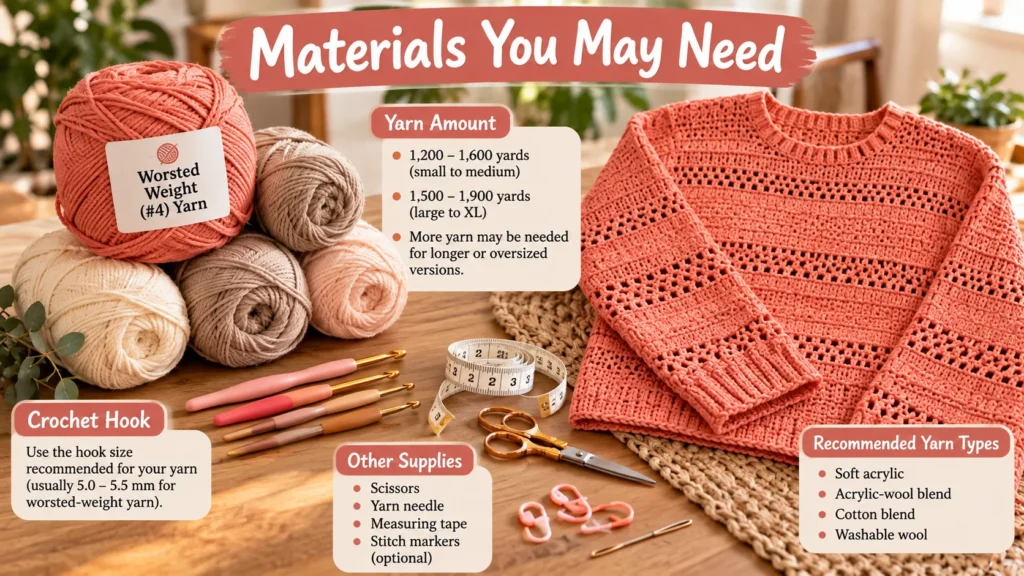
For the featured sweater pattern below, use a worsted-weight (#4) yarn.
You will need approximately:
- 1,200–1,600 yards for an adult small to medium
- 1,500–1,900 yards for an adult large to XL
- More yarn may be needed for longer or oversized versions
A soft acrylic, acrylic-wool blend, cotton blend, or washable wool can work well.
For a sweater, I recommend feeling the yarn against your skin before committing to a large project. A yarn that feels slightly scratchy in a small swatch can become much more noticeable when you are wearing the finished sweater for several hours.
Crochet Hook
Start with a 5.0 mm (H-8) crochet hook.
Your hook size may need to change depending on your tension.
If your fabric is overly tight, try a larger hook.
If your fabric is too loose try a smaller hook.
Other Supplies
You will also need:
- Yarn needle
- Scissors
- Measuring tape
- Stitch markers
- Blocking pins, optional
- Blocking mat or clean towel, optional
Easy Crochet Sweater Pattern Free
This original pattern creates a simple relaxed pullover using basic stitches and straightforward construction.
The sweater has a front panel, back panel and two sleeves. The pieces are sewn together, and the neckline and cuffs are finished afterward.
It is a good choice if you want one of the free easy crochet sweater patterns that does not require complicated shaping.
Skill Level
Advanced beginner
You should be comfortable with:
- Chain stitch
- Single crochet
- Half double crochet
- Slip stitch
- Basic seaming
- Working into the back loop
Finished Measurements
The sample is designed for an adult medium with approximately 4–6 inches of positive ease.
Approximate finished measurements:
| Measurement | Finished Size |
|---|---|
| Chest circumference | 40 inches |
| Body length | 22 inches |
| Sleeve length | 17 inches |
| Sleeve opening | 13 inches |
| Neck opening | 8–9 inches |
The sweater is intentionally relaxed rather than closely fitted.
For the best result, compare these measurements with a sweater you already own and like.
Gauge
With the 5.0 mm hook:
14 hdc × 10 rows = 4 × 4 inches
Work your gauge swatch before beginning the sweater.
If you have fewer than 14 stitches across 4 inches, your stitches are larger than the pattern gauge. Try a smaller hook.
If you have more than 14 stitches, your stitches are loose. Try a larger hook.
For garments, gauge is not optional. A small difference in stitch size becomes much more noticeable across the width of an entire sweater.
Abbreviations
US crochet terminology:
- ch — chain
- sc — single crochet
- hdc — half double crochet
- sl st — slip stitch
- BLO — back loop only
- st — stitch
- sts — stitches
- rep — repeat
- hdc2tog — half double crochet two together
How to Make the Sweater
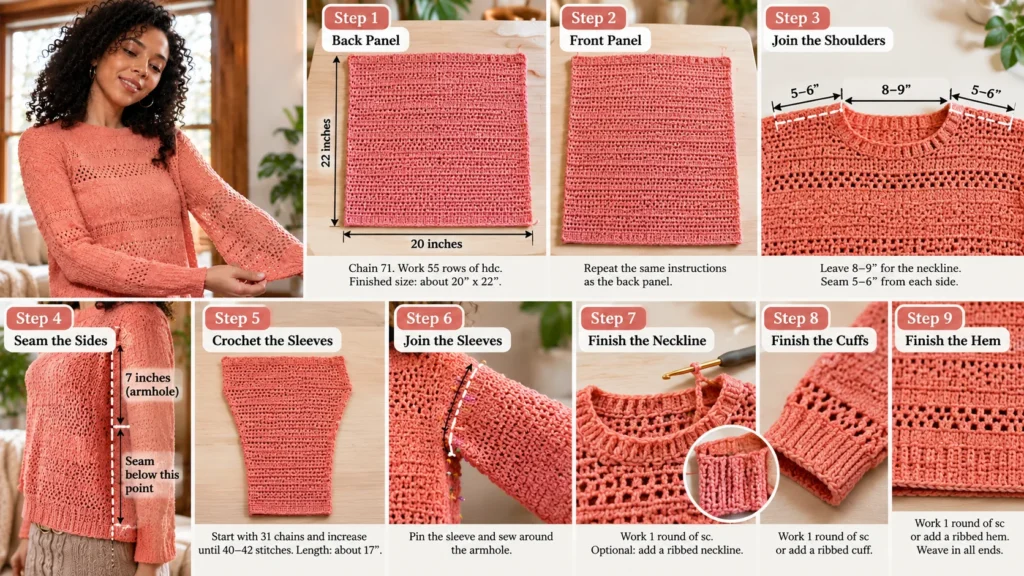
Step 1: Crochet the Back Panel
Chain 71.
Row 1
Hdc in 2nd chain from hook and in each chain across.
70 hdc
Rows 2–55
Ch 1 and turn.
Hdc in each stitch across.
70 hdc
Fasten off and leave a yarn tail for weaving in.
The finished panel should measure approximately 20 inches wide by 22 inches tall.
If your row gauge is different, focus on the measurement rather than blindly following the row number.
Sizing Note
To make the sweater wider, increase the starting chain in multiples that work with your stitch pattern.
To make it longer, simply add more rows.
Step 2: Crochet the Front Panel
Repeat the exact instructions used for the back panel.
Chain 71.
Work 55 rows of hdc.
Make sure the front and back panels are approximately the same size before joining them.
Stack them on top of each other and then continue. If one panel is noticeably wider or longer, check your stitch and row gauge before sewing.
Step 3: Join the Shoulders
Join the front panel to the back panel, right sides together.
Leave an opening of about 8-9 inches in the middle for the neckline.
Seam about 5–6 inches from each outside edge toward neckline.
If the neckline is too tight, take out some stitches from the shoulder seam.
Do not pull the seam too tightly. The fabric should still have some natural flexibility.
Helpful Tip
Before permanently sewing both shoulders, try the sweater on.
If the neckline feels too narrow, remove a few stitches from the shoulder seam.
If it feels too wide, extend the shoulder seam slightly.
Small adjustments at this stage can make a noticeable difference in comfort.
Step 4: Seam the Sides
Measure approximately 7 inches down from each shoulder seam.
This section will remain open for the armhole.
Starting below the armhole opening, seam the front and back panels together along each side.
Continue until you reach the bottom edge.
Repeat on the opposite side.
You now have the basic body of the sweater.
Sizing Note
For a looser sweater, leave a slightly larger armhole.
For a closer fit, the armhole can be reduced, but make sure there is enough room for comfortable movement.
Step 5: Crochet the Sleeves
The sleeves are worked from the wrist upward.
Chain 31.
Row 1
Hdc into the 2nd chain from hook and across.
30 hdc
Rows 2–10
Ch 1 and turn.
Hdc across.
Sleeve Increase
For the next rows, gradually increase the sleeve width.
Row 11
Ch 1 and turn.
2 hdc in the first stitch.
Hdc across until one stitch remains.
2 hdc in the final stitch.
32 hdc
Row 12
Hdc across.
Row 13
Repeat the increase from Row 11.
34 hdc
Continue alternating one plain row with an increase row until the sleeve reaches approximately 40–42 stitches across.
The exact number depends on your preferred sleeve fit.
Continue working even until the sleeve measures approximately 17 inches from the wrist edge.
Fasten off.
Make the second sleeve to match.
Step 6: Join the Sleeves
Fold each sleeve lengthwise with the wrong side facing outward.
Seam the long edge.
Turn the sleeve right side out.
Insert the sleeve into the armhole of the sweater, matching the sleeve seam with the underside of the arm.
Sew around the armhole carefully.
Repeat with the second sleeve.
Helpful Tip
Pin the sleeve in place before sewing.
This makes it easier to check that the sleeve is evenly distributed around the armhole.
Step 7: Finish the Neckline
Join yarn at the neckline.
Work one round of single crochet evenly around opening.
Join with a slip stitch.
If you want a slightly more finished neckline, work another round of single crochet.
Don’t increase too much around the neckline. Excess stitches can make the opening flare outward.
Optional Ribbed Neckline
For a more structured finish, work a ribbed band separately.
Chain 7.
Sc BLO across.
Turn and repeat until the strip reaches the circumference of the neckline.
Work one round of single crochet around the bottom edge of the sweater.Join the ends and sew the ribbing around the neck opening.
This creates a more traditional sweater-style finish.
Step 8: Finish the Cuffs
Join yarn around the bottom of each sleeve.
Work one round of single crochet.
For a firmer cuff, you can add a ribbed band using the same technique as the optional neckline.
Keep the cuff comfortable around the wrist.
A cuff that is too tight can make the sweater unpleasant to wear even when the rest of the garment fits well.
Step 9: Finish the Hem
Single crochet around the bottom edge of the sweater, one round.
For a simple finish, fasten off after this round.
For a more defined hem, add two or three rounds of single crochet or create a separate ribbed band.
Weave in all loose ends securely.
Tips for Better Results
Choosing the Right Yarn
When choosing yarn for crochet sweater patterns free, think about the final garment rather than just the color.
Ask yourself:
- Is it soft enough against the skin?
- Will it stretch?
- Is it easy to wash?
- Is it appropriate for the season?
- Does it have enough drape?
- Will the finished sweater feel too heavy?
For a lightweight spring sweater, a cotton blend can be a nice choice.
For a warmer winter sweater, wool or an acrylic-wool blend may be more suitable.
Getting the Right Gauge
Make your swatch in the same stitch you will be using for the main body.
Do not assume that a gauge swatch made with single crochet will accurately predict your half double crochet gauge.
Wash and dry the swatch the same way you plan to care for the sweater if you are using a fiber that changes significantly after washing.
Improving Fit and Shape
Take measurements before starting.
Useful measurements include:
- Bust or chest circumference
- Shoulder width
- Desired sweater length
- Upper-arm circumference
- Sleeve length
- Wrist circumference
- Neck opening
If you already own a sweater with a fit you love, measure it instead of relying only on body measurements.
This gives you a practical reference for the amount of ease you prefer.
Common Mistakes to Avoid
Skipping the Gauge Swatch
A sweater can take many hours to crochet. Spending a few minutes on gauge is much easier than discovering later that the finished garment is several inches too large.
Making Every Size With the Same Stitch Count
A size adjustment should not simply mean adding random stitches.
Consider the entire garment, including the shoulders, armholes, sleeves, and neckline.
Forgetting About Sleeve Width
A sweater body can fit perfectly while the sleeves feel restrictive.
Try the sleeve on before finishing it.
Overlooking Yarn Weight
Changing from worsted-weight yarn to bulky yarn without recalculating gauge can dramatically change the finished sweater.
Always make a new swatch when changing yarn weight.
Other Free Crochet Sweater Ideas
The featured pattern is only one way to approach handmade sweaters. Here are several styles worth exploring when planning future projects.
Easy Crochet Cardigan
An open-front cardigan is a forgiving choice because there is no need to calculate a fitted front closure.
A simple back panel, two front panels, and sleeves can create a classic cardigan silhouette.
This is also where free crochet cardigan sweater patterns can be especially useful for beginners who want to practice garment construction.
Granny Square Sweater
Granny squares can be joined to make colorful pullovers, cardigans and oversized sweaters.
This style is particularly useful for using leftover yarn.
For a cleaner modern look, choose two or three coordinating colors rather than using every color in your stash.
Oversized Crochet Sweater
An oversized sweater is a relaxed option for anyone who prefers extra room.
Use generous positive ease and pay close attention to sleeve length.
An oversized sweater can look polished when paired with simple jeans, leggings, or fitted trousers.
Lightweight Mesh Sweater
A mesh design is ideal for warmer weather.
Open stitches allow air to move through the fabric, making the sweater useful as a light layer over a tank top or camisole.
Cotton and cotton-blend yarns are good choices for this type of garment.
Crochet Puppy Sweater Patterns Free
If you enjoy crocheting garments, a small dog sweater can be a fun project between larger human-sized sweaters.
Before making one, measure the dog’s:
- Neck
- Chest
- Back length
- Front-leg position
- Belly area
The sweater should never restrict breathing, walking, sitting, or normal movement.
Avoid loose decorative pieces that could be chewed or swallowed, and supervise a pet while wearing a handmade garment.
The same principles used in free crochet dog sweater patterns apply here: accurate measurements and comfortable ease are more important than following a fixed stitch count.
Easy Ways to Customize Your Sweater
Once you understand the basic construction, it is easy to make the design feel more personal.
Change the Color
Try:
- Cream and oatmeal
- Sage green
- Dusty blue
- Warm rust
- Soft brown
- Black and natural
- Two-tone neutral combinations
Add Texture
Replace plain hdc sections with a simple textured stitch.
Moss stitch, ribbing, and subtle post stitches can add interest without making the garment too complicated.
Always make a new gauge swatch when changing stitch patterns.
Change the Length
For a cropped sweater, stop several rows earlier.
For a longer tunic-style sweater, continue adding body rows.
Measure the garment against yourself as you work rather than estimating the final length.
Change the Sleeves
Try:
- Fitted cuffs
- Wide sleeves
- Three-quarter sleeves
- Bell-shaped sleeves
- Long cozy sleeves
Sleeve changes can completely change the overall appearance of the same basic sweater.
Final Thoughts
The best crochet sweater patterns free aren’t always the ones with the most complicated stitches. A well-fitting sweater with a simple stitch pattern can become an everyday favorite, especially when the yarn, color, and proportions suit your style.
If you’re new to crochet garments, start with the featured panel-style sweater and take your time with the gauge and measurements. Once you are comfortable with the construction, experiment with cardigans, granny-square designs, mesh textures, oversized silhouettes, and different sleeve shapes.
A handmade sweater does not have to be perfect to be worth wearing. The goal is to create something comfortable, useful, and made in a way that you genuinely enjoy.
FAQ
What is the easiest crochet sweater pattern?
A simple panel-style pullover is usually one of the easiest places to start. The construction is straightforward, and you can check each panel’s measurements before joining everything together.
Can I crochet a sweater without making a gage square?
The amount depends on your size, yarn weight, stitch pattern, sweater length, and fit. A medium adult sweater made with worsted-weight yarn may require roughly 1,200–1,600 yards, but always allow extra yarn if you plan to make the garment longer or oversized.
What yarn is best for crochet sweaters?
Soft worsted-weight acrylic, wool blends, cotton blends, and similar yarns can all work. The best choice depends on the season, desired drape, warmth, softness, and care requirements.
Are crochet sweater patterns free?
There are many free crochet sweater patterns available online, but always check exactly what is included. A free pattern should provide enough information to actually construct the garment rather than offering only a photograph or general description.
Can I make a crochet sweater without a gauge swatch?
You can, but it is risky. Even a small difference in gauge can become several inches across a sweater. A gauge swatch is one of the simplest ways to improve your chances of getting the intended size.
How much ease should a crochet sweater have?
That depends on the style. A close-fitting sweater may have little positive ease, while an oversized design may have several inches. Compare the finished measurements with a sweater you already enjoy wearing.
Can I use a different yarn weight?
Yes, but you should not use the same number of stitches and expect the same size. Make a new gauge swatch and recalculate the number of stitches and rows required for your desired measurements.
Can I make this sweater larger or smaller?
Yes. The simplest adjustments are generally the width and length of the front and back panels. Sleeve width, armhole size, neckline, and shoulder measurements should also be considered when making larger changes.