Crochet Loaf Animals Pattern Easy Step-by-Step Guide for Beginners
Make adorable loaf-shaped animals with this crochet loaf animals pattern. Beginner-friendly, step-by-step, with cat, bunny, dog and duck variations.
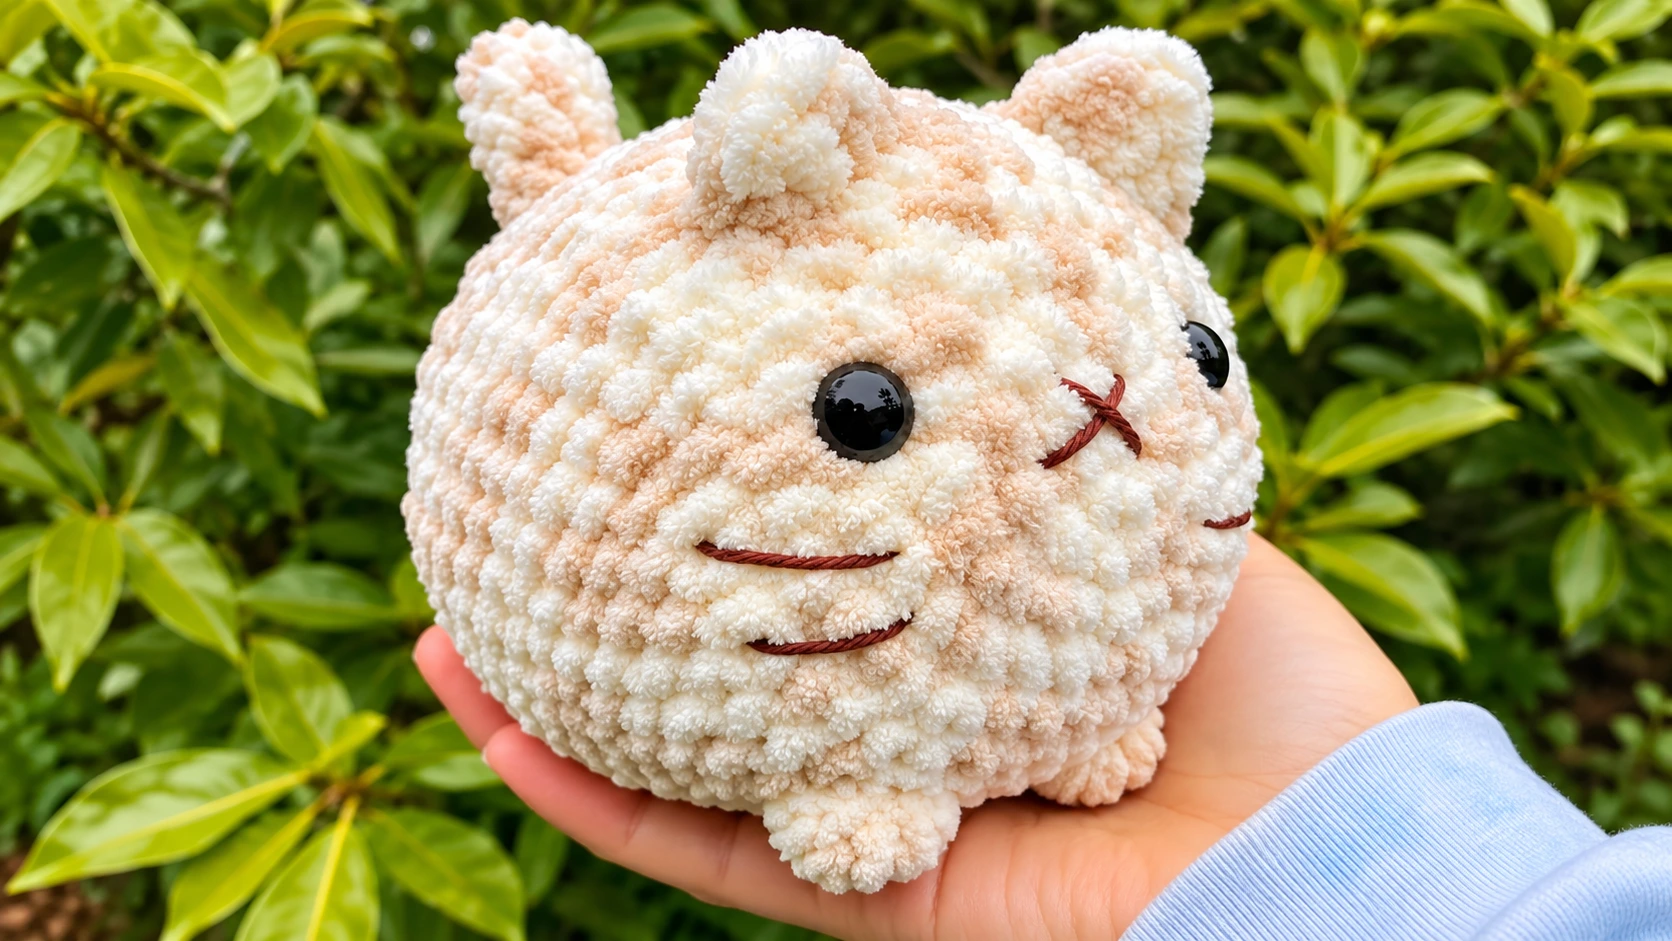
Table of Contents
If you have spent any time scrolling through cute animal photos lately, you have almost certainly met a “loaf.” A loaf cat tucks its paws under its chest and sits in a perfectly rounded, compact shape that looks just like a freshly baked loaf of bread. Bunnies do it, ducks do it, and dogs do it when they are feeling especially cozy. The internet fell in love with this pose, and now crocheters everywhere are turning it into plush toys.
This crochet loaf animals pattern shows you how to make one simple, plump body and then transform it into a cat, bunny, dog, duck, and more. You do not need advanced skills. If you can make a magic ring or a chain, single crochet, increase, and decrease, you can finish your first loaf in an afternoon. Even better, once you have the basic body down, you can make a whole family of critters just by changing the ears, tail, and colors.
In this guide, you will find the materials list, a clear explanation of abbreviations, the full round-by-round body pattern, instructions for four different animals, face placement tips, finishing techniques, troubleshooting advice, and ideas for selling or gifting your finished pieces. Grab your hook and a ball of yarn, and let’s get started.
What Are Crochet Loaf Animals?
Crochet loaf animals are amigurumi, the Japanese art of crocheting small stuffed creatures, worked in the shape of a rounded oval. The body has no visible legs, arms, or neck. Instead, it is a soft, chubby shape with a face on the front and a few small details like ears and a tail. The charm comes from the simplicity: the round, squishy silhouette is what makes it instantly recognizable and instantly cute.
Because the body is basically a stuffed oval, the pattern is far easier than a traditional amigurumi animal with separate limbs, a head, and a neck to sew together. There is very little assembly. You make the body in one piece, stuff it, and then add the face and a couple of small parts. That is why this project is perfect for beginners and a favorite for experienced makers who want a quick, relaxing make.
Why Loaf Animals Are So Popular
There are a few good reasons why this style has taken off with crocheters and with buyers at craft fairs and online shops.
They are quick. Most people finish one loaf in one to two hours, depending on yarn weight and experience. That makes them ideal for last-minute gifts and for building up stock for a market stall.
They are forgiving. A small mistake in the body is easy to hide because the shape is so simple. If one side is slightly wider than the other, it just looks like a character.
They are endlessly customizable. One basic pattern can become dozens of designs. Change the color and add pointed ears for a cat, long ears for a bunny, a beak for a duck, or tiny wings for a chick. Add a scarf, a bow, a flower crown, or a hat, and you have a brand-new character.
They are cuddly and photogenic. The soft, squishy form is wonderful for hugging, and the cute faces look great in photos, which is important if you share your work on social media or sell online.
Materials You Will Need
You do not need much to get started, and you can use leftover yarn from other projects.
Yarn. Worsted or DK weight yarn in cotton or acrylic works best. You will need roughly 50 grams (about 100 yards) for one animal, plus small amounts of other colors for ears, beaks, and details. Cotton gives crisp, defined stitches and holds its shape well. Acrylic is softer, cheaper, and easier to find in many colors. A soft milk cotton or cotton blend is especially nice if the toy is meant for a baby.
Crochet hook. Use a 3.0 to 3.5 mm hook. This is smaller than the size recommended on most yarn labels, and that is intentional. Tight stitches create a dense fabric so the stuffing does not show through the gaps.
Safety eyes. Eight to ten millimeter safety eyes give the best proportions for the standard size. If the toy is for a baby or toddler, skip the plastic eyes and embroider them with black yarn or thread instead.
Polyester fiberfill. Soft polyfill gives the smoothest result. Avoid using too little, since a loaf needs to look plump and round.
Tools. A stitch marker, a tapestry needle, and sharp scissors. A pair of tweezers or the blunt end of a pencil helps push stuffing into corners.
Extras. Pink thread or yarn for a nose and mouth, black embroidery floss for whiskers, a scrap of pink felt or a little cosmetic blush for cheeks, and a few straight pins to hold parts in place before sewing.
Choosing the Right Yarn and Hook
Yarn choice changes the personality of your loaf. Here is a quick guide.
- Worsted weight cotton: Gives a sturdy, slightly firm loaf. Great for beginners because the stitches are easy to see.
- DK acrylic or milk cotton: Creates a softer, more cuddly toy with a smooth finish.
- Chunky or velvet yarn: Makes a huge, squishy pillow-sized loaf. Use a larger hook, such as 5 to 6 mm, and expect to finish even faster.
- Fingering or sock weight yarn: Perfect for tiny keychain loaves. Use a 2.0 mm hook and small 5 mm eyes.
Whatever yarn you choose, the golden rule is the same: go down at least one or two hook sizes from the label so the fabric is tight and dense.
Abbreviations (US Terms)
- ch: chain
- sc: single crochet
- inc: increase (2 sc in the same stitch)
- dec: decrease (single crochet two stitches together)
- st(s): stitch(es)
- sl st: slip stitch
- ( ): the total number of stitches at the end of the round
The pattern is worked in continuous rounds without joining, so use a stitch marker to mark the first stitch of every round and move it up as you go.
Size and Gauge
Gauge is not critical for a toy, but here is what to expect. With worsted yarn and a 3.0 mm hook, the finished loaf measures about 4 inches (10 cm) long and 3 inches (7.5 cm) wide, and about 3 inches (7.5 cm) tall once stuffed. If you use a different yarn or hook, your loaf will simply be bigger or smaller, and that is perfectly fine.
Basic Loaf Body Pattern
This body is the foundation for every animal in this guide. Work in continuous rounds, and place a marker in the first stitch of each round.
Round 1: Ch 6. Work an increase in the 2nd chain from the hook, sc in the next 3 chains, and work 3 sc in the last chain. Turn your work to the other side of the chain and sc in the next 3 stitches, then work 1 sc in the same chain as your first increase. (12)
Round 2: Work an increase in each of the 3 stitches at each curved end, and sc in the stitches along the straight sides. (18)
Round 3: Increase 3 times at each curved end again, and sc along the straight sides. (24)
Round 4: Increase 3 times at each curved end once more, and sc along the straight sides. (30)
Rounds 5 to 13: Sc in each stitch around. (30)
At this point, your piece should look like a small oval cup. Begin stuffing now, pushing the fiberfill firmly into the base and corners. Keep adding stuffing as you go so the loaf looks smooth and full, not lumpy.
Round 14: Decrease 3 times at each curved end, and sc along the straight sides. (24)
Round 15: Decrease 3 times at each curved end again. (18)
Round 16: Decrease 3 times at each curved end once more. (12)
Add any last bits of stuffing, then close the opening. To do this, cut the yarn, leaving a tail about 6 inches long, thread it onto your tapestry needle, and weave it through the front loops of the remaining 12 stitches. Pull tight, knot it, and hide the end inside the body.
Your basic loaf is done. Now comes the fun part: giving it a personality.
Making the Face
The face is what brings a loaf animal to life, so take your time with this step. Placement matters more than anything.
Eyes. Place the safety eyes on the front curved end of the loaf, around rounds 8 to 9 and about 5 to 6 stitches apart. Low, wide-set eyes give the sweetest, most baby-like look. Before you lock the backs on, stick the eyes in place with pins and look at the toy from a few angles. Once you are happy, secure the washers firmly.
Nose and mouth. Use pink or black yarn to embroider a small nose in the middle, just below and between the eyes. Add a tiny “w” shaped mouth for a cat or a simple small stitch for a bunny. Keep the nose small. A tiny nose on a big round face looks much cuter than a large one.
Whiskers. For a cat, embroider three short lines on each side of the nose using black floss, or pull a length of yarn through the face and trim it to size.
Cheeks. A small circle of pink felt, or a light brush of cosmetic blush on each cheek, adds a lovely touch. Position the cheeks level with or just below the eyes.
Turn the Loaf Into Your Favorite Animal
Loaf Cat
The loaf cat is the original and the most popular version.
Ears (make 2): Ch 4. Sc in the 2nd chain from the hook and in the next 2 chains. Ch 1, turn, and work sc2tog, then sc in the last stitch. Fasten off, leaving a long tail for sewing. Alternatively, crochet a small flat triangle by working in rows and decreasing at the end of each row.
Assembly: Pin the ears on top of the loaf, toward the front, about 3 to 4 stitches apart. Sew them on securely with the tail.
Tail (optional): Ch 8, sc in the 2nd chain from the hook and in each chain across (7). Fasten off and sew it to the back so that it curls beside the body.
Color ideas: Gray, orange tabby with embroidered stripes, black, cream, or a calico patchwork made with small color changes.
Loaf Bunny
Ears (make 2): Ch 9. Sc in the 2nd chain from the hook and in the next 6 chains, then work 3 sc in the last chain. Work back along the other side of the chain, sc in the next 6 and 1 sc in the last stitch. Fasten off, leaving a tail for sewing. For floppy ears, leave them unstuffed. For upright ears, add a tiny bit of stuffing or a short piece of pipe cleaner.
Tail: Make a small pom-pom from white yarn, or crochet a mini ball by working a magic ring with 6 sc, increasing to 12, working a round even, then decreasing and stuffing. Sew it to the back.
Color ideas: White, soft pink, light brown, or gray. Add an inner ear in a contrasting shade.
Loaf Dog
Ears (make 2): Ch 6. Sc in the 2nd chain from the hook and in the next 4 chains. Ch 1, turn, and sc in each stitch across. Repeat for 3 more rows, then sc2tog at the beginning and end of the last row. Fasten off.
Assembly: Sew the ears on the sides of the head so they hang down softly. Add a small oval muzzle in a lighter color beneath the eyes, then embroider a dark nose on top.
Color ideas: Golden tan, chocolate brown, or a white loaf with a brown patch around one eye for a classic cartoon dog look.
Loaf Duck
Beak: In orange yarn, ch 4. Sc in the 2nd chain from the hook and in the next 2 chains. Ch 1, turn, and sc in each stitch across. Fasten off and sew it to the center of the face just below the eyes.
Wings (make 2): Make a magic ring with 6 sc, then increase to 12. Work 2 rounds even, and fasten off. Flatten and sew them to the sides of the body.
Tuft (optional): Add a tiny tuft of yellow yarn on top for a cheeky chick feel.
Color ideas: Bright yellow, white, or a soft pastel duckling.
More Ideas
Once you have mastered these four, try a few more. A bear needs two small round ears and a lighter muzzle. A frog needs two bulging eyes on top and a wide embroidered smile. A panda needs black ears and eye patches. A fox needs pointed ears with white tips and a bushy tail. A mouse needs round pink inner ears and a long thin tail. Each one is just the same loaf with a small twist.
Assembly and Finishing
Good finishing makes the difference between a handmade-looking toy and a professional-looking one.
- Pin before you sew. Always pin ears, tails, and wings in place and check the symmetry before stitching.
- Use the invisible stitch. Sew through the back loops of the ear and the front loops of the body, so the stitches almost disappear.
- Hide all ends. Weave every tail deep into the body, then trim close to the surface.
- Shape the loaf. Roll the finished toy gently between your palms to even out the stuffing and smooth any bumps.
- Check security. Tug on every part to make sure it is firmly attached, especially if the toy will be given to a child.
Tips for the Best Results
Keep your tension tight. Loose stitches show the stuffing and create holes. If you find your tension drifting, drop down another hook size.
Mark every round. On an oval, it is surprisingly easy to lose track of where a round starts. A simple stitch marker saves a lot of frustration.
Stuff as you go. Do not wait until the end. Adding stuffing gradually lets you control the shape and fill the corners properly.
Stuff firmly, but not too firmly. A loaf should be plump and squishy, not hard. If the stitches are stretched and the stuffing is showing, you have added too much.
Count your stitches. Counting at the end of each round keeps the oval symmetrical and the ends even.
Try a smaller hook for the ears. Small parts look neater when they are worked tightly.
Take photos in natural light. If you plan to share or sell your loaf animals, soft daylight makes the colors look true and the faces look sweet.
Common Mistakes and How to Fix Them
Gaps in the fabric. Your hook or your tension is too loose. Use a smaller hook, or switch to a yarn with a bit more body.
A lopsided loaf. The increases or decreases were probably uneven. Count your stitches every round, and make sure the increases at both ends fall in the same spot.
A lumpy surface. This comes from stuffing in big chunks. Pull the fiberfill apart into small, fluffy pieces first, and add them one at a time.
A face that looks off. If the eyes are too high or too close together, the toy can look worried or surprised. Pin the eyes in several positions before you decide. Lower and wider almost always looks cuter.
Ears that flop the wrong way. Sew them on a little more upright, and make sure to attach the whole base of the ear, not just one corner.
Safety Notes for Toys
If your loaf animal is for a baby or toddler under three years old, do not use safety eyes or any small parts that could come off. Embroider the eyes and nose, sew every piece on extra securely, and avoid beads, buttons, and loose pom-poms. If you sell toys, check the safety rules in your country, since some regions require labeling or testing for items intended for children.
Caring for Your Crochet Loaf Animal
Most loaf animals can be cleaned by hand. Wash gently in lukewarm water with a mild soap, press out the water without twisting, and let it air dry fully before using it. Place it on a towel in a warm, ventilated spot. Do not put toys with safety eyes in a hot dryer. If the toy is made of cotton, it will hold its shape well after washing. Acrylic may need a little reshaping once it is dry.
Making and Selling Loaf Animals
Loaf animals are a fantastic choice for small sellers. They are quick to make, inexpensive in materials, and wildly popular. A few ideas to help you get started:
- Make sets. A trio of loaf cats in three colors, or a bunny and chick Easter set, sells better than a single piece.
- Offer customization. Let buyers choose the fur color, eye color, and accessory. Custom loaf pets that look like a real cat or dog are especially popular.
- Add small accessories. Tiny scarves, bows, hats, and bandanas increase the perceived value.
- Create seasonal versions. Think Santa hats at Christmas, bunny ears at Easter, and little pumpkins at Halloween.
- Use great photos. A simple, clean background and good lighting do more for your sales than almost anything else.
If you sell finished items made from a designer’s pattern, always read the pattern’s terms of use. Many designers allow sales of finished items as long as you credit them. If you write your own variations, you are free to sell what you make.
Ways to Use Your Loaf Animals
Beyond cuddly toys, loaf animals can be used in many creative ways. Make them as keychains or bag charms using fine yarn and small eyes. Use them as desk buddies or shelf decorations. Add a loop to turn them into Christmas ornaments. Make them in chunky yarn and use them as bed or sofa pillows. Give them as baby shower presents, birthday surprises, or thank-you gifts for teachers.
Why You Will Love This Pattern
- It is fast: most people finish one in one to two hours.
- It is beginner-friendly, with simple stitches and almost no sewing.
- It is flexible, so you can make dozens of animals from one body.
- It is a perfect way to use leftover yarn.
- It makes thoughtful, handmade gifts that people truly love.
Final Thoughts
The crochet loaf animals pattern proves that the simplest ideas are often the most delightful. One easy oval, a few small details, and a sweet face are all it takes to create a plush friend that looks like it came straight from your favorite cute-animal feed. Whether you are making your first amigurumi or your fiftieth, this pattern is a relaxing, rewarding project that you will want to repeat in every color.
Start with a cat, move on to a bunny, and before long you will have a whole bakery of loaf critters lined up on your shelf. Try new yarns, new colors, and new accessories, and make the pattern your own. Happy crocheting!
(FAQ)
What is a crochet loaf animal?
A crochet loaf animal is an amigurumi toy shaped like a plump, rounded loaf of bread, inspired by the way cats and other animals tuck in their paws and sit in a compact shape. It has a face on the front and small details such as ears and a tail.
Is this crochet loaf animals pattern good for beginners?
Yes. It uses only basic stitches (single crochet, increases, and decreases), is worked in simple continuous rounds, and needs very little sewing. It is one of the easiest amigurumi projects you can choose.
How long does it take to crochet a loaf animal?
Most crocheters finish one in about one to two hours. Beginners may take a bit longer, and tiny keychain versions can be even faster.
How much yarn do I need?
About 50 grams (roughly 100 yards) of worsted or DK weight yarn is enough for one standard loaf, plus small scraps for the ears, beak, and other details.
What hook size should I use?
A 3.0 to 3.5 mm hook works well for worsted weight yarn. Use a hook that is one or two sizes smaller than the yarn label recommends so the fabric is tight and the stuffing does not show.
Can I make the loaf animal bigger or smaller?
Yes. Use chunky yarn and a larger hook for a big pillow-style loaf, or fine yarn and a small hook for a mini keychain loaf. The pattern stays exactly the same.
Are loaf animals safe for babies?
They can be, as long as you embroider the eyes and nose instead of using safety eyes, and make sure every part is sewn on very securely. Avoid buttons, beads, and any small removable parts for children under three.
Which yarn is best for crochet loaf animals?
Cotton gives clean, defined stitches and a firmer shape, while acrylic and milk cotton are softer and more cuddly. Choose based on how you want the finished toy to feel.
How do I stop the stuffing from showing through?
Crochet tightly with a smaller hook, use a yarn with good body, and stuff in small fluffy pieces. If you still see gaps, drop down another hook size.
How do I make the loaf animal stay round and plump?
Stuff gradually as you crochet, push the stuffing into the corners, and roll the finished toy gently between your hands to smooth it out. Do not underfill it.
Can I sell the loaf animals I make?
In most cases, yes, but check the terms of use of the pattern you are following. Many designers allow sales of finished items if you credit them. If you adapt the pattern with your own design changes, you can generally sell your creations freely.
Can I wash a crochet loaf animal?
Yes. Hand wash gently in lukewarm water with mild soap, press out the water without wringing, and air dry completely. Avoid tumble drying, especially if the toy has safety eyes.
What other animals can I make from the loaf body?
Cats, bunnies, dogs, ducks, bears, pandas, foxes, frogs, mice, and many more. Change the ears, tail, color, and face details, and the same loaf body becomes a brand-new character.