Easy Crochet Flowers Free Patterns to Brighten Your Projects
Explore crochet flowers free patterns and learn how to make colorful blooms for hats, bags, gifts, and home decor with this easy step-by-step guide today.
Table of Contents
Have you ever wondered how a simple loop of yarn can instantly transform a plain accessory into a vibrant work of art? Whether you are a beginner picking up a hook for the first time or a seasoned crafter, these botanical creations offer endless possibilities. You can use them to elevate your favorite beanies, headbands, bags, or even handmade greeting cards.
This guide serves as your practical roadmap to mastering beautiful, handmade blooms. We provide a collection of crochet flowers free patterns that cater to every skill level. You will learn how to select the right materials and master basic stitches before moving on to complex, layered textures.
Our instructions walk you through every step of the process. You will discover how to troubleshoot common mistakes, finish your work professionally, and attach your pieces securely to any surface. Get ready to explore various easy crochet flower designs that bring a touch of nature to your home decor and clothing.
Choose the Right Crochet Flower Project for Your Skill Level
Choosing a project that fits your experience ensures a fun and stress-free crafting session. When you browse through various crochet flower patterns, consider how much time you want to invest and what specific skills you currently possess. Taking a moment to evaluate these factors will help you avoid frustration and keep your creative momentum high.
Match the Flower Design to Your Crochet Experience
If you are new to the craft, look for beginner-friendly flower crochet patterns that focus on simple rings and basic stitches. These designs typically use single or double crochet stitches worked in rounds, which helps you practice consistency without complex techniques. Starting with these foundational shapes allows you to build confidence before moving on to intricate, multi-layered blooms.
As your skills grow, you can experiment with patterns that incorporate puff stitches or popcorn stitches for added texture. Experienced crafters often enjoy designs that require changing colors mid-round or working in both front and back loops. Always check the difficulty rating of a pattern before you begin to ensure it aligns with your current comfort zone.
Select Flowers for Hats, Bags, Gifts, and Home Decor
The size and construction of your flower should depend on its final destination. Small, flat blossoms work beautifully as embellishments for hair clips, gift tags, or delicate headbands. For larger items like tote bags or cushion covers, you might prefer sturdier, three-dimensional flowers that can withstand daily use.
Consider the weight of the yarn when choosing a design for your project. A heavy, chunky yarn creates a bold statement piece for a winter hat, while fine cotton thread is perfect for elegant home decor accents. Matching the scale of the flower to the item ensures a balanced and professional look.
Estimate the Time and Materials for Each Project
Before you pick up your hook, take a moment to estimate the resources required for your chosen design. Most patterns list the necessary yarn weight, hook size, and any extra embellishments like beads or buttons. Having these items ready prevents mid-project interruptions and helps you stay organized.
Use the following table to help you plan your next floral creation based on your available time and project goals.
| Project Type | Skill Level | Estimated Time | Best Use |
| Simple Flat Bloom | Beginner | 15-30 Minutes | Gift Tags |
| Layered Petal Flower | Intermediate | 45-60 Minutes | Hats & Bags |
| Textured 3D Rose | Advanced | 1-2 Hours | Home Decor |
Always keep a small notebook to track your progress and note any adjustments you make to the pattern. This simple habit makes it easier to replicate your favorite designs for future gifts or home projects. Proper planning is the secret to turning simple yarn into beautiful, lasting art.
Gather Yarn, Hooks, and Essential Crochet Supplies
Creating beautiful handmade crochet flower patterns starts with selecting the right tools and materials. The texture and final appearance of your project depend on the specific fibers and tools you choose to use.
Choose Yarn Weights and Colors for Defined Petals
Yarn weight significantly impacts the scale and definition of your floral designs. For most projects, an 8-ply light worsted or DK weight yarn paired with a 4 mm hook serves as an excellent starting point.
If you prefer delicate, intricate blooms, opt for fine cotton thread. Conversely, thicker wool or acrylic yarns create sturdier, more substantial shapes that hold their form well.
Select the Correct Crochet Hook Size
Your hook size should match the weight of your yarn to ensure consistent tension. A smaller hook creates tighter stitches, which prevents stuffing from showing through your finished work.
Always test your tension with a small swatch before committing to a full pattern. Adjusting your hook size by half a millimeter can often fix issues with loose or uneven petals.
Prepare Scissors, Tapestry Needles, Stitch Markers, and Stuffing
Keep a sharp pair of scissors nearby for clean yarn cuts. You will also need tapestry needles to weave in your ends securely once the flower is complete.
Stitch markers help you keep track of rounds, especially when working in a spiral. If you are making three-dimensional blooms, keep some polyester fiberfill or scrap yarn on hand for stuffing.
When to Use Cotton, Acrylic, Wool, or Blended Yarn
Different fibers offer unique benefits for your handmade crochet flower patterns. Cotton is ideal for crisp, defined petals, while acrylic is budget-friendly and comes in a vast array of colors.
| Fiber Type | Best Use Case | Texture Quality |
| Cotton | Delicate, flat flowers | Firm and crisp |
| Acrylic | General decor projects | Soft and versatile |
| Wool | Sturdy, textured blooms | Warm and structured |
| Blends | Wearable accessories | Durable and flexible |
How to Check Your Yarn Label Before Starting
Always inspect the yarn label for essential information before you begin. The label indicates the recommended hook size, fiber content, and care instructions for your finished items.
Checking the dye lot number is also vital if you are using multiple skeins of the same color. This ensures that your handmade crochet flower patterns maintain a consistent color throughout the entire project.
Learn the Basic Stitches Behind Easy Crochet Flower Designs
Building your own garden of yarn starts with mastering these essential crochet movements. Many free crochet flower tutorials rely on a small set of foundational skills that allow you to create intricate shapes with ease. By focusing on these core techniques, you will gain the confidence to tackle any pattern you encounter.
Make a Slip Knot and Crochet a Foundation Ring
Every project begins with a slip knot, which secures your yarn to the hook. Once you have your slip knot, you will typically create a foundation ring to serve as the heart of your flower. You can achieve this by chaining a few stitches and joining them with a slip stitch, or by using a magic ring for a tighter, adjustable center.
Use Chain, Slip Stitch, Single Crochet, and Double Crochet
Understanding standard abbreviations is vital for following instructions accurately. Most patterns use a combination of chains (ch) for height, slip stitches (sl st) for joining, and various crochet stitches to build the body of the petals. The following table outlines the most common stitches you will use in your work.
| Stitch Name | Abbreviation | Primary Function |
| Chain | ch | Creates height and foundation |
| Slip Stitch | sl st | Joins rounds and moves yarn |
| Single Crochet | sc | Provides a dense, sturdy base |
| Double Crochet | dc | Adds height and petal volume |
Build Petals with Increases and Repeated Stitch Groups
Petals are formed by working multiple stitches into the same space, which creates the necessary fullness. By repeating specific stitch groups around your center ring, you can easily transform a flat circle into a blooming flower. These easy crochet flower designs rely on consistent increases to ensure each petal has the same shape and size.
How to Count Stitches Around a Flower Center
Accurate counting is the best way to ensure your project looks professional. Always place a stitch marker in the first stitch of your round so you know exactly where to join your work. If you lose track, simply count the “V” shapes along the top of your stitches to verify your total before moving to the next petal.
How to Keep Petals Even and Symmetrical
Symmetry depends on maintaining the same tension throughout your entire project. If you find your petals look lopsided, check that you are working the same number of stitches into each section of the ring. Taking your time to count after every round will prevent uneven growth and keep your finished flowers looking balanced and beautiful.
Start with a Simple Five-Petal Crochet Flower
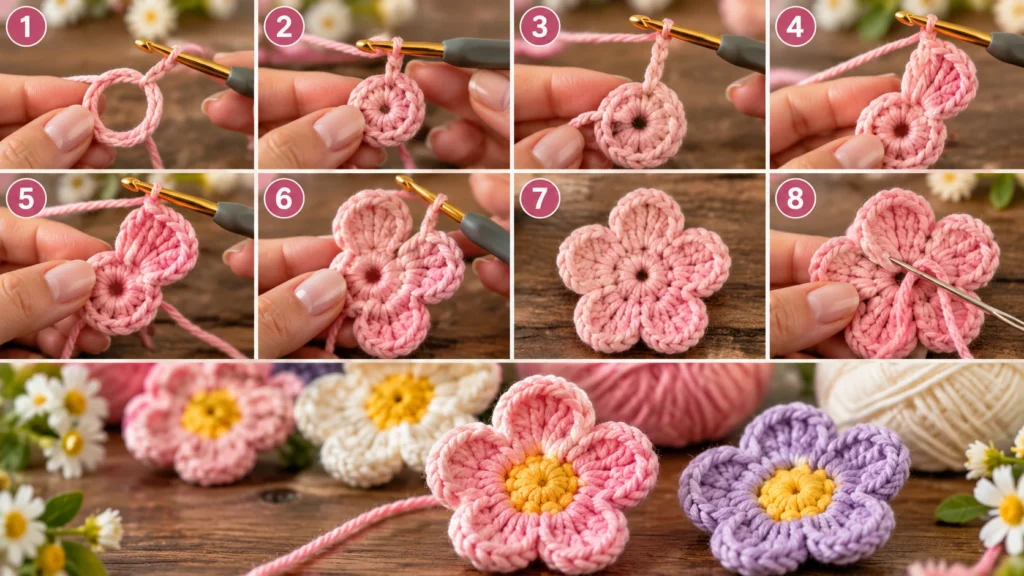
If you are looking for the perfect starting point, a simple five-petal bloom is an ideal choice. Many crochet flowers free patterns rely on this classic structure because it teaches you the fundamentals of working in the round. By following these beginner-friendly flower crochet patterns, you will gain the confidence needed for more complex designs.
Step 1: Create the Center Ring
Begin by making a magic ring, which allows you to pull the center tight for a professional look. Into this ring, work five single crochet stitches. Once you have completed these, pull the yarn tail firmly to close the gap, then join with a slip stitch to the first single crochet.
Step 2: Crochet the First Petal
To build your first petal, chain one to gain height. Into the same stitch, work one half double crochet, three double crochets, and one half double crochet. This specific sequence creates a rounded, organic shape that defines the petal.
Step 3: Repeat the Petal Pattern Around the Ring
Move to the next single crochet stitch from your foundation ring. Repeat the petal sequence of one half double crochet, three double crochets, and one half double crochet. Continue this process until you have five distinct petals surrounding the center.
Step 4: Close the Round and Shape the Flower
After finishing the final petal, join with a slip stitch to the base of the first petal. Fasten off your yarn, leaving a long tail for attaching the flower to your project. Gently pull on each petal to ensure they are evenly spaced and shaped.
How to Weave in Ends Without Flattening the Bloom
Use a tapestry needle to weave the yarn ends through the back of the stitches. Avoid pulling the yarn too tightly, as this can compress the center and ruin the three-dimensional effect. Keep the tension loose to maintain the natural, airy volume of your finished piece.
| Stitch Type | Purpose | Effect on Petal |
| Half Double Crochet | Transition | Creates a smooth curve |
| Double Crochet | Height | Adds fullness and width |
| Slip Stitch | Joining | Secures the petal base |
Following these step-by-step crochet flower instructions ensures your project looks polished and professional. Practice this technique a few times to master your tension and petal consistency.
Make a Layered Crochet Flower with Fuller Petals
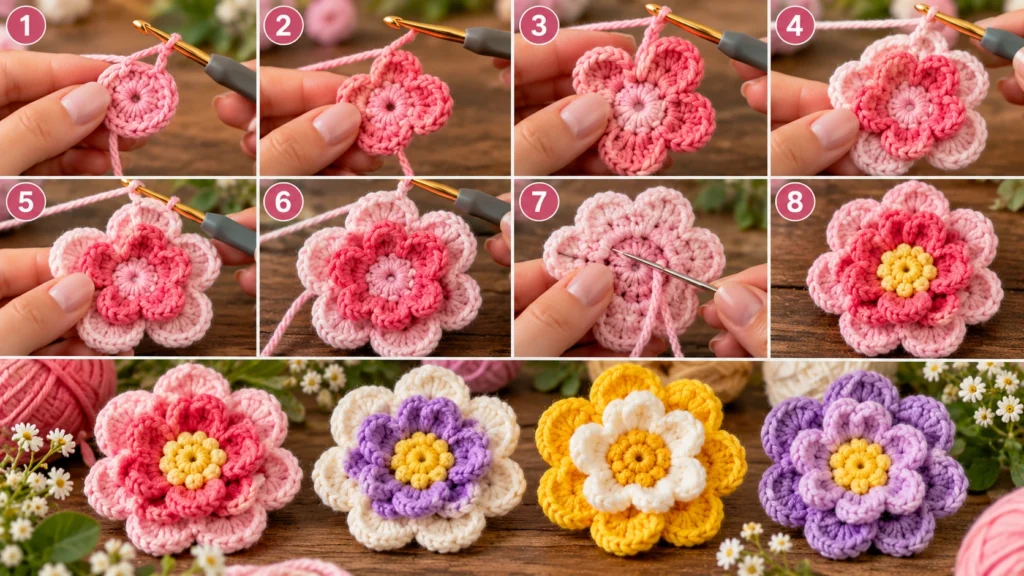
You can easily transform flat designs into stunning, multi-dimensional blooms with a few simple techniques. By reserving unused loops during your initial rounds, you create a sturdy base for adding extra volume. This approach is a staple for many beautiful diy crochet flower projects that require a professional, high-end finish.
Step 1: Crochet the First Round of Short Petals
Begin by working your first set of petals into the front loops of your foundation ring. Keep these stitches relatively tight to ensure the center of the flower remains compact. This initial layer provides the foundation for the rest of your work.
Step 2: Add a Second Round Behind the First
Once the first layer is complete, turn your work to locate the unused back loops. You will crochet your second, larger set of petals directly into these remaining loops. This technique is essential for adding depth to your diy crochet flower projects.
Step 3: Offset the Petals for a Natural Shape
To achieve a realistic look, ensure your second round of petals sits in the gaps between the first round. Staggering the placement prevents the flower from looking too uniform or stiff. This simple adjustment mimics the organic growth patterns found in nature.
Step 4: Secure the Layers with a Yarn Needle
After finishing both rounds, use a tapestry needle to weave in your ends securely. Gently pull the layers into their final position to ensure they lay flat against one another. This final step keeps your work durable and prevents the petals from shifting during use.
How to Combine Two or More Colors
Using different colors for each layer adds visual interest and highlights the depth of your design. Simply join your new yarn color when you begin the second round of petals. This creates a striking contrast that makes your diy crochet flower projects stand out.
How to Prevent the Layers from Twisting
Maintain consistent tension throughout your stitches to keep the layers from curling or twisting. If you notice the petals bunching up, try using a slightly larger hook for the second round. Keeping your stitches relaxed ensures that each layer sits neatly behind the one before it.
Try Crochet Rose, Daisy, and Sunflower-Inspired Patterns
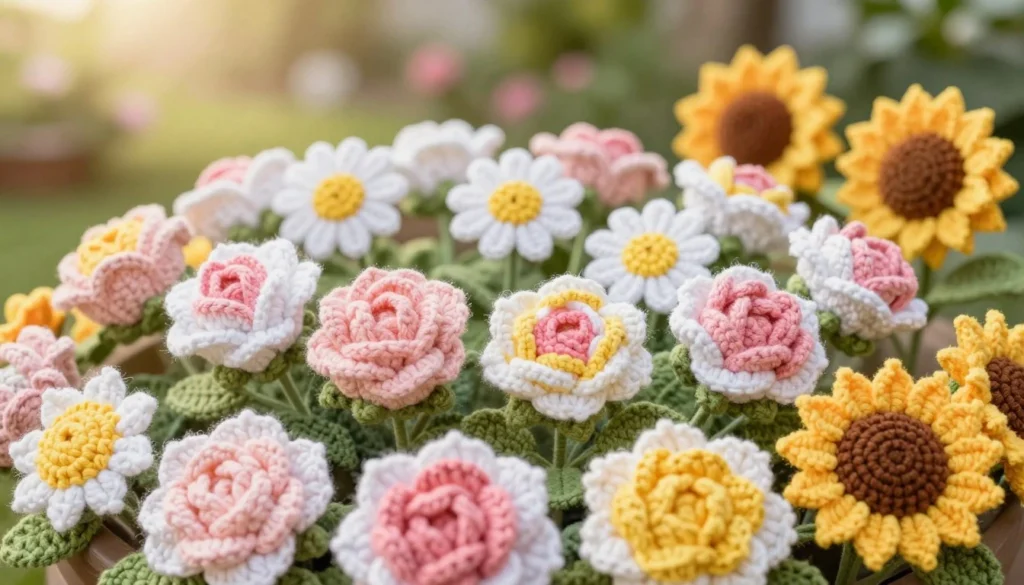
If you want to create beautiful crochet flower ideas, look no further than these iconic botanical inspirations. By mimicking the shapes of real plants, you can elevate your craft and produce stunning results. Whether you are making a carnation, lilac, cherry blossom, freesia, or daffodil, the techniques remain rooted in simple geometry.
Shape a Rolled Crochet Rose from a Curved Strip
A rolled rose is one of the most elegant crochet flower patterns you can master. You start by crocheting a long, curved strip using double crochet stitches. Once the strip is complete, you simply roll it tightly and secure the base with a tapestry needle to form the iconic spiral of a rose.
Create a Flat Daisy with a Contrasting Center
Daisies are perfect for beginners because they rely on a flat, circular construction. You begin by crocheting a small, dense center in a dark color. Then, you work long, chain-based petals outward from this core to create a clean, classic silhouette.
Build a Sunflower-Inspired Bloom with Textured Petals
Sunflowers require a bit more texture to capture their bold, rustic appearance. You can achieve this by using puff or cluster stitches for the center to mimic seeds. For the petals, use longer stitches like treble or double treble crochet to give them the necessary height and drama.
Adapt Petal Length and Center Size for Different Looks
You can easily modify any design by adjusting the scale of your stitches. Increasing the number of chains in a petal creates a longer, more delicate look, while a larger center ring provides a sturdier base for fuller blooms. Experimenting with these proportions allows you to customize your work for any project.
How to Use Color Changes to Define Each Flower
Strategic color changes are essential for adding depth to your work. Consider these tips for professional results:
- Use a darker shade for the center to create a realistic depth effect.
- Switch to a lighter color on the petal tips to highlight the edges.
- Incorporate variegated yarn to suggest natural botanical variations found in nature.
Follow Free Crochet Flower Tutorials for Three-Dimensional Blooms
Elevate your crochet skills by moving beyond flat designs into the world of three-dimensional blooms. By utilizing high-quality free crochet flower tutorials, you can create stunning pieces that stand out on any project. These advanced techniques add life and character to your handmade items.
Form Cup-Shaped Petals with Front- and Back-Loop Stitches
You can achieve a beautiful cup shape by working into specific loops of your stitches. When you crochet only into the front loop, the remaining back loop creates a natural ridge that forces the fabric to curve upward. This simple shift in technique is a staple in many step-by-step crochet flower instructions for creating realistic, bowl-like petals.
Add Texture with Popcorn, Puff, and Cluster Stitches
Texture is the secret to making your flowers look professional and intricate. Popcorn, puff, and cluster stitches create raised bumps that mimic the natural appearance of pollen or dense petal centers. These stitches are perfect for adding depth without needing extra layers.
| Stitch Type | Visual Effect | Best Use Case |
| Popcorn | High, rounded bump | Flower centers |
| Puff | Soft, airy texture | Petal edges |
| Cluster | Tight, tapered shape | Petal bases |
Layer Small Flowers into a Fuller Bouquet
You can combine multiple small blooms to create a lush, full-looking bouquet. By stacking smaller flowers on top of larger ones, you build volume that looks great on hats or home decor. Always secure these layers firmly with a tapestry needle to ensure they stay in place.
How to Stuff a Crocheted Flower Lightly
For a truly dimensional look, you might want to add a tiny amount of fiberfill to the center of your bloom. Use a small tool or the end of your crochet hook to push the stuffing into the base. Be careful not to overstuff, as this can distort the shape of your petals.
How to Shape Petals with Blocking
Blocking is the final step to ensure your flowers look their best. Use steam or a damp cloth to gently press your petals into the desired position. Following these step-by-step crochet flower instructions for blocking will help your work maintain its shape and professional finish over time.
Fix Common Problems with Handmade Crochet Flower Patterns
Mastering the art of crochet means learning how to correct errors in your handmade crochet flower patterns. Even experienced crafters occasionally face challenges with tension or stitch counts. By identifying these issues early, you can adjust your technique to ensure your floral projects look professional and polished.
Correct Wavy Petals Caused by Too Many Increases
If your petals appear ruffled or wavy, you likely added too many stitches in a single round. This excess fabric forces the yarn to ripple rather than lie flat. To fix this, simply unravel the last round and reduce the number of increases to match the pattern requirements.
Repair Tight, Curled, or Uneven Petals
Conversely, petals that curl inward often suffer from a lack of stitches. When you do not have enough increases, the piece cannot expand properly. Ensure you are following the stitch count for each round to keep your handmade crochet flower patterns looking flat and symmetrical.
Keep the Center from Leaving a Visible Hole
A large hole in the center of your flower usually happens when the initial ring is too loose. You can prevent this by pulling the starting yarn tail firmly after completing your first round. If a gap remains, use a tapestry needle to weave the tail through the base stitches and cinch the center closed.
Unravel and Rework Mistakes Without Losing Your Place
Mistakes are a normal part of the learning process. When you need to undo your work, pull the yarn gently to remove stitches one by one. Place your hook back into the active loop immediately to prevent the entire piece from unraveling further.
How to Read Written Instructions and Stitch Abbreviations
Understanding shorthand is essential for following complex designs. Most patterns use standard abbreviations to save space and keep instructions clear. Refer to the table below to decode common terms you will encounter in your projects.
| Abbreviation | Full Term | Description |
| sc | Single Crochet | Basic stitch for tight fabric. |
| dc | Double Crochet | Taller stitch for faster growth. |
| ch | Chain | The foundation for most stitches. |
| ss | Slip Stitch | Used to join rounds or finish. |
How to Use a Stitch Marker in Repeating Rounds
Stitch markers are your best tool for keeping track of where a round begins and ends. Simply clip one into the first stitch of your round before you continue working. This small step prevents confusion and helps you maintain the correct count throughout your entire project.
Finish and Embellish Your DIY Crochet Flower Projects
You can elevate your handmade blooms by focusing on the details that ensure durability and style. Taking the time to refine your work transforms simple yarn loops into professional-looking accessories. These final steps are essential for any successful diy crochet flower projects.
Weave in Ends for a Neat, Durable Finish
Securing your yarn tails prevents your hard work from unraveling over time. Use a tapestry needle to weave the ends back and forth through the stitches on the reverse side of the flower. This hidden technique keeps the front looking clean and polished.
Add Buttons, Beads, Embroidery, or Felt Centers
Personalizing your flowers adds character and depth to your designs. You might sew a vintage button in the center for a rustic feel or use glass beads for a touch of elegance. Embroidery stitches can also define the veins of a petal or add a pop of color to the middle.
Attach Leaves, Stems, and Layered Petals
Combining different elements creates a more realistic and dimensional appearance. You can stitch small green leaves to the base or attach a wire stem wrapped in floral tape for a bouquet effect. Layering smaller petals over larger ones adds volume and visual interest to your diy crochet flower projects.
Block and Shape Flowers Before Applying Them
Blocking is the secret to achieving a professional, symmetrical shape. Lightly mist your finished flower with water and pin it to a foam mat to stretch the petals into their desired position. Once dry, the stitches will set, ensuring your bloom stays flat or maintains its intended curve.
| Method | Best For | Durability |
| Sewing | Buttons and Beads | High |
| Fabric Glue | Felt Centers | Medium |
| Weaving | Yarn Ends | High |
Safety Tips for Buttons and Small Embellishments
- Always double-check that buttons are sewn on tightly to prevent choking hazards.
- Avoid using small beads or loose sequins if the item is intended for young children.
- Consider using embroidered centers instead of plastic pieces for baby-safe items.
- Test the strength of your attachments by giving them a gentle tug before gifting your work.
Attach Crochet Flowers to Wearables, Gifts, and Home Decor
Your beautiful crochet flower ideas deserve to be showcased on more than just a shelf. By integrating these handmade elements into your daily life, you turn simple objects into personalized treasures. Whether you want to refresh an old sweater or create a unique gift, the possibilities are endless.
Secure Flowers to Hats, Headbands, Scarves, and Sweaters
Adding a floral touch to your wardrobe is a simple way to express your style. You can pin a single large bloom to a beanie or cluster smaller flowers along the edge of a scarf. For sweaters, consider placing a bouquet of varying sizes near the neckline for a sophisticated look.
Decorate Tote Bags, Purses, Hair Clips, and Gift Wrap
Accessories provide the perfect canvas for your crochet work. A sturdy tote bag looks instantly elevated with a few colorful blossoms attached to the strap. You can also glue small flowers onto hair clips or use them as a reusable, eco-friendly topper for gift wrap.
Create Garlands, Wreaths, Table Decor, and Cushion Accents
Bring the beauty of nature indoors by incorporating your work into home styling. String your flowers together to form a festive garland or attach them to a grapevine wreath for a seasonal display. You can even sew them onto cushion covers to add texture and charm to your living room.
Choose Removable or Permanent Attachments
Selecting the right attachment method depends on how you plan to use the item. If you want to wash your garment frequently, permanent sewing is usually the best choice. For items that change with the seasons, consider using temporary fasteners.
| Method | Best For | Durability |
| Sewing | Clothing, Bags | High |
| Safety Pins | Hats, Scarves | Medium |
| Fabric Glue | Decor, Crafts | Low |
How to Sew on an Appliqué for Everyday Durability
To ensure your work stays secure, use a matching thread and a sharp tapestry needle. Focus your stitches on the stable points of the flower, such as the center or the base of each petal. This technique prevents the flower from drooping and helps it withstand regular handling and laundering.
Always knot your thread securely on the back of the fabric to prevent unraveling. By following these steps, you ensure that your beautiful crochet flower ideas remain a lasting part of your favorite items.
Conclusion
Your journey into crafting beautiful blooms transforms simple yarn into intricate art. By utilizing crochet flowers free patterns, you gain the skills to evolve from basic five-petal shapes to complex, layered, and botanical designs.
Success relies on your attention to detail. Matching your yarn weight to the correct hook size ensures your petals maintain their intended structure. Counting your stitches carefully prevents uneven edges, while securing your ends creates a professional, long-lasting finish.
Take time to block your work before adding it to your projects. This simple step defines the shape of your petals and makes your flowers look polished. Whether you attach them to hats, bags, or home decor, these handmade accents add a unique touch to your style.
Continue exploring new color combinations and fiber types to keep your creativity flowing. Experimenting with different petal proportions and center embellishments allows you to build a signature look. Use these crochet flowers free patterns as a foundation for your future designs and enjoy the process of creating something beautiful.
FAQ
Where can I find high-quality crochet flowers free patterns for beginners?
Many reputable brands like Yarnspirations and Lion Brand offer extensive libraries of free crochet flower tutorials. You can also find step-by-step crochet flower instructions on hobbyist blogs that specialize in easy crochet flower designs for various skill levels.
What are the best yarn brands for handmade crochet flower patterns?
For excellent stitch definition and a wide color palette, many crafters prefer Lion Brand 24/7 Cotton or Red Heart Soft. These brands provide consistent weight and durability, making them ideal for beautiful crochet flower ideas that need to hold their shape.
Are there specific free crochet flower tutorials for making 3D blooms?
Yes! Look for tutorials that focus on “dimensional” or “textured” flowers. These often use stitches like the popcorn, puff, or cluster stitch, and utilize front-loop or back-loop techniques to create depth and realistic silhouettes.
How can I use beginner-friendly flower crochet patterns for home decor?
You can easily adapt simple patterns into DIY crochet flower projects for the home. Try creating a floral garland, a seasonal wreath, or using them as decorative accents on throw pillows and table runners to add a touch of handmade charm.
Can I turn basic crochet flower patterns into a full bouquet?
Absolutely. By combining different sizes and types—such as roses, daisies, and sunflowers—and attaching them to floral wire or stems, you can create stunning handmade crochet flower patterns that work perfectly as a lasting gift or centerpiece.
What tools do I need for most diy crochet flower projects?
At a minimum, you will need a crochet hook (usually 3.5mm to 4.5mm), your chosen yarn, scissors, and a tapestry needle. For more advanced projects, stitch markers, stuffing, and embellishments like beads or buttons are helpful for finishing.