
Free Crochet Dragon Pattern: Beautiful Amigurumi Toy
Looking for a crochet dragon pattern free amigurumi project? Follow this beginner-friendly guide with materials, stitches, shaping, and finishing tips.
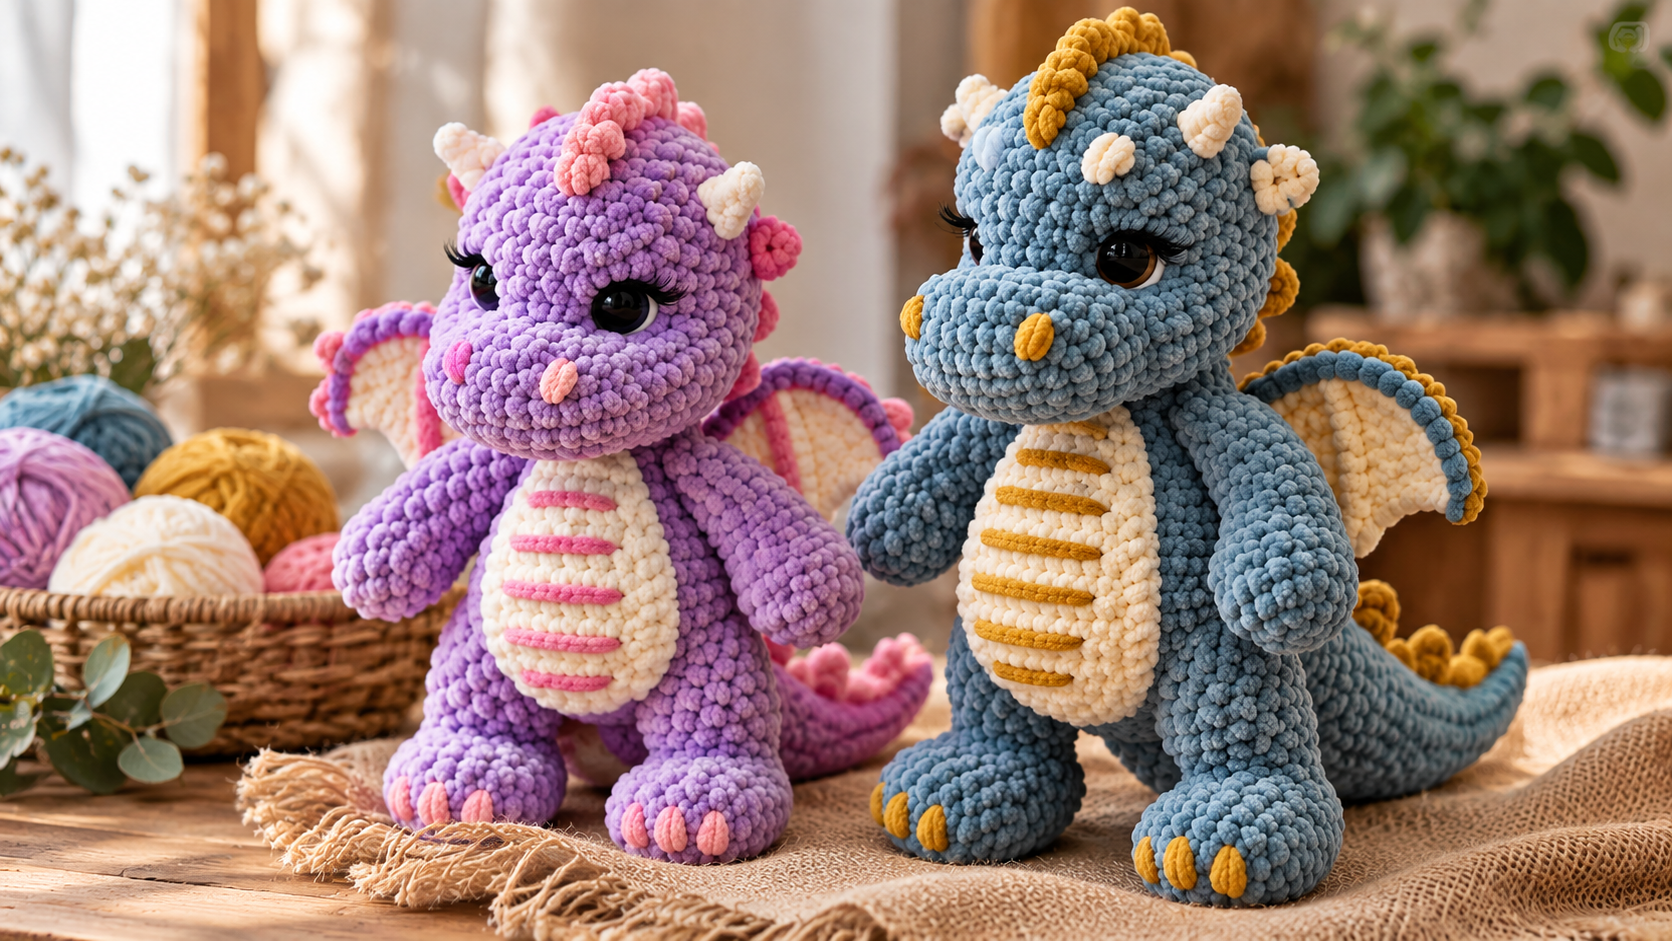
Table of Contents
If you love cute handmade creatures, this crochet dragon pattern is a fun project to add to your amigurumi collection. This little dragon has a rounded body, four legs, small wings, horns, a long tail, and simple facial details that give it a playful personality.
The pattern uses basic amigurumi techniques such as working in continuous rounds, single crochet, increases, decreases, and simple sewing. That makes it a nice project for an experienced beginner who wants to move beyond basic balls and simple stuffed toys.
You can keep your dragon classic with green yarn, or choose any color combination you like. Purple, blue, orange, cream, and even pastel shades can create completely different personalities.
In this guide, you’ll find the materials, gauge, abbreviations, complete pattern instructions, assembly steps, and several ideas for customizing your finished dragon.
What Is a Crochet Dragon Pattern?
A crochet dragon pattern is a set of instructions for creating a small dragon using yarn and a crochet hook. Most amigurumi dragons are built from individual pieces that are stuffed and sewn together.
Unlike flat crochet projects, amigurumi is usually worked tightly in rounds. The goal is to create a firm fabric that holds stuffing without large gaps.
This particular dragon is designed with a simple rounded body and separate pieces for the legs, wings, horns, tail, and spikes.
Key Features
This free pattern includes:
- Rounded dragon body
- Separate head and body sections
- Four small legs
- Curved tail
- Two wings
- Two horns
- Small back spikes
- Embroidered facial details
- Optional safety eyes
The finished dragon measures approximately 8 inches tall when made with the recommended yarn and hook.
Why Crocheters Love Amigurumi Dragons
Dragons are especially fun because there is plenty of room for creativity.
You can change the body color, make contrasting wings, add colorful spikes, embroider different facial expressions, or make the dragon larger by using thicker yarn.
A small handmade dragon also makes a sweet gift for children, fantasy lovers, or anyone who enjoys handmade crochet toys.
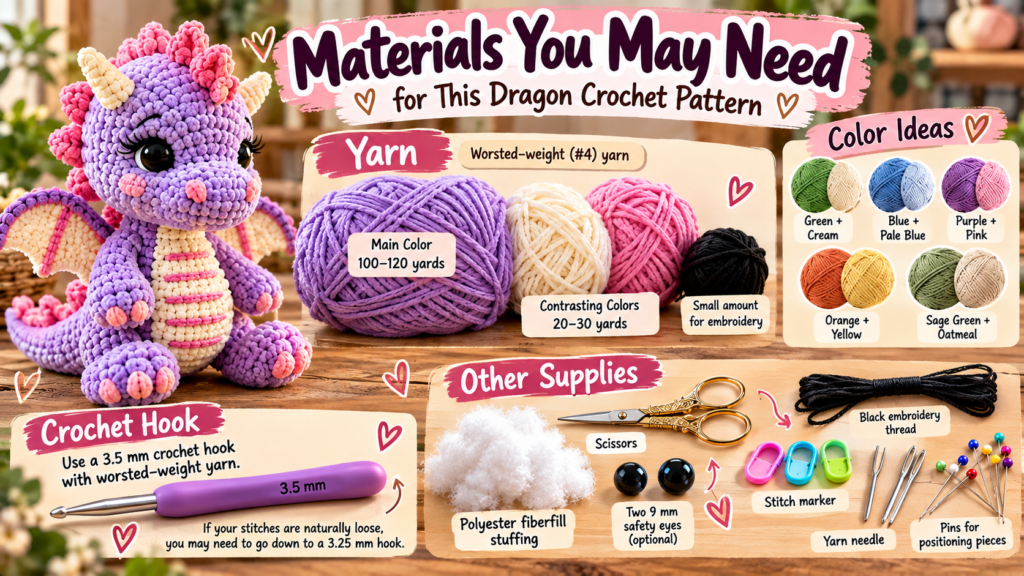
Materials You May Need
Yarn
This dragon crochet pattern uses #4 worsted-weight yarn.
You will need approximately:
- 100–120 yards of main-color yarn
- 20-30 yards of contrasting yarn for horns, wings and detail
- Small amounts of black yarn for embroidery
A smooth acrylic yarn is good because you can easily see the stitches and it’s readily available.
Cotton yarn also works well if you prefer a slightly firmer amigurumi fabric.
Color Ideas
Try combinations such as:
- Green body + cream horns
- Blue body + pale blue wings
- Purple body + pink details
- Orange body + yellow wings
- Sage green body + oatmeal details
Crochet Hook
Use a 3.5 mm crochet hook with worsted-weight yarn.
Amigurumi is normally crocheted with a smaller hook than you might use for a wearable project. The tighter fabric helps keep the stuffing from showing through.
If your stitches are naturally loose, you may need to go down to a 3.25 mm hook.
Other Supplies
You will also need:
- Polyester fiberfill stuffing
- Yarn needle
- Stitch marker
- Scissors
- Two 9 mm safety eyes, optional
- Small amount of black embroidery thread
- Pins for positioning pieces
If the dragon is intended for a young child, embroidered eyes are a safer alternative to plastic safety eyes.
Crochet Dragon Pattern: Size and Gauge
Finished Size
The finished dragon should measure approximately:
- 8 inches tall
- 5 inches long, excluding the tail
- Approximately 8–9 inches long including the tail
The exact size will depend on your yarn, hook, and individual tension.
Gauge
Gauge is not critical for this amigurumi project.
What matters most is creating a firm fabric with no obvious holes between stitches.
Your hook should be small enough that the stuffing does not show through the finished fabric.
Abbreviations
US crochet terminology:
- MR — magic ring
- ch — chain
- sc — single crochet
- sl st — slip stitch
- inc — 2 sc in the same stitch
- dec — single crochet 2 stitches together
- st — stitch
- sts — stitches
- BLO — back loop only
- FO — fasten off
Unless otherwise stated, work in continuous rounds.
Place a stitch marker on the first stitch of each round.
How to Make This Crochet Dragon
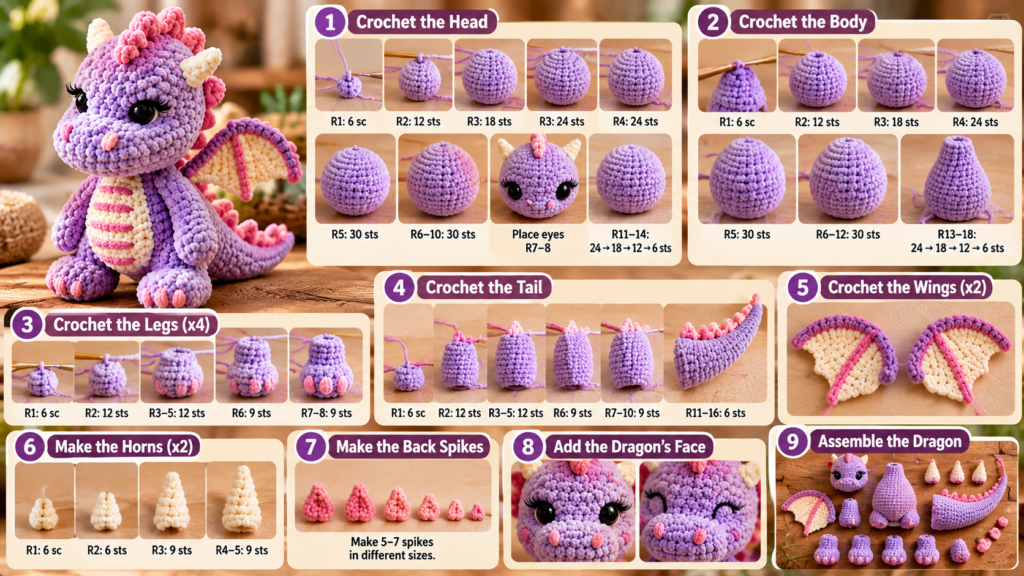
Step 1: Crochet the Head
Begin by making a magic ring using your main yarn color.
Round 1
Work 6 sc into the magic ring.
6 sts
Round 2
Inc in each stitch around.
12 sts
Round 3
Sc in next stitch, inc in next stitch.
Repeat around.
18 sts
Round 4
Sc in next 2 sts, inc in next st.
Repeat around.
24 sts
Round 5
Sc in next 3 sts, inc in next st.
Repeat around.
30 sts
Rounds 6–10
Sc in each stitch around.
30 sts
Insert the safety eyes between Round 7 and 8 with about 6 stitches in between.
Do not attach safety eyes if the finished toy will be given to a child who could remove them.
Round 11
Sc in next 3 sc. * Dec in next 2 sc.
Repeat around.
24 sts
Round 12
Sc in next 2 sts, dec.
Repeat around.
18 sts
Begin adding a small amount of stuffing.
Round 13
Sc in next stitch, dec.
Repeat around.
12 sts
Add a little more stuffing.
Do not pack the head so tightly that the stitches become stretched.
Round 14
Dec around.
6 sts
Fasten off and leave a long yarn tail.
Close the remaining hole with your yarn needle.
Weave in the end securely.
Step 2: Crochet the Body
Using the main color, make a magic ring.
Round 1
6 sc into the ring.
6 sts
Round 2
Inc around.
12 sts
Round 3
Sc, inc.
Repeat around.
18 sts
Round 4
Sc in next 2 sts, inc.
Repeat around.
24 sts
Round 5
Sc in next 3 sts, inc.
Repeat around.
30 sts
Rounds 6–12
Sc around.
30 sts
Round 13
Sc in next 3 sts, dec.
Repeat around.
24 sts
Round 14
Sc around.
24 sts
Round 15
Sc in next 2 sts, dec.
Repeat around.
18 sts
Begin stuffing the body.
Round 16
Sc around.
18 sts
Round 17
Sc, dec.
Repeat around.
12 sts
Add more stuffing.
Round 18
Dec around.
6 sts
Fasten off.
Close the opening with a yarn needle and weave in the end.
Step 3: Crochet the Legs
Make four identical legs.
Using the main color:
Round 1
6 sc into a magic ring.
6 sts
Round 2
Inc around.
12 sts
Rounds 3–5
Sc around.
12 sts
Round 6
Sc in next 2 sts, dec.
Repeat around.
9 sts
Stuff the lower portion lightly.
Rounds 7–8
Sc around.
9 sts
Fasten off and leave a long sewing tail.
Do not overstuff the legs. They should remain flexible enough to sit naturally against the body.
Repeat for all four legs.
Step 4: Crochet the Tail
The tail is worked from the wide base toward the pointed end.
Using the main color:
Round 1
6 sc into a magic ring.
6 sts
Round 2
Inc around.
12 sts
Rounds 3–5
Sc around.
12 sts
Round 6
Sc in next 2 sts, dec.
Repeat around.
9 sts
Rounds 7–10
Sc around.
9 sts
Round 11
Sc, dec.
Repeat around.
6 sts
Rounds 12–16
Sc around.
6 sts
Do not stuff the final narrow section heavily.
Fasten off and leave a long tail for sewing.
For a slightly curved tail, gently shape it as you sew it to the body.
Step 5: Crochet the Wings
Make two wings using your contrasting color.
Wing Base
Ch 6.
Row 1
Sc in the second chain from the hook and across.
5 sts
Row 2
Ch 1, turn.
Sc across.
5 sts
Row 3
Ch 1, turn.
Sc, inc, sc across.
6 sts
Row 4
Ch 1, turn.
Sc across.
6 sts
Row 5
Ch 1, turn.
Sc, inc, sc across.
7 sts
Row 6
Ch 1, turn.
Sc across.
7 sts
Row 7
Ch 1, turn.
Sc, inc, sc across.
8 sts
Fasten off and leave a sewing tail.
Repeat for the second wing.
You can add a decorative edge by working slip stitches around the outer edge.
Step 6: Make the Horns
Make two horns in a contrasting color.
Round 1
6 sc into a magic ring.
6 sts
Round 2
Sc around.
6 sts
Round 3
Sc, inc.
Repeat around.
9 sts
Rounds 4–5
Sc around.
9 sts
Fasten off.
If necessary, add a little stuffing.
The horns should remain relatively firm.
Step 7: Make the Back Spikes
For a simple spike, chain 5.
Starting in the second chain from the hook:
- Sl st
- Sc
- Hdc
- Dc
Fasten off.
Make several spikes in different sizes.
For this dragon, approximately 5–7 spikes work well.
You can sew them in a line from the back of the head toward the tail.
Step 8: Add the Dragon’s Face
If you used safety eyes, the main facial detail is already in place.
For an embroidered face, use black embroidery thread.
Add:
- Two small eyes
- A tiny curved mouth
- Optional nostrils
Keep the embroidery simple.
A few carefully placed stitches can give the dragon more character without making the face look crowded.
Step 9: Assemble the Dragon
Before sewing anything permanently, arrange all of the pieces with pins.
This makes changing the placement so much easier.
Attach the Head
Using the long tail of yarn from the head, sew it to the body.
Place the head on top of the body and check that it is centered before joining the pieces.
Work through several stitches around the joining area.
Check that the head is centered before finishing.
Attach the Legs
Place four legs in front of the body and two in back.
Sew each leg securely into place.
Make sure the dragon can sit or stand naturally.
Attach the Tail
Place tail on back of body.
Sew around the base several times.
If you want the tail to curve upward, use a few additional stitches to hold the curve in place.
Attach the Wings
Place one wing on each side of the upper back.
Pin them first and check that they sit at approximately the same height.
Sew them securely along the base.
Attach the Horns
Place the horns on the upper portion of the head.
Sew them firmly into place.
Stitch Notes
Amigurumi is worked much more tightly than many flat crochet projects.
If your stitches are loose, stuffing may become visible.
In that case, try:
- A smaller crochet hook
- Slightly tighter tension
- A yarn with good stitch definition
Do not pull each stitch excessively tight. Extremely tight tension can make your hands uncomfortable and make the fabric difficult to work into.
Sizing Notes
The easiest way to make this dragon larger is to change the yarn weight and hook size.
For example:
- Worsted yarn → medium-sized dragon
- Bulky yarn → larger dragon
- DK yarn → smaller dragon
- Sport-weight yarn → smaller detailed dragon
When changing yarn weight, adjust the hook accordingly and remember that the finished measurements will change.
Helpful Tip
Stuff the dragon gradually.
Adding a huge amount of stuffing at the end can create lumps and stretch the crochet fabric.
Instead, add small amounts after the body begins to narrow.
Use the back of your crochet hook or a stuffing tool to gently push fiberfill into smaller areas.
Tips for Better Results
Choosing the Right Yarn
Smooth yarn is usually easier for amigurumi because individual stitches are easier to see.
Avoid very fuzzy yarn for your first dragon. The fuzz can hide stitch placement and make counting rounds frustrating.
Acrylic and cotton are both useful choices.
Cotton tends to create a firm, defined fabric, while acrylic can give the finished dragon a slightly softer feel.
Keep Your Stitches Tight
The fabric should be dense enough that the stuffing does not show through.
If you can clearly see large gaps between stitches, try a smaller hook.
Count Your Stitches
Amigurumi depends heavily on stitch counts.
If a round says 24 stitches, finish the round with 24 stitches.
Losing one or two stitches can gradually change the shape of the head or body.
Use a stitch marker and count periodically instead of waiting until something looks wrong.
Stuff Carefully
Use small pieces of polyester fiberfill rather than pushing in one large ball.
Start at the narrowest areas and gradually work toward the wider sections.
The goal is a firm but squeezable toy.
Common Mistakes to Avoid
Using a Hook That Is Too Large
A large hook creates loose stitches and can make stuffing visible.
Overstuffing the Head
Too much stuffing can stretch the stitches and make the head look unusually round.
Sewing Pieces Without Pinning
Even small differences in placement can change the appearance of the finished dragon.
Pin the pieces first.
Forgetting to Leave Sewing Tails
Fasten off, leaving a long enough tail to sew the piece on.
A short yarn end can make assembly much more difficult.
Variations and Ideas
Make a Colorful Dragon
Use one main color for the body and a contrasting color for:
- Wings
- Horns
- Spikes
- Feet
- Tail tip
This creates a more playful fantasy look.
Make a Pastel Dragon
For a softer nursery-style dragon, try:
- Sage green
- Dusty pink
- Pale blue
- Lavender
- Cream
Keep the facial details simple for a gentle appearance.
Make a Fierce Dragon
Use darker colors such as:
- Forest green
- Burgundy
- Charcoal
- Deep purple
- Navy
Add larger horns and more pronounced back spikes.
Turn It Into a Mini Dragon
DK or sport-weight yarn works well for this project, paired with a smaller crochet hook for tighter, more defined stitches.
Because the finished piece will be smaller, use appropriately sized safety eyes or embroider the face.
Final Thoughts
This crochet dragon pattern is a great little project when you want something more playful than a traditional amigurumi animal. The basic shape is simple enough to customize, but the wings, horns, spikes, and tail give you plenty of opportunities to make the finished dragon your own.
If you’re new to crochet amigurumi, take your time with stitch counting and stuffing. Those two details make a surprisingly big difference in the finished shape.
Once you’ve made the first dragon, try changing the colors or yarn weight to create a whole collection of tiny fantasy creatures. A simple dragon crochet pattern free project can easily become a fun way to practice shaping, assembly, and creative design.
FAQ
Is this crochet dragon pattern suitable for beginners?
Yes. This is a good beginner amigurumi pattern for someone who already knows basic single crochet, increases, decreases, and working in continuous rounds.
The assembly requires patience, but the individual pieces are relatively simple.
What yarn is best for a crochet dragon?
Worsted-weight acrylic or cotton yarn works well. Choose a smooth yarn with good stitch definition so you can easily see each stitch while working.
What crochet hook size is best for amigurumi?
A 3.5 mm hook is a useful starting point with worsted-weight yarn. If your stitches are loose, try a smaller hook.
Can I make this crochet dragon bigger?
Yes. Using bulky yarn and a larger hook will produce a larger dragon. You can also enlarge individual pieces by adding additional increase rounds before working even rounds.
How do I stop stuffing from showing?
Use a smaller hook or tighten your tension slightly. The fabric should be dense, but not so tight that crocheting becomes uncomfortable.
Can I use safety eyes?
Yes, safety eyes can be used for an older child or decorative toy. For babies and young children, embroidered eyes are a safer option because plastic safety eyes can present a choking hazard if they become detached.
How do I make the dragon stand?
The pattern is designed primarily as a soft stuffed toy. For a standing version, make the feet slightly larger and place the legs carefully so the body weight is distributed evenly.
Can I sell dragons made from this pattern?
You can make physical items from your own crochet work, but if you plan to sell them, check the terms attached to the pattern and avoid selling or reproducing the written pattern itself.