
Easy Crochet Cape Pattern Make a Cozy Scalloped Capelet
This free crochet cape pattern uses double crochet stitches and spaced increases to shape a flowing capelet, with materials, gauge, sizing, and finishing tips.
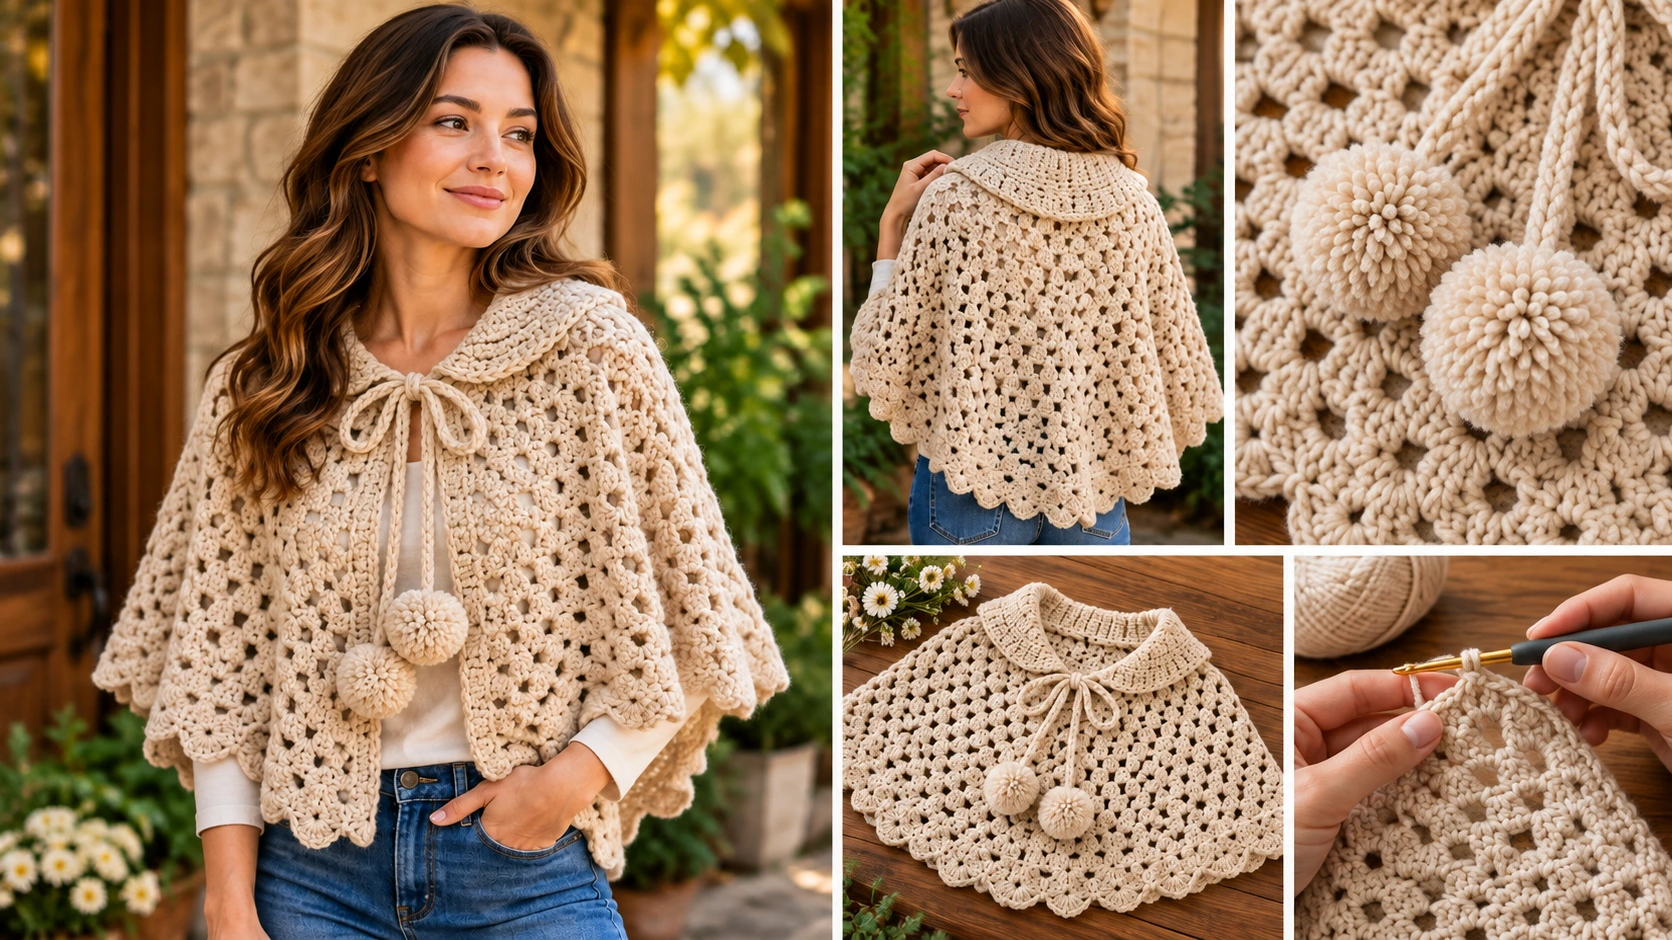
Table of Contents
A crochet cape is a versatile handmade layer that can add warmth and texture without the construction of a full sweater. Wear a short capelet over a long-sleeved shirt, layer it over a dress, or style it with jeans and boots for a relaxed fall outfit.
This crochet cape pattern creates a circular, pull-over capelet with a simple double crochet body, a softly ribbed neckline, and a scalloped edge. The project is worked from the neckline outward, so there are no separate front and back panels to sew together.
The pattern uses US crochet terminology and provides a starting adult size, stitch counts, and adjustment instructions. You can make it in a neutral shade for everyday wear or choose a seasonal color for a handmade statement piece.
What You’ll Make
The finished capelet has a simple circular silhouette that spreads gently over the shoulders. Four increase points shape the fabric as you work outward from the neckline. A decorative shell edging finishes the hem.
Project details
- Skill level: Confident beginner
- Construction: Top-down in joined rounds
- Fit: Adult one-size starting point, adjustable
- Estimated finished depth: Approximately 15–16 inches before accounting for the collar
- Estimated bottom circumference: Approximately 53–54 inches before blocking
- Yarn amount: Approximately 550–750 yards
- Main hook: 5.0 mm (US H/8)
- Collar: Four rounds of finishing, including the setup round
- Finish: Scalloped shell edging
These measurements are estimates based on the stated gauge. Yarn fiber, blocking, and individual tension can change the finished dimensions.
Materials
Before starting, gather the following supplies:
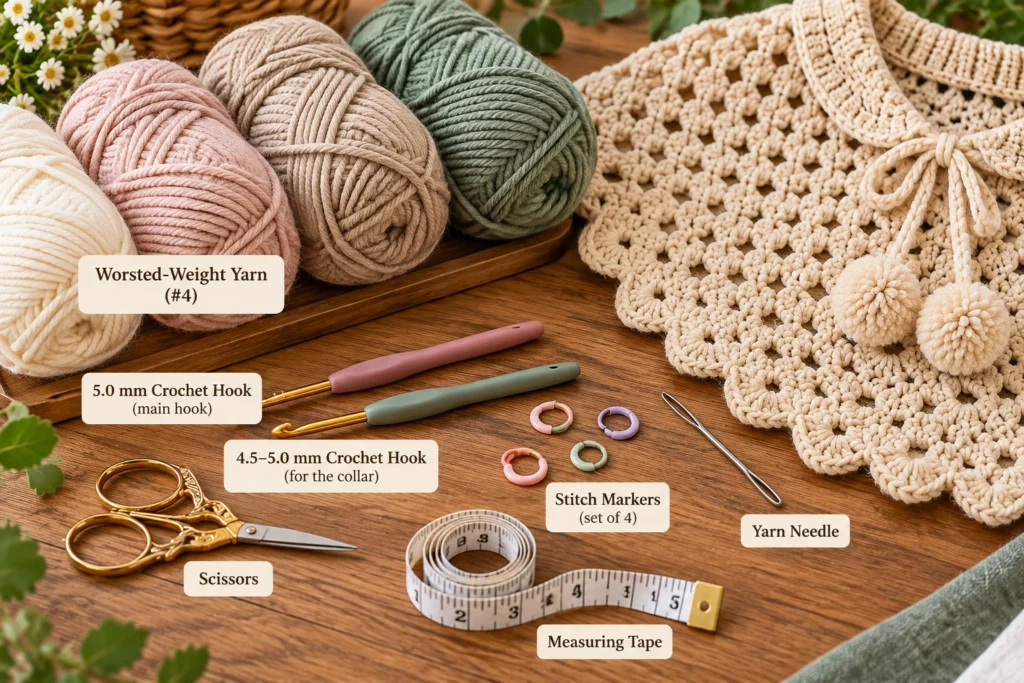
- 550–750 yards of worsted-weight yarn (#4)
- 5.0 mm crochet hook, or the size needed to obtain the gauge
- 4.5–5.0 mm hook for the collar, if a slightly firmer rib is preferred
- Four stitch markers
- Yarn needle
- Scissors
- Measuring tape
Choosing the Right Yarn
For a lightweight capelet, look for a smooth worsted-weight yarn with a soft drape. Acrylic, wool, wool blends, and cotton blends can all work, but they behave differently.
Wool and some wool blends offer warmth and elasticity. Acrylic may be easier to care for, depending on the yarn label. Cotton tends to feel heavier and may drape differently, particularly in a garment that grows wider toward the hem.
Avoid a very stiff yarn if you want the capelet to fall naturally over the shoulders. Bulky yarn will create a thicker fabric and change the size, drape, and yardage, so it is not a direct substitute for the recommended weight.
Gauge and Finished Measurements
Gauge matters because this capelet grows outward in rounds. If your stitches are wider than the sample gauge, the hem may become larger than expected. If your stitches are smaller, the cape may feel shorter and narrower.
Target gauge: 14 double crochet stitches × 7 rounds = 4 × 4 inches, measured after gently blocking a swatch.
Make a small swatch in joined rounds if possible, using the same hook and joining method intended for the cape. Do not stretch it while measuring.
Adult Starting Size
With the sample gauge, the pattern is designed to produce approximately:
- Neckline circumference: 22–23 inches before collar adjustments
- Cape depth: 15–16 inches
- Hem circumference: 53–54 inches
The neckline measurement is particularly important because the garment is designed to be pulled over the head. Check that the foundation ring can pass comfortably over your head before continuing.
For a larger neckline, add chains in multiples of four. This keeps the four increase sections balanced.
Abbreviations
The pattern uses standard US crochet terms:
- ch: chain
- sl st: slip stitch
- sc: single crochet
- dc: double crochet
- hdc: half double crochet
- BLO: back loop only
- st(s): stitch(es)
Increase: Work two dc stitches into the same stitch.
Before You Begin
This capelet is worked in joined rounds, starting at the neckline and expanding toward the hem. It is not an open-front cape; it slips over the head like a short circular cape or capelet.
The four increase points are spaced evenly around the first round. Markers help you keep these positions consistent. At each increase point, work two dc into the marked stitch, then place the marker in the second new stitch. This gives each section one additional stitch per round.
The ch-2 turning chain does not count as a stitch. Join each body round with a slip stitch to the first actual dc.
Free Crochet Cape Pattern
Step 1: Create the Neckline
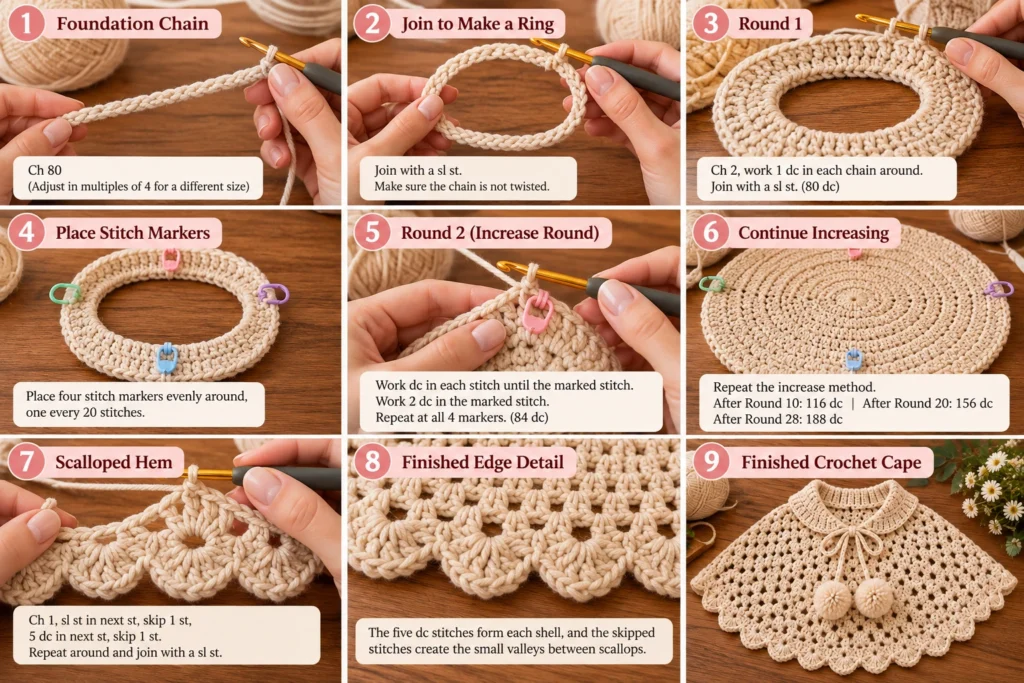
Foundation: Ch 80.
Check the chain ring against your head before joining. If it is too tight, add chains in multiples of four. If it is excessively loose, reduce the chain count in multiples of four.
Join with a sl st to the first chain, taking care not to twist the foundation.
Round 1: Ch 2. Work 1 dc in each chain around. Join with a sl st to the first dc. (80 dc)
Place four stitch markers evenly around the round, one every 20 stitches. These mark the four increase points.
Step 2: Build the Cape Shape
Round 2: Ch 2. Work dc in each stitch until you reach the first marked stitch. Work 2 dc in that marked stitch, then move the marker to the second dc just made. Continue around, repeating the increase at each of the four markers. Join with a sl st. (84 dc)
Rounds 3–10: Ch 2. Work dc in each stitch, increasing once at each marked position as described in Round 2. Move each marker to the second stitch of its increase. Join at the end of every round.
Your stitch count increases by four on each round.
After Round 10, you should have 116 dc.
Step 3: Continue Widening the Cape
Rounds 11–20: Repeat the same increase method. Work dc in every stitch except that each marked stitch receives 2 dc. Move each marker to the second stitch of its increase, then join the round.
After Round 20, you should have 156 dc.
Rounds 21–28: Continue in the same way, maintaining all four increase points.
After Round 28, you should have 188 dc.
At this stage, try the capelet on over your intended clothing layer. The fabric should spread over your shoulders and fall around your upper torso without pulling tightly at the neckline.
If you want a longer capelet, add more increase rounds before the edging. Each added round increases the circumference and the depth, so check the fit as you go.
Step 4: Make the Scalloped Hem
The sample body has 188 stitches, which works with the four-stitch repeat used for the edging.
Edging round: Join the yarn at the hem if needed. Ch 1, then repeat the following around:
- Sl st in the next stitch.
- Skip the next stitch.
- Work 5 dc in the next stitch.
- Skip the next stitch.
Continue around and join with a sl st to the first sl st.
Fasten off and weave in the yarn end.
The five dc stitches form each shell, while the skipped stitches create the small valleys between scallops. Keep the stitches relaxed so the edge can lie naturally.
If your stitch count is different from the sample, check that it is divisible by four before working this edging. For an uneven count, use a plain sc edging instead or adjust the last increase round to produce a suitable multiple.
Add a Soft Ribbed Collar
A short ribbed collar gives the neckline a more finished look and helps frame the face.
The collar is added around the top of the original neckline round. With the right side of the cape facing you, locate the first round of 80 dc.
Collar Round 1: Attach the yarn to the top of any stitch in the neckline round. Ch 1, then sc in each of the 80 stitches. Join with a sl st to the first sc. (80 sc)
Collar Rounds 2–4: Ch 2, then hdc in BLO around. Join with a sl st to the first hdc at the end of each round. (80 hdc)
Fasten off and weave in the ends.
The collar should feel comfortable rather than tight. If the fabric pulls inward around the neckline, try a larger hook or fewer collar rounds.
Optional Decorative Ties
A small tie detail can add a handmade finish. Because the capelet is closed and pulled over the head, the ties are decorative rather than a front closure.
Attach yarn at one point near the front of the collar and ch 28–32. Sl st back along the chain to strengthen it, then fasten off. Repeat at a point a couple of inches away.
Tie the two cords into a loose bow. Keep them away from the face and neck, and avoid tying them tightly.
You can leave the ties off completely for a clean, simple capelet.
How to Adjust the Crochet Cape Size
The easiest way to customize this pattern is to change the foundation circumference and the number of rounds.
Make the Neckline Larger or Smaller
The sample begins with 80 chains. Add or subtract chains in multiples of four so the four increase sections remain even.
At the target gauge of 3.5 dc per inch, four stitches represent approximately 1.14 inches of circumference. This is a starting estimate rather than an exact guarantee, because chain length and stitch stretch differ.
Make the Cape Longer
Continue adding increase rounds after Round 28. Each added round contributes approximately 4/7 inch of depth and adds four stitches to the circumference.
For instance, adding four rounds adds roughly 2.3 inches of depth and 16 stitches to the final circumference. Check the cape on your body before adding several extra rounds.
Make the Cape Less Full
If you prefer a more compact, less flared shape, you can skip the four increases on selected rounds. For example, work the increase points every other round for a gentler expansion.
This changes the expected stitch count, so measure the circumference and check that the final stitch count suits your chosen hem edging.
Make a Larger Overall Capelet
For a broader capelet, start with a neckline that comfortably fits over the head and continue for additional rounds. Because the project expands outward, a few extra rounds can make a noticeable difference.
Remember that adding rounds increases both the width and length. If you need a much longer garment, consider a different construction rather than adding rounds without checking the proportions.
Troubleshooting Common Problems
The Cape Is Curling or Ruffling
Some curling during construction can be normal. Once several rounds are complete, lay the capelet flat to check its shape.
If the fabric forms pronounced waves, you may be adding too many stitches for your tension. Try skipping an increase round. If it cups inward and refuses to spread, additional increases may be needed.
The Neckline Feels Too Tight
Check that the foundation chain passes comfortably over your head. If it doesn’t, unravel the first round and increase the chain count in multiples of four.
Do this before completing the body, since changing the neckline later is more difficult.
The Cape Feels Heavy
A heavy garment may come from dense stitches, a thick yarn, or too many rounds. Try a lighter worsted yarn with better drape, or stop a few rounds earlier after checking the cape’s proportions.
The Scalloped Edge Looks Uneven
Check that each repeat has the same placement: sl st, skip one stitch, five dc in the next stitch, skip one stitch. Use a stitch marker at the start of the edging round if necessary.
Blocking may help smooth small irregularities, but it will not correct a stitch count that changes unexpectedly.
How to Finish and Care for Your Capelet
Weave in all ends securely with a yarn needle. If your yarn is suitable for blocking, gently shape the capelet on a flat surface according to the fiber’s care instructions.
Do not stretch the neckline or scallops aggressively. Shape each shell so the edge looks consistent, then let the garment dry completely before wearing it.
Follow the yarn label for washing and drying. Store the capelet folded or loosely draped rather than hanging it for long periods if the yarn is likely to stretch under its own weight.
How to Style a Handmade Crochet Cape
A short capelet adds texture without covering an entire outfit.
For everyday wear, pair a cream or oatmeal capelet with jeans, a fitted long-sleeved top, and boots. A darker color such as forest green, rust, or charcoal can create a more seasonal look. Over a simple dress, a lighter capelet can act as a decorative layer for a gathering or evening out.
If your cape has a scalloped hem and a textured collar, keep the rest of the outfit relatively simple so the stitches remain visible.
Conclusion
This crochet cape pattern creates a cozy, circular capelet with a simple double crochet body, four increase points, a ribbed collar, and a scalloped hem. The construction is approachable for crocheters who can work double crochet in joined rounds and keep track of stitch markers.
Use the recommended gauge as your starting point, measure the neckline before moving forward, and adjust the round count for the drape you prefer. A thoughtful yarn choice and neat finishing can make this a versatile handmade layer for cooler days.
FAQ
How much yarn do I need for a crochet cape?
For this adult capelet, plan for approximately 550–750 yards of worsted-weight yarn. A longer or fuller version may require more, depending on gauge, yarn fiber, and the number of rounds.
Is this crochet cape pattern suitable for beginners?
It is suitable for confident beginners who know how to chain, work double crochet, join rounds, and follow stitch markers. A first garment project may take longer because of sizing and finishing.
Can I make this cape longer?
Yes. Add increase rounds before the scalloped hem. Each additional round adds four stitches and increases the depth. Try the capelet on periodically to check the proportions.
Can I use a different yarn weight?
You can, but the finished dimensions and drape will change. Make a gauge swatch with the new yarn and adjust the hook as needed. A lighter yarn may create a more delicate cape, while thicker yarn produces a heavier, bulkier fabric.
Is the cape open at the front?
No. This pattern creates a closed circular capelet that slips over the head. The optional neckline ties are decorative. For an open-front cape, you would need a different construction.
How do I keep the scalloped edge neat?
Work the same four-stitch repeat consistently around the hem and keep your tension even. The sample’s 188-stitch count divides evenly into the edging repeat. If your count differs, use a plain sc border or adjust the count before making the shells.