
Cute Crochet Pumpkin Turtle Pattern Easy Halloween Amigurumi
Make a cute crochet pumpkin turtle with this original amigurumi pattern. Get yarn details, exact rounds, assembly steps, sizing tips, and Halloween ideas.

Table of Contents
A crochet Pumpkin turtle combines two fun crochet themes in one small project: a cute turtle and a round pumpkin-inspired shell. The result is a seasonal amigurumi that works well as a Halloween decoration, handmade gift, desk buddy, or part of a fall display.
This pattern uses simple amigurumi techniques, including single crochet, increases, decreases, stuffing, and basic sewing. The pumpkin shell is crocheted separately and attached to the turtle body, so you can also customize the colors without changing the main construction.
The finished turtle is designed to be small enough for a shelf, craft table, or seasonal basket, while still having enough detail to make the pumpkin shape easy to recognize.
This pattern uses US crochet terminology and is worked in continuous rounds unless otherwise noted.
Crochet Pumpkin Turtle at a Glance
Skill level: Easy / Advanced Beginner
Finished size: Approximately 5–6 inches long
Yarn: Category 4 worsted weight
Main hook: 3.25 mm (US D-3)
Main stitch: Single crochet
Gauge: Not essential; maintain firm amigurumi tension
Construction: Separate body, head, legs, tail, and pumpkin shell
Style: Halloween / fall amigurumi
Materials
You will need:

- Green worsted-weight yarn for the turtle
- Orange worsted-weight yarn for the pumpkin shell
- Small amount of brown yarn for the stem
- Small amount of dark orange yarn for pumpkin ridges
- Small amount of black yarn for facial details
- 3.25 mm crochet hook
- Fiberfill stuffing
- Tapestry needle
- Stitch marker
- Scissors
- Optional 6 mm safety eyes
Approximately 100–120 yards of total yarn should be enough for one small turtle, although actual usage depends on tension and yarn choice.
For a particularly cute Halloween version, try a soft pumpkin orange with moss or forest green.
Before You Begin
Amigurumi looks best when the fabric is firm enough that stuffing cannot easily be seen between the stitches.
Use a smaller hook than you might normally pair with worsted-weight yarn.
Work continuously around the piece unless the instructions tell you to join.
Place a stitch marker in the first stitch of every round. Move it after completing each round.
Crochet Abbreviations
- MR = magic ring
- ch = chain
- sc = single crochet
- inc = 2 sc in the same stitch
- dec = single crochet 2 stitches together
- sl st = slip stitch
- st = stitch
Step 1: Crochet the Turtle Body
Use green yarn.
The body is a compact oval that sits underneath the pumpkin shell.
Body Pattern
Round 1: MR, 6 sc — 6 sts
Round 2: Inc around — 12 sts
Round 3: Sc 1, inc around — 18 sts
Round 4: Sc 2, inc around — 24 sts
Rounds 5–7: Sc around — 24 sts
Round 8: Sc 2, dec around — 18 sts
Round 9: Sc around — 18 sts
Begin adding stuffing.
Round 10: Sc 1, dec around — 12 sts
Add a little more stuffing.
Round 11: Dec around — 6 sts
Fasten off and close the opening.
Do not overstuff the body. The shell will add some weight and structure when attached later.
Step 2: Crochet the Turtle Head
Use green yarn.
Head Pattern
Round 1: MR, 6 sc — 6 sts
Round 2: Inc around — 12 sts
Round 3: Sc 1, inc around — 18 sts
Round 4: Sc 2, inc around — 24 sts
Rounds 5–6: Sc around — 24 sts
Round 7: Sc 2, dec around — 18 sts
Round 8: Sc 1, dec around — 12 sts
Add a small amount of stuffing.
Round 9: Dec around — 6 sts
Fasten off and close.
Add the Face
Place the eyes approximately between Rounds 4 and 5.
For embroidered eyes, use black yarn to make two small oval shapes.
Add a tiny curved mouth using black yarn.
For a more playful expression, add two tiny blush marks with pink yarn.
Set the finished head aside until the body is assembled.
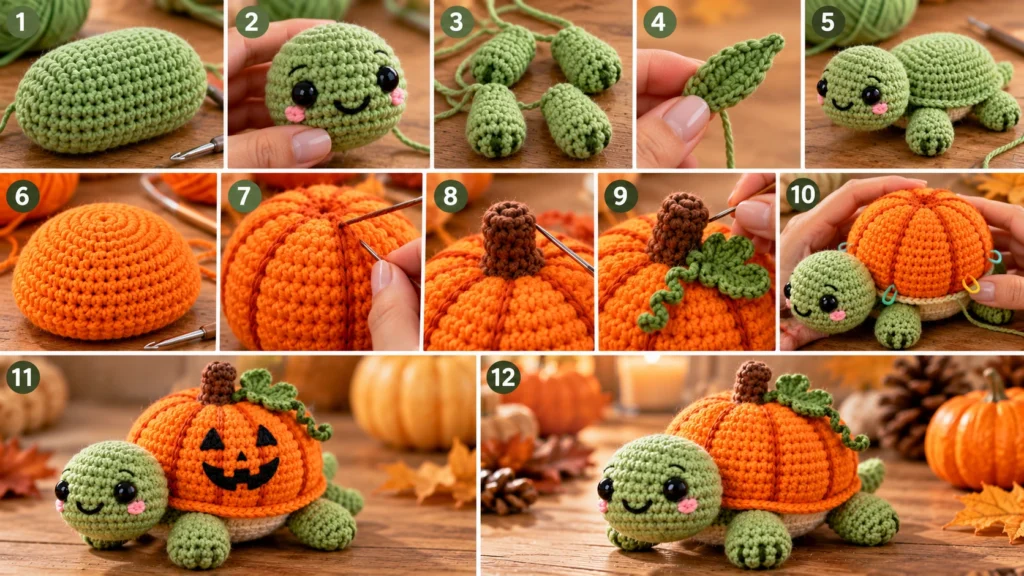
Step 3: Make Four Turtle Legs
Use green yarn.
Make 4 legs.
Leg Pattern
Round 1: MR, 6 sc — 6 sts
Rounds 2–4: Sc around — 6 sts
Do not stuff the legs heavily.
Fasten off, leaving a long tail for sewing.
Flatten each leg slightly between your fingers.
Step 4: Make the Tail
The tail is small and simple.
Use green yarn.
Foundation: Ch 5.
Row 1: Sc in the second chain from the hook and across — 4 sts.
Row 2: Ch 1, turn. Sc across — 4 sts.
Fasten off, leaving a long sewing tail.
Fold the piece slightly to create a tapered tail.
Step 5: Assemble the Turtle Base
Sew the head to the wider end of the body.
Use several passes with the tapestry needle so the head remains secure.
Next, attach the four legs.
Place two legs toward the front sides of the body and two toward the back.
Keep the spacing as symmetrical as possible.
Finally, sew the tail to the back center.
Before adding the pumpkin shell, place the turtle on a flat surface and check that all four legs touch the surface evenly.
Small adjustments are easier now than after the shell is attached.
Step 6: Crochet the Pumpkin Shell
Now create the main feature of the project.
Use orange yarn.
The shell is worked as a rounded dome that sits over the green turtle body.
Pumpkin Shell Pattern
Round 1: MR, 6 sc — 6 sts
Round 2: Inc around — 12 sts
Round 3: Sc 1, inc around — 18 sts
Round 4: Sc 2, inc around — 24 sts
Round 5: Sc 3, inc around — 30 sts
Round 6: Sc around — 30 sts
Round 7: Sc 4, inc around — 36 sts
Round 8: Sc around — 36 sts
Round 9: Sc 4, dec around — 30 sts
Round 10: Sc 3, dec around — 24 sts
Round 11: Sc 2, dec around — 18 sts
Begin lightly stuffing the shell.
Round 12: Sc 1, dec around — 12 sts
Add only enough stuffing to create a rounded pumpkin shape.
Round 13: Dec around — 6 sts
Fasten off and close.
The shell should remain slightly rounded rather than tightly stuffed.
Check the Shell Fit
Place the pumpkin shell on top of the completed turtle.
It should cover most of the body while leaving the green head, feet, and tail visible.
If the shell feels too large, use less stuffing.
If it looks too small, your tension may be tighter than the suggested starting point.
Step 7: Add Pumpkin Ridges
The ridges are what make the shell look like a pumpkin rather than a plain orange ball.
Use dark orange yarn and a tapestry needle.
Start near the center top of the pumpkin shell.
Insert the needle through the center and bring it out near the lower edge.
Pull gently so the yarn creates a shallow indentation.
Repeat around the shell to make approximately 6 pumpkin sections.
Do not pull too tightly.
The goal is to create gentle grooves rather than deep folds.
For an even more dimensional finish, slightly offset two of the ridge lines.
Step 8: Add the Pumpkin Stem
Use brown yarn.
Stem Pattern
Round 1: MR, 6 sc — 6 sts
Rounds 2–3: Sc around — 6 sts
Fasten off, leaving a sewing tail.
Add a very small amount of stuffing.
Sew the stem to the center top of the pumpkin shell.
For a natural pumpkin look, tilt the stem very slightly instead of placing it perfectly upright.
Step 9: Add a Small Vine or Leaf
This step is optional.
For a simple vine, use green yarn.
Foundation: Ch 8.
Work sl st back along the chain.
Fasten off and sew the vine next to the pumpkin stem.
For a small leaf, chain 5 and work sl st, sc, hdc, and sl st back along the chain.
Sew the leaf beside the stem.
Keep the leaf small so the turtle remains the main character.
Step 10: Attach the Pumpkin Shell
Place the shell on top of the turtle body.
The rounded center should sit directly above the body.
Use stitch markers to hold the shell temporarily in place.
Thread your tapestry needle with orange yarn.
Sew around the lower edge of the shell and into the green body.
Make your stitches close together while avoiding the legs.
The shell should feel secure but should not flatten the turtle body completely.
Once the sewing is complete, hide the yarn ends inside the body and trim the excess.
Step 11: Add a Cute Halloween Detail
You can leave the pumpkin shell plain for a classic fall look, or add a tiny Halloween detail.
Mini Jack-o’-Lantern Face
Using black yarn, embroider two small triangles on the front of the pumpkin shell.
Add a small curved mouth beneath them.
Keep the face relatively small so it does not cover the pumpkin ridges.
Tiny Bow
For a decorative version, make a tiny black bow from yarn and sew it between the turtle’s head and shell.
This gives the pumpkin turtle a cute Halloween gift-shop look without changing the basic pattern.
Step 12: Final Finishing
Check all attachment points carefully.
The head should not wobble excessively.
The legs should be evenly spaced.
The shell should sit securely.
The stem and optional leaf should be firmly attached.
Weave all remaining yarn ends through several stitches before trimming them.
Give the finished turtle a gentle shake to make sure the stuffing remains evenly distributed.
How to Customize Your Pumpkin Turtle
Make a Larger Turtle
Use thicker yarn with a proportionally larger hook, or increase the body and shell dimensions by adding another increase round.
When resizing, remember that the shell and body need to remain proportional.
Make a Mini Turtle
Use DK or sport-weight yarn with an appropriately smaller hook.
Reduce the number of plain rounds to keep the finished design compact.
Change the Shell Color
Traditional orange works beautifully for Halloween, but you can also try:
- Cream
- Mustard yellow
- Dusty peach
- Rust
- Burnt orange
- Olive green
A cream shell with a green turtle creates a softer fall version.
Give the Turtle a Different Expression
Try sleepy eyes, smiling eyes, surprised eyes, or a tiny stitched tongue.
The face is one of the easiest parts to personalize.
Common Problems and Fixes
The pumpkin shell is floppy
Add a little more stuffing before closing it. The shell should be firm enough to hold its dome shape.
The shell hides the turtle head
Your shell may be too large or sitting too far forward. Reposition it before sewing.
The turtle tips over
Check the leg placement. The four legs should form a stable base.
You can also add a tiny amount of extra stuffing to the lower body.
The pumpkin ridges are too deep
Loosen the embroidery tension. Pumpkin grooves should shape the shell without sharply compressing it.
The head looks too small
Check the head-to-body proportions. You can make the head larger by repeating an increase round before working the plain rounds.
Where to Display Your Crochet Pumpkin Turtle
This little amigurumi works particularly well as a seasonal accent.
Place it on a Halloween craft shelf beside miniature pumpkins and dried leaves.
It can also sit on a desk, entryway table, bookshelf, or fall-themed tray.
For a larger display, group the turtle with a crocheted pumpkin, ghost, or bat to create a small handmade Halloween collection.
Why This Project Makes a Nice Handmade Gift
Small amigurumi projects are practical gift choices because they do not require a large amount of yarn.
A pumpkin turtle can be packaged in a small gift box with tissue paper and a handmade tag.
For a child, consider embroidering the facial details instead of using safety eyes. For decorative adult gifts, glossy safety eyes can create a polished toy-like appearance.
Care Tips
Keep the finished turtle away from prolonged moisture and direct heat.
For light dust, gently brush the surface or use a soft dry cloth.
If washing is appropriate for your specific yarn, follow the yarn manufacturer’s care instructions rather than assuming every fiber can be machine washed.
Store seasonal amigurumi in a clean container when Halloween is over.
Final Thoughts
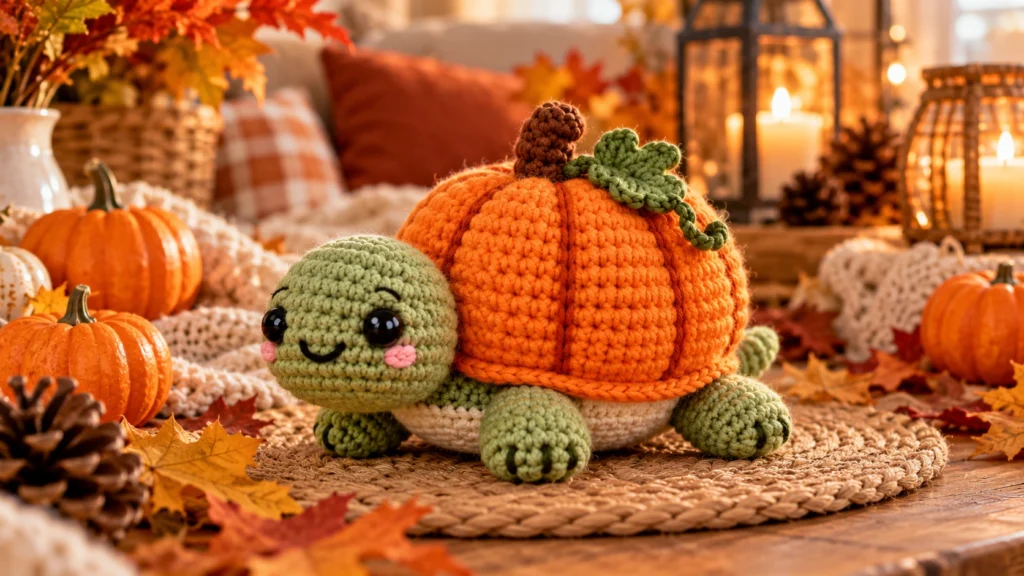
This crochet Pumpkin turtle is a simple project with a lot of personality. The turtle itself uses basic amigurumi shapes, while the rounded orange shell transforms it into a fun seasonal decoration.
The pattern also gives you plenty of opportunities to personalize the finished piece. Change the turtle color, add a tiny leaf, embroider a jack-o’-lantern expression, or make several turtles in different pumpkin shades.
Because the shell and body are made separately, you can experiment with new color combinations without changing the basic construction.
Once you have made one, it becomes easy to imagine an entire little fall collection of handmade turtles, pumpkins, ghosts, and other seasonal crochet decorations.
FAQ
Is this crochet Pumpkin turtle pattern beginner-friendly?
Yes. The project mainly uses single crochet, increases, decreases, stuffing, and basic sewing. It is a good choice for someone comfortable with simple amigurumi.
What yarn should I use?
Category 4 worsted-weight yarn is the recommended starting point. Use a smooth yarn so the stitches remain easy to see.
How big is the finished pumpkin turtle?
The finished turtle is approximately 5–6 inches long, but the exact size depends on yarn, hook size, and individual tension.
Can I make the pumpkin shell a different color?
Yes. Orange is traditional, but cream, rust, mustard, and muted green can all create attractive fall versions.
Can I make this amigurumi safe for young children?
For projects intended for young children, embroidered facial features are a safer alternative to detachable safety eyes. Small accessories should also be avoided or firmly secured.
Why does my pumpkin shell look like a ball?
The shell is intentionally rounded. Adding the embroidered vertical ridges and attaching it over the turtle body creates the pumpkin appearance.
Can I sell finished pumpkin turtles made from this pattern?
Finished handmade items can be sold, but you should review the rules and terms that apply to the specific pattern and marketplace where you plan to list them.