Easy Crochet Jersey Patterns and Stylish to Make
Discover easy and stylish Crochet Jersey Patterns with step-by-step tips to create comfortable designs you will love wearing and gifting today at home.
Table of Contents
Have you ever wondered if you could blend the relaxed, athletic vibe of a classic team shirt with the cozy, handmade charm of your favorite yarn crafts? Many people assume that athletic wear requires high-tech looms, but you can actually achieve that iconic look using simple hooks and yarn. These unique pieces offer a fresh take on modern style by combining boxy silhouettes with soft, tactile textures.
By mastering a few essential techniques, you can create custom apparel that features bold stripes, contrast trim, or even personalized emblems. This guide serves as your practical roadmap for crafting professional-looking crochet clothing designs from scratch. We will walk you through everything from selecting the right materials and achieving the perfect fit to final assembly and long-term care. Whether you want a V-neck finish or a classic rounded collar, you now have the tools to build a wardrobe that truly reflects your personality.
Choose Materials and a Jersey Design That Fits Your Skill Level
Success in creating your first handmade jersey starts long before you pick up your hook. By carefully selecting your supplies, you set the stage for a smooth experience that makes following advanced crocheting tutorials much easier. Taking the time to organize your tools now will save you frustration later.
Step 1: Select Yarn for Comfort, Drape, and Durability
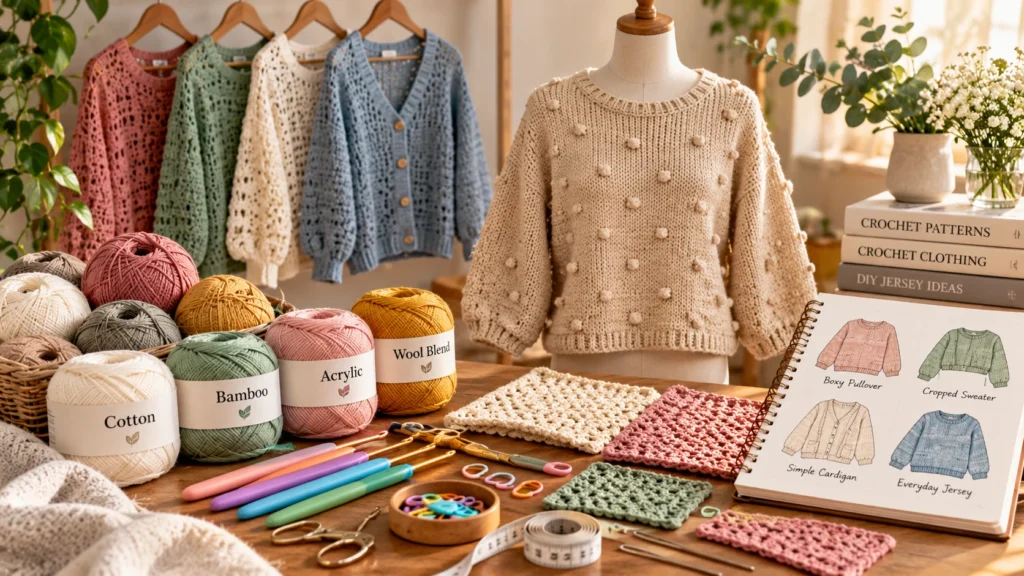
Compare cotton, bamboo, acrylic, and wool-blend yarns
The fiber you choose dictates how your garment feels against your skin and how it hangs on your body. Cotton offers excellent stitch definition but can be heavy, while bamboo provides a beautiful, silky drape. Acrylic is budget-friendly and easy to wash, whereas wool-blends offer warmth and elasticity.
| Fiber Type | Best For | Drape | Durability |
| Cotton | Summer Tops | Low | High |
| Bamboo | Flowy Garments | High | Medium |
| Acrylic | Everyday Wear | Medium | High |
| Wool-Blend | Winter Sweaters | Medium | High |
Match yarn weight and fiber to the season
Consider the climate where you live when picking your yarn weight. Lightweight fingering or sport weight yarns work best for summer, while worsted or bulky weights are ideal for winter layers. Always check the yardage requirements, as adult garments often need between 800 and 1,200 yards of yarn.
Step 2: Gather Hooks, Measuring Tools, and Finishing Supplies
Choose the crochet hook recommended for your gauge
Your hook size should match the yarn label’s recommendation to ensure your fabric is not too stiff or too loose. If you are new to crocheting tutorials, ergonomic hooks can help reduce hand fatigue during long sessions. Always test your tension with a small swatch before starting the main panels.
Prepare stitch markers, a tapestry needle, scissors, and blocking tools
Keep a set of locking stitch markers nearby to track your rows and identify armhole openings. You will also need a sharp pair of scissors and a blunt-tipped tapestry needle for weaving in ends. Finally, gather blocking mats and pins to give your finished piece a professional, polished look.
Step 3: Pick a Beginner-Friendly Jersey Shape
Start with a boxy pullover, cropped sweater, or simple cardigan
Beginners should focus on shapes that require minimal shaping, such as a boxy pullover or a straight-cut cardigan. These designs allow you to practice basic stitches without worrying about complex increases or decreases. A simple cropped sweater is another excellent choice that uses less yarn and works up quickly.
Use stitch patterns that create attractive crochet clothing designs without complex shaping
Stick to repetitive stitch patterns like double crochet or moss stitch to maintain a consistent fabric density. These textures look sophisticated while remaining easy to execute for those still learning. By choosing a simple silhouette, you ensure your first project is a success you will be proud to wear.
Measure Your Body and Plan the Perfect Crochet Jersey Fit
Planning your diy crochet tops requires a clear understanding of your body dimensions. Taking the time to prepare before you start stitching ensures that your final garment looks professional and fits comfortably. Proper planning prevents common sizing issues that often occur when working with handmade textiles.
Step 1: Take Accurate Bust, Waist, Hip, Arm, and Sleeve Measurements
Measure over the clothing you plan to wear underneath
Always use a flexible measuring tape to capture your body dimensions accurately. Wear the type of clothing you intend to pair with your finished piece to get the most realistic results. Stand in a natural position without holding your breath to ensure the measurements reflect your true shape.
Record ease preferences for a fitted, relaxed, or oversized jersey
Ease refers to the difference between your body measurements and the final size of the garment. You must decide if you want a snug fit or a loose, flowing silhouette for your diy crochet tops. Use the table below to help determine the amount of positive ease needed for your desired style.
| Fit Style | Ease Amount | Best For |
| Fitted | 0 to 2 inches | Layering under jackets |
| Relaxed | 3 to 5 inches | Everyday casual wear |
| Oversized | 6+ inches | Cozy, loungewear looks |
Step 2: Make and Measure a Gauge Swatch
Test stitch width, row height, and fabric stretch
Create a swatch that is at least 4 to 5 inches square using your chosen yarn and hook. Wash and dry this sample exactly as you plan to treat the finished garment. Measure the number of stitches and rows per inch to understand how your tension affects the final dimensions.
Adjust your hook size or yarn choice when the gauge is incorrect
If your swatch is too small, try using a larger hook to increase the stitch size. Conversely, a swatch that is too large may require a smaller hook or a different yarn weight. Achieving the correct gauge is vital because even a small error can significantly change the size of your diy crochet tops.
Step 3: Adapt the Pattern to Your Measurements
Calculate foundation chains and panel dimensions
Use your gauge data to determine the exact number of stitches needed for your foundation chain. Multiply your desired width by the number of stitches per inch found in your swatch. This calculation ensures your panels will match your body measurements perfectly.
Plan neckline, armhole, body length, and sleeve proportions
Map out the height of your armholes and the depth of your neckline based on your personal comfort. Adjust the length of the body and sleeves to suit your height and style preferences. By customizing these proportions, you create a unique piece that fits your body better than any store-bought alternative.
Follow the Essential Steps for Making Crochet Jersey Patterns
These easy crochet sweater instructions will guide you through every phase of your project. By breaking the process into manageable parts, you ensure that your garment maintains a professional structure from start to finish.
Step 1: Crochet and Check the Foundation Chain
Keep the chain loose enough to prevent a tight lower edge
Your foundation chain sets the tension for the entire hem. If you crochet too tightly, the bottom of your jersey will pull inward and lose its drape.
Count stitches carefully before beginning the first row
Always verify your stitch count before you turn your work. A single missing stitch at the start can cause your entire panel to slant or shrink unexpectedly.
Step 2: Build the Front and Back Panels
Work even rows in half double crochet, double crochet, or textured stitches
Consistency is the key to a polished look. Whether you choose a simple double crochet or a complex texture, keep your tension steady across every row.
Use stitch markers to maintain straight edges and consistent shaping
Place markers at the beginning and end of your rows to track your progress. This simple habit prevents accidental increases or decreases that ruin the fit of your sweater.
Step 3: Shape the Neckline and Shoulder Sections
Divide stitches evenly for a crew neck, scoop neck, or V-neck
When you reach the upper chest, calculate your stitch distribution based on your chosen neckline. Marking the center point helps you maintain symmetry as you work toward the shoulders.
Join or seam the shoulders while checking the garment’s width
Connect your shoulder pieces firmly to provide stability. Check that the width matches your initial measurements to ensure the neckline sits comfortably against your skin.
Step 4: Create and Attach the Sleeves
Work flat sleeves or crochet sleeves directly into the armholes
You can choose to crochet sleeves as separate flat panels or work them in the round directly from the armhole. Both methods offer unique benefits for your final design.
Taper the cuffs for a polished fit around the wrists
Gradually decrease your stitch count as you approach the wrist. This tapering creates a tailored look that prevents the sleeves from feeling bulky or loose.
Step 5: Assemble the Jersey Without Distorting the Fabric
Use mattress stitch, whip stitch, or slip-stitch joins
Choose a joining method that complements your stitch pattern. A mattress stitch often provides the cleanest, most invisible seam for heavy fabrics.
Align rows and seams before securing loose ends
Pin your panels together before you begin sewing to prevent shifting. Following these easy crochet sweater instructions ensures your seams remain straight and your garment hangs perfectly.
| Feature | Flat-Panel Construction | Top-Down Construction |
| Fitting | Requires pre-planning | Allows mid-project trials |
| Seaming | Requires assembly | Minimal to no seaming |
| Complexity | Beginner-friendly | Intermediate skill |
| Adjustability | Limited once finished | Highly flexible |
Use Stylish Stitches and Details to Personalize Your Handmade Jersey
You can elevate your handmade sweater patterns by focusing on texture, color, and custom details. Personalizing your work allows you to express your creative vision through every stitch. These small adjustments turn a simple design into a standout piece that reflects your unique style.
Choose Stitch Textures That Suit Your Crochet Skill Level
Use moss stitch or lemon peel stitch for easy texture
If you are new to crochet, start with simple, repetitive stitches. The moss stitch and lemon peel stitch provide excellent visual interest without requiring complex techniques. These textures create a dense, cozy fabric that works perfectly for a casual jersey.
Try cables, bobbles, lace, or ribbing for more advanced handmade sweater patterns
Once you feel confident, experiment with more intricate designs. Cables and bobbles add depth and a professional look to your garment. Lace patterns offer a lighter, more delicate feel, while ribbing provides structure to your cuffs and hems.
| Stitch Type | Skill Level | Best Use |
| Moss Stitch | Beginner | Main Body |
| Lemon Peel | Beginner | Texture Accents |
| Cables | Advanced | Front Panels |
| Ribbing | Intermediate | Cuffs and Hems |
Add Color and Pattern Without Making the Garment Too Busy
Combine neutral panels with one accent color
Color choice defines the mood of your jersey. Using neutral tones like cream, gray, or navy creates a timeless look. Adding a single bright accent color on the sleeves or neckline provides a modern, sporty touch.
Use stripes, color blocking, or planned color changes for trendy knitwear designs
Stripes are a classic choice for a jersey-style top. You can also try color blocking to highlight specific sections of the garment. Plan your color changes carefully to ensure the final result remains balanced and stylish.
Customize the Neckline, Hem, and Cuffs
Finish edges with ribbing, single crochet, or a decorative shell border
The edges of your garment provide the final polish. Ribbing offers a clean, professional finish that holds its shape well. Alternatively, a decorative shell border adds a soft, feminine touch to your cuffs or hemline.
Adjust cropped, tunic-length, fitted, and oversized silhouettes
Your choice of silhouette changes how the garment fits your body. A cropped cut pairs well with high-waisted pants, while a tunic length offers extra coverage. Decide if you prefer a fitted look or an oversized, relaxed feel before you begin.
Include Functional and Decorative Features
Add buttons, pockets, ties, textured panels, or a hood
Functional details make your jersey more practical for daily wear. Pockets are a great addition for convenience, while a hood adds extra warmth. You can also incorporate ties or buttons to adjust the fit of your handmade sweater patterns.
Check that embellishments remain comfortable and securely attached
Always ensure that any added features do not pull or distort the fabric. Test the weight of buttons or pockets to confirm they sit flat against the garment. Securely fasten all attachments so they remain durable through regular washing and wear.
Finish, Block, and Check Your Crochet Jersey Before Wearing It
Transforming your handmade pieces into stylish crochet projects requires careful attention to detail during the final stages. While the main construction is complete, these finishing steps ensure your garment remains durable and looks professionally made.
Weave in Ends and Reinforce High-Stress Areas
Secure yarn tails through several stitches on the wrong side
Start by turning your garment inside out to locate all loose yarn tails. Use a tapestry needle to weave these ends back and forth through the stitches on the wrong side of the fabric to prevent them from unraveling.
Reinforce shoulder seams, underarms, cuffs, and pocket openings
High-stress areas often experience the most wear during daily use. Add extra stitches or use a matching thread to reinforce these points, ensuring your hard work stays intact for years to come.
Block the Finished Garment for a Professional Shape
Choose wet blocking or steam blocking according to the fiber
Blocking is essential for evening out your stitches and achieving the correct dimensions. The method you choose depends entirely on the fiber content of your yarn, as natural fibers react differently than synthetic blends.
Pin panels to the intended measurements without overstretching them
Lay your garment flat on a blocking mat and gently pin it into the desired shape. Avoid pulling the fabric too tightly, as this can distort the stitch pattern and ruin the drape of your stylish crochet projects.
| Blocking Method | Best For | Key Benefit |
| Wet Blocking | Wool and Natural Fibers | Relaxes fibers for better drape |
| Steam Blocking | Acrylic and Synthetic Blends | Sets shape without soaking |
| Spray Blocking | Delicate or Light Items | Quick and easy adjustment |
Inspect the Fit and Correct Common Problems
Fix uneven seams, tight armholes, loose necklines, and curling edges
Before you consider the project finished, check for any construction errors. You can easily adjust tight armholes or loose necklines by adding a simple border or tightening the existing seam with a slip stitch.
Try on the jersey before trimming any remaining yarn ends
Always wear the garment to verify the fit before cutting your final tails. This allows you to make last-minute adjustments if the piece feels too restrictive or hangs incorrectly on your frame.
Follow Basic Safety and Care Practices
Use caution with hot steam, sharp hooks, needles, and blocking pins
Safety is paramount when handling finishing tools. Keep your fingers away from hot steam and ensure that all sharp pins are accounted for once the blocking process is complete.
Check the yarn label before washing, drying, or ironing the finished piece
Finally, consult the original yarn label for specific care instructions. Following these guidelines will help maintain the quality of your stylish crochet projects and keep them looking fresh for every season.
Style and Care for Your Finished Crochet Jersey
Mastering the art of styling and maintenance will help you get the most out of your trendy knitwear designs. Proper care ensures that your hard work remains a staple in your closet for many seasons to come.
Build Everyday Outfits Around Your Crochet Top
Pair a cropped jersey with high-waisted jeans or skirts
A cropped silhouette works beautifully when balanced with high-waisted bottoms. This combination creates a flattering proportion that highlights your waistline while keeping the look modern and chic.
Layer a lightweight pullover over a T-shirt or button-down shirt
For a versatile look, try layering your jersey over a crisp button-down shirt. This adds texture to your outfit and makes your handmade piece suitable for professional or casual settings.
Adapt One Pattern for Different Seasons
Use breathable fibers and open stitches for warm weather
You can easily adjust your trendy knitwear designs for the heat by selecting cotton or linen blends. Incorporating open, lacy stitches allows for better airflow, keeping you cool during the summer months.
Choose dense stitches, longer sleeves, and wool blends for cooler months
When temperatures drop, switch to warmer fibers like wool or alpaca. Using tighter stitch patterns and extending the sleeve length provides the extra insulation needed for autumn and winter.
Wash and Store the Jersey to Preserve Its Shape
Hand wash or use the gentle cycle when the fiber allows it
Always check the yarn label before cleaning your garment. If the fiber is delicate, hand washing in cool water with a mild detergent is the safest way to prevent shrinking or damage.
Lay the garment flat to dry and fold it instead of hanging it
Gravity can stretch out crochet fabric if you hang it on a coat hanger. Instead, lay your jersey flat on a clean towel to dry and store it folded in a drawer to maintain its original structure.
Turn the Pattern Into a Thoughtful Handmade Gift
Confirm the recipient’s measurements, style preferences, and fiber sensitivities
Before you start a project for someone else, verify their size and favorite colors. It is also vital to ask about any allergies to specific wools or synthetic fibers to ensure the gift is comfortable.
Include care instructions and a personalized note with the finished jersey
Adding a small card with washing instructions helps the recipient keep the item in great condition. A handwritten note adds a personal touch that makes your handmade gift truly special.
Conclusion
Creating beautiful Crochet Jersey Patterns becomes a rewarding process when you prioritize precision. You gain confidence by taking accurate body measurements and crafting a blocked gauge swatch before starting your project. A top-down sample using a 4.5 mm hook often yields a gauge of 18 double crochet stitches by 9 rows per 10 centimeters, providing a reliable foundation for your work.
Your creative journey allows for endless adjustments to body length and sleeve details. You possess the freedom to customize every element, from the neckline and color palette to the overall fit. These Crochet Jersey Patterns serve as a versatile base for your unique style.
Transform your finished piece into a cozy tunic, a stylish dress, or a layered seasonal staple. You might even choose to share your skills by gifting a handmade garment to someone special. Embrace the process of building your own collection of Crochet Jersey Patterns to ensure your wardrobe reflects your personal taste and craftsmanship.
FAQ
What is the best yarn for summer crochet jersey patterns?
For breathable diy crochet tops, use plant-based fibers like Lion Brand 24/7 Cotton or bamboo blends. These materials offer the best drape and keep you cool in warmer weather compared to heavy wools.
How can I make my handmade sweater patterns look more professional?
The secret to professional stylish crochet projects lies in the finishing. Always make a gauge swatch, use consistent tension, and finish your garment with steam or wet blocking to set the stitches and refine the silhouette.
Are these easy crochet sweater instructions suitable for total beginners?
Yes, if you choose a boxy, flat-panel construction. By following simple crocheting tutorials that focus on rectangles rather than complex shaping, beginners can successfully create wearable crochet clothing designs.
How do I ensure my trendy knitwear designs don’t stretch out over time?
To preserve the shape of your crochet jersey patterns, always store them folded in a drawer rather than on a hanger. Additionally, using a ribbing stitch at the hem and cuffs helps the garment retain its structure during wear.
How much yarn do I need for most crochet clothing designs?
While it depends on the size and stitch pattern, most adult-sized handmade sweater patterns require between 1,000 and 1,500 yards of yarn. Always check your pattern requirements and buy an extra skein from the same dye lot to be safe.