
Crochet Hat Pattern Free: Easy Styles for Beginners
Looking for crochet hat pattern free? Start with this simple beginner friendly design featuring easy stitches, clear instructions, sizing, and finishing tips.
Table of Contents
A handmade hat is one of the most satisfying crochet projects because it is small enough to finish without a huge time commitment, yet useful enough to wear again and again. This crochet hat pattern free guide uses simple stitches and a straightforward construction method, making it a practical project for someone who is comfortable with basic crochet.
The hat is worked from the bottom upward in rounds. The crown is shaped gradually, and the ribbed-looking brim is created first so the finished hat has a comfortable amount of stretch.
The pattern below is written for an adult medium head, with instructions for adjusting the circumference and height so you can adapt it for another size.
What You’ll Make
This pattern creates a simple crochet beanie with:
- A stretchy ribbed-style brim
- A smooth body worked in half double crochet
- A gently shaped crown
- A clean, minimal finish
- An adjustable fit based on your measurements
The finished adult medium hat is designed for approximately a 21–22 inch head circumference with a little negative ease.
Because crochet tension varies considerably, use the measurement instructions rather than relying only on a fixed stitch count.
Materials You’ll Need
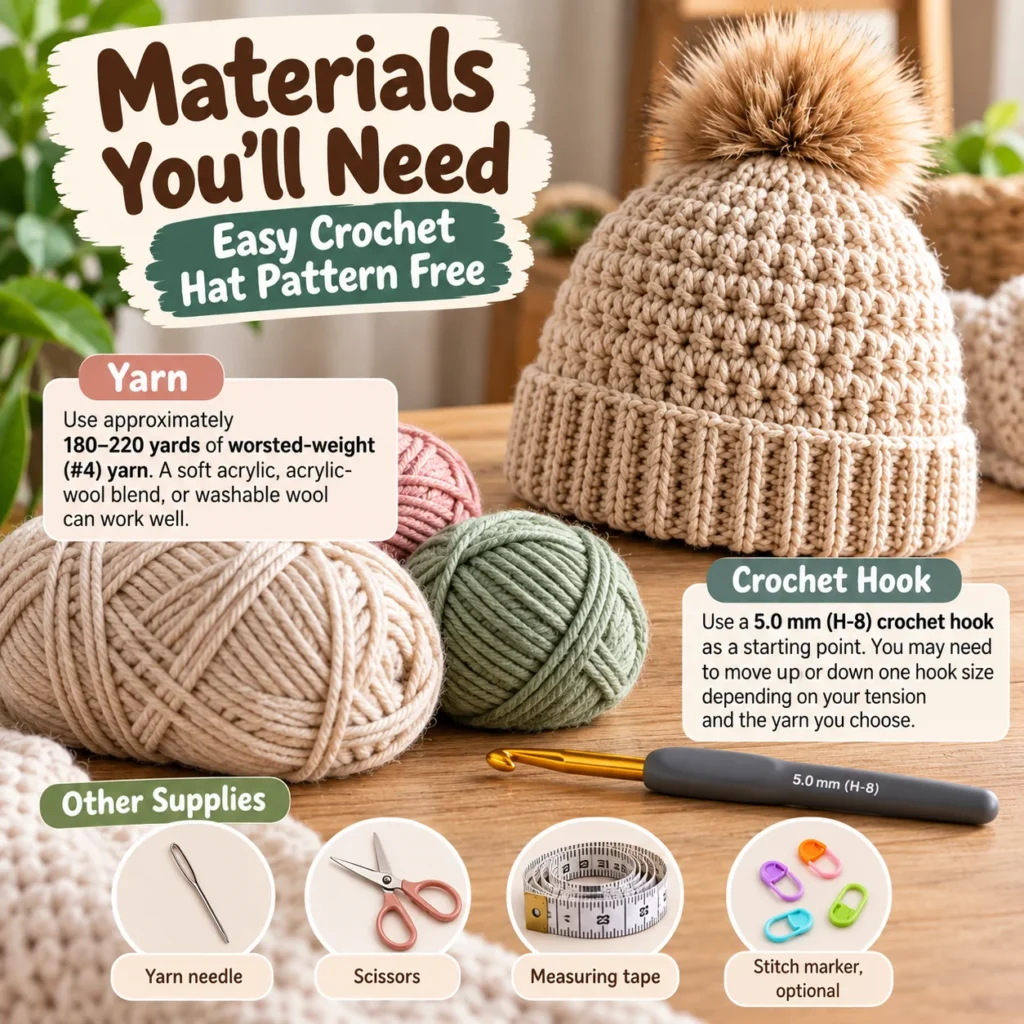
Yarn
Use approximately 180–220 yards of worsted-weight (#4) yarn.
A soft acrylic, acrylic-wool blend, or washable wool can work well. For a hat that will be worn frequently, choose a yarn that feels comfortable against the forehead and is easy to care for.
Avoid choosing a very stiff yarn for this project because the brim needs enough flexibility to stretch comfortably.
Crochet Hook
Use a 5.0 mm (H-8) crochet hook as a starting point.
You may need to move up or down one hook size depending on your tension and the yarn you choose.
Other Supplies
- Yarn needle
- Scissors
- Measuring tape
- Stitch marker, optional
Finished Size
The sample instructions are designed around an adult medium size:
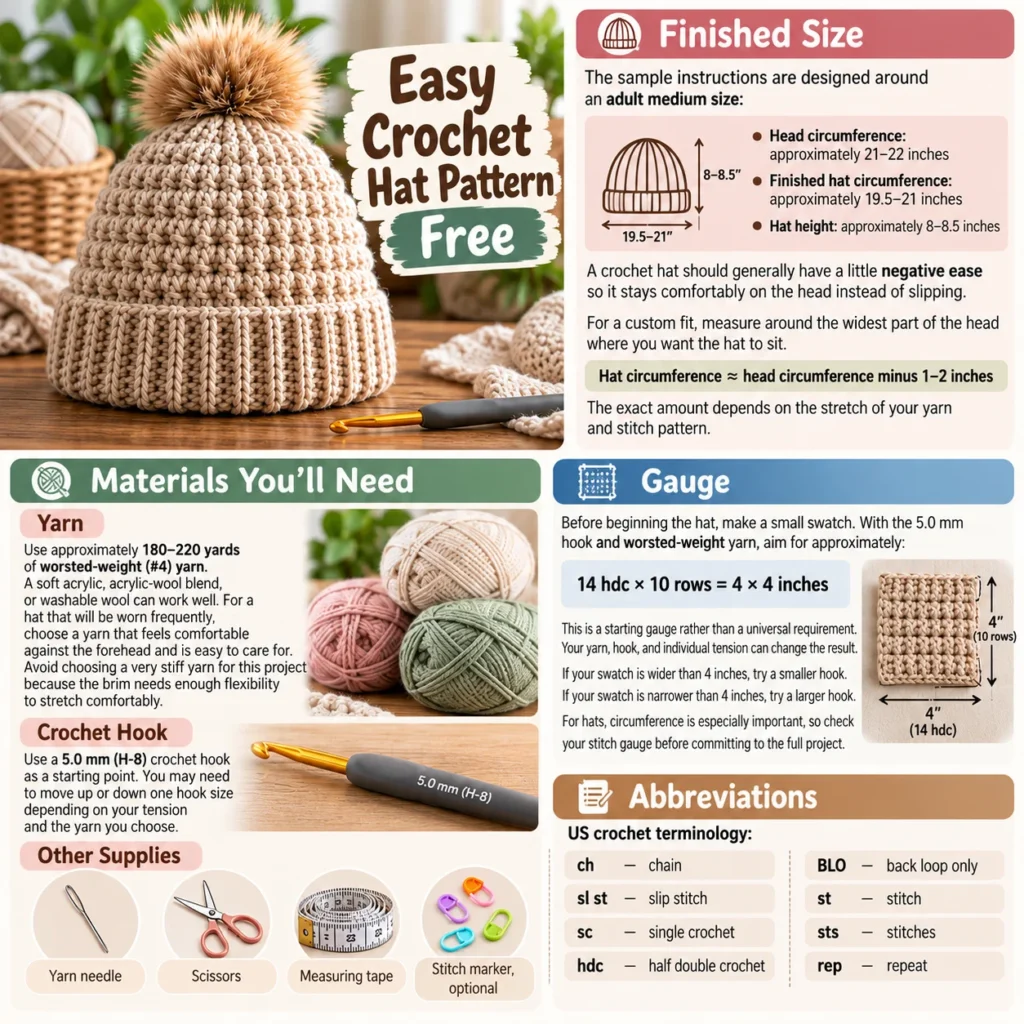
- Head circumference: approximately 21–22 inches
- Finished hat circumference: approximately 19.5–21 inches
- Hat height: approximately 8–8.5 inches
A crochet hat should generally have a little negative ease so it stays comfortably on the head instead of slipping.
For a custom fit, measure around the widest part of the head where you want the hat to sit.
A useful starting point is:
Hat circumference ≈ head circumference minus 1–2 inches
The exact amount depends on the stretch of your yarn and stitch pattern.
Gauge
Before beginning the hat, make a small swatch.
With the 5.0 mm hook and worsted-weight yarn, aim for approximately:
14 hdc × 10 rows = 4 × 4 inches
This is a starting gauge rather than a universal requirement. Your yarn, hook, and individual tension can change the result.
If your swatch is wider than 4 inches, try a smaller hook.
If your swatch is narrower than 4 inches, try a larger hook.
For hats, circumference is especially important, so check your stitch gauge before committing to the full project.
Abbreviations
US crochet terminology:
- ch — chain
- sl st — slip stitch
- sc — single crochet
- hdc — half double crochet
- BLO — back loop only
- st — stitch
- sts — stitches
- rep — repeat
Pattern Notes
The hat is constructed in two main sections.
First, crochet a band using rows of single crochet worked through the back loop only. The band is then joined to form a ring.
Next, work half double crochet stitches around the top edge of the band. The crown is shaped with decreases until the opening becomes small enough to close.
Do not pull the crown decreases extremely tight. A slightly relaxed decrease section will give the top of the hat a smoother appearance.
Easy Crochet Hat Pattern Free
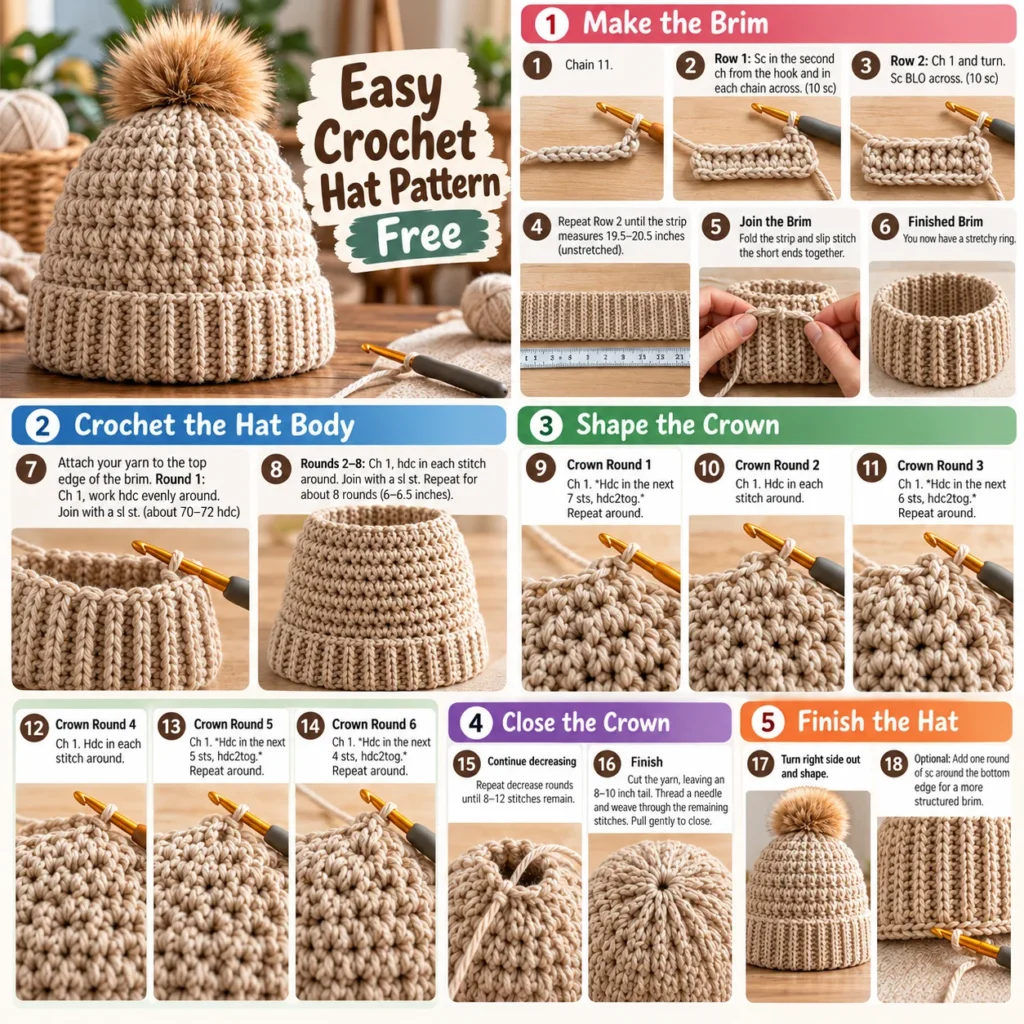
Step 1 — Make the Brim
Chain 11.
Row 1
Sc in the second ch from the hook and in each chain across.
10 sc
Row 2
Ch 1 and turn.
Sc BLO across.
10 sc
Repeat Row 2 until the strip measures approximately 19.5–20.5 inches when laid flat without stretching.
For a smaller or larger head, measure the strip around the intended head circumference as you work.
The band should fit snugly but should not feel uncomfortably tight.
Join the Brim
Fold the strip so the first and last rows meet.
Slip stitch the short ends together through both layers.
Fasten off if necessary, but keep the working yarn attached if you prefer to continue directly into the body.
You now have a stretchy ring.
Step 2 — Crochet the Hat Body
Turn the brim so the seam is positioned on the inside.
Attach your yarn to the top edge of the brim.
Round 1
Ch 1.
Work hdc evenly around the entire top edge of the brim.
Join with a sl st to the first hdc.
The exact number of stitches will depend on how many rows you made for the brim.
Aim for approximately 70–72 hdc for an adult medium hat.
Do not force the stitch count. If your brim has a different number of rows, distribute the hdc stitches evenly around the edge.
Rounds 2–8
Ch 1.
Hdc in each stitch around.
Join with a sl st to the first hdc.
Repeat for a total of approximately 8 rounds, or until the hat measures around 6–6.5 inches from the bottom edge.
At this stage, try the hat on or compare it with the wearer’s head measurement.
If you need additional height, add another round or two before beginning the crown decreases.
Step 3 — Shape the Crown
The crown is worked with gradual decreases.
If your Round 8 has approximately 72 stitches, use the following sequence.
Crown Round 1
Ch 1.
Hdc in the next 7 sts, hdc2tog.
Repeat around.
Join with a sl st.
Crown Round 2
Ch 1.
Hdc in each stitch around.
Join with a sl st.
Crown Round 3
Ch 1.
Hdc in the next 6 sts, hdc2tog.
Repeat around.
Join with a sl st.
Crown Round 4
Ch 1.
Hdc in each stitch around.
Join with a sl st.
Crown Round 5
Ch 1.
Hdc in the next 5 sts, hdc2tog.
Repeat around.
Join with a sl st.
Crown Round 6
Ch 1.
Hdc in the next 4 sts, hdc2tog.
Repeat around.
Join with a sl st.
At this point, the crown should be noticeably smaller.
If your stitch count does not divide evenly into the repeat, simply work the final few stitches as hdc rather than forcing an extra decrease.
Step 4 — Close the Crown
Continue decreasing in a similar manner:
- Work a round with decreases.
- Follow with a round of hdc if the crown needs a gentler shape.
- Continue until approximately 8–12 stitches remain.
Cut the yarn, leaving a tail of approximately 8–10 inches.
Thread the yarn needle with the tail.
Weave the needle through the remaining stitches, moving around the opening.
Pull gently to close the crown.
Secure the yarn on the inside of the hat and weave in the remaining end.
Do not pull so aggressively that the crown forms a large puckered knot.
Step 5 — Finish the Hat
Turn the hat right side out and inspect the crown.
Use your fingers to gently shape the top.
Check the brim for loose stitches and make sure the seam is secure.
If you prefer a slightly firmer and more defined brim, work one final round of single crochet around the bottom edge. This is optional and may reduce the stretch slightly.
How to Adjust the Crochet Hat Size
The easiest way to customize this pattern is to start with the wearer’s actual head measurement.
Measure around the widest part of your head, or wherever you want the hat to sit.
For example, if your head measures about 22 inches, a finished hat circumference of approximately 20–21 inches may give you a comfortable fit, depending on the yarn and how stretchy your stitches are.
For a smaller head, make the brim shorter.
For a larger head, make the brim longer.
Since the brim is worked sideways, you can adjust its length without being restricted to a fixed stitch count.Because the brim is worked sideways, you are not locked into a specific stitch count.
Adjusting the Height
You can also adjust the hat’s height by adding or removing body rounds before you begin shaping the crown.The height can be changed by adding or removing body rounds before beginning the crown.
For a shorter beanie, begin the crown decreases earlier.
For a slouchier hat, add several rounds before shaping the crown.
A useful approach is to measure the hat directly against the intended wearer rather than relying only on age-based sizing.
Tips for Better Results
Check the Brim Before Joining It
The brim should stretch comfortably around the head. If it already feels too tight before you join it, add more rows.
Do not assume the finished hat will become significantly larger after the body is crocheted.
Keep Your Tension Consistent
Uneven tension can make the hat look lumpy, particularly around the crown.
If your stitches become noticeably tighter during the decrease rounds, slow down and consciously relax your hands.
Count Your Stitches
The body is forgiving, but losing several stitches can cause the crown to become uneven.
Using a stitch marker can make it easier to keep track of where each round begins.
Try the Hat on Before Closing the Crown
Checking the fit as you work is one of the simplest ways to spot sizing issues early.
If the hat feels too short, simply work another body round before starting the crown.
If the circumference feels too loose, check your gauge and brim measurements before moving forward.
Common Problems and Simple Fixes
The brim is too tight
The brim probably does not have enough rows. Undo the seam and add rows until it reaches the required circumference.
The hat is too loose
Check your stitch gauge and finished brim measurement. If you want the finished hat to be a little larger around, you can use a larger hook or a looser crochet tension.
The crown looks pointed
You may be decreasing too quickly.
Try spacing the decreases with plain hdc rounds, particularly if you want a rounded rather than sharply tapered crown.
The crown has visible gaps
Your decreases may be too loose. Try to maintain consistent tension throughout the project, and avoid pulling or stretching the stitches while working.
The hat is too short
Add more hdc rounds before starting the crown shaping.
Washing and Caring for a Crochet Hat
Always follow the care instructions provided for the specific yarn you are using.
Washable acrylic can often be machine washed according to the yarn label, while wool may require gentler handling.
Avoid wringing a wet crochet hat. Rather than wringing the hat, gently press out the excess water and reshape it while it is still damp.
Allow it to dry completely before storing.
For long-term storage, keep the hat clean and dry and avoid placing heavy objects on top of it.
Make This Pattern Your Own
Once you are comfortable with the basic construction, you can easily personalize the hat in several simple ways.
Try a folded brim by making the band taller before joining it.
Use a contrasting color for the final few rounds.
Add a simple pom-pom to the crown.
Switch from worsted-weight yarn to another yarn weight and adjust the hook and stitch count according to your gauge.
You can also experiment with texture by replacing selected plain hdc rounds with a simple stitch pattern. Just make sure the stitch pattern does not significantly change the amount of stretch you need around the head.
Conclusion
A simple hat is an excellent way to practice crochet while creating something genuinely useful. This crochet hat pattern free project keeps the construction straightforward: make the stretchy brim, build the body with half double crochet, shape the crown, and finish the top.
The most important part of getting a good fit is not memorizing a fixed stitch count. Measure the head, check your gauge, and adjust the brim and height as needed. Those small decisions can make the difference between a hat that merely looks good and one that is actually comfortable to wear.
FAQ
Is this crochet hat pattern suitable for beginners?
Yes. The pattern uses basic US crochet stitches and a simple construction method. Beginners should be comfortable with chains, single crochet, half double crochet, slip stitches, and basic decreases.
What yarn is best for a crochet hat?
Worsted-weight (#4) yarn is a good choice for beginners because it is easy to handle and creates a warm fabric without being overly bulky. Choose a yarn based on the intended wearer, climate, desired drape, and care requirements.
How do I make the hat smaller or larger?
Adjust the length of the brim because the brim determines much of the finished circumference. To change the overall height, simply add or remove body rounds before beginning the crown decreases.
Can I use a different yarn weight?
Yes, but you should expect the finished size and fabric to change. Make a gauge swatch first, then adjust your hook size and stitch count to match your desired measurements rather than relying strictly on the stitch count given for worsted-weight yarn.
How much negative ease should a crocheted hat have?
There is no one negative ease that works for all crochet hats. As a guideline, you can make a stretchy hat 1–2 inches smaller than the person’s head circumference. The final fit will also depend on the yarn, stitch pattern and your crochet tightness.
How long will it take to knit this hat?
Time varies depending on your experience and speed of crocheting. Measure the head and check your gage before you finish the crown, then adjust the brim and hat height to fit for best fit.