10 Crochet Wall Hanging Ideas to Brighten Your Home
Discover 10 Crochet wall hanging ideas to brighten your home, add texture, and create a cozy focal point with easy inspiration for every room in your space.
Table of Contents
A bare wall above a desk, bed, or entry table is a clear place to start imagining a handmade focal point. Could a small piece of yarn work make that empty space feel more like yours? A Crochet wall hanging can add color and texture without needing to match every other decor item in the room.
These ten ideas range from small, simple designs to more elaborate textured pieces, so you can choose a project that suits your taste and comfort with crochet. Gauge is the number of stitches and rows in a measured area, used to check whether your work matches a pattern’s intended size. It helps you judge whether a finished piece will fit the space you have in mind.
Your choice can be guided by the room, the colors you already enjoy, or the time you want to spend making something. Begin with a distinctive hoop design, then move from that specific example to other styles.
Crochet Wall Hanging Ideas for a Boho Hoop Display
A half-circle attached to a round hoop can read like a crescent moon while giving the room a strong geometric outline. The Aura design pairs ridged texture with lace-like openings, a contrasting edge, and a golden hoop for a boho wall hanging look. Those details offer visual inspiration, not a promise that a particular crochet pattern is free.
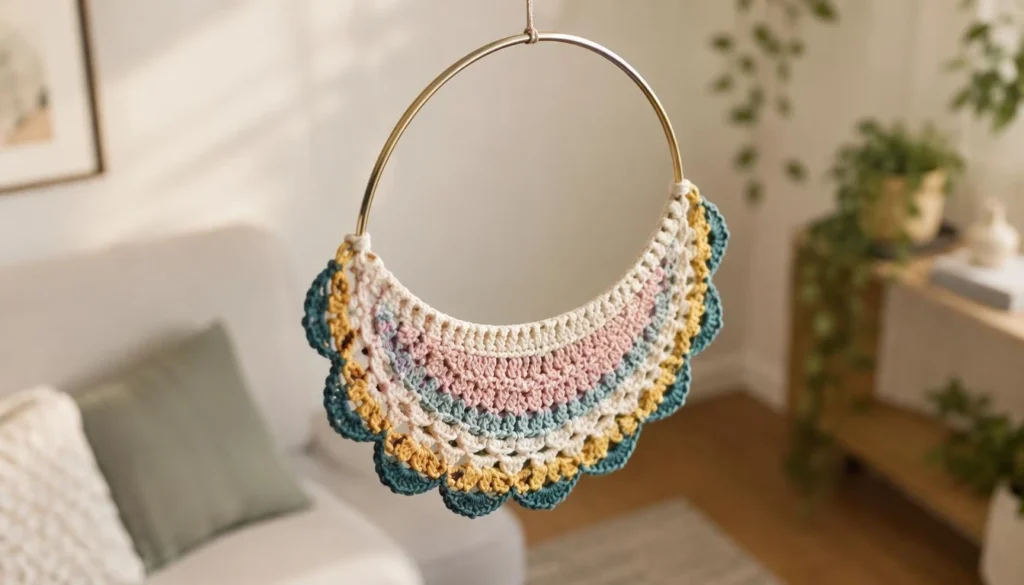
The 12-row half-circle is an intermediate project, though an advanced beginner may manage it with care. Its stitches include chain, single crochet, and double crochet, along with increases, chain spaces, and work along a raw edge.
Shape and color make the Aura half-circle stand out
The sample uses medium-weight worsted yarn, about 55 yards of Color A and 20 yards of Color B, not including fringe. A 5 mm hook and a 14-inch metal floral hoop suit its design. A single color can keep the ridges in focus, while a contrast color highlights the edge.
| Color plan | Visual effect | Design consideration |
|---|---|---|
| One color | Texture-led, quiet finish | Choose yarn with clear stitch definition |
| Two colors | Contrasting edge and body | Sample uses Color A and Color B |
| Several colors | Rainbow-mandala effect | Plan color changes to keep the half-circle balanced |
If you are comparing crochet wall hanging patterns, look for a design that explains the increases and raw-edge work. A crochet wall hanging free pattern may have different instructions, yarn amounts, or availability than another pattern, so check the pattern’s own details before starting.
Fit the half-circle to a hoop and finish it with fringe
- Worsted-weight yarn in one or more colors
- 14-inch metal floral hoop
- 5 mm crochet hook
- Tapestry needle, scissors, and stitch markers
Check gauge after Row 4. The straight edge should measure about 4.25-4.5 inches. Before stretching, the 12-row piece should sit about 0.25-0.5 inches inside the hoop. That small gap lets you fit the crochet securely without assuming the unstretched edge will sit flush.
The sample measures about 26 inches long with 12-inch fringe. Its full fringe uses two strands in each space along about three-quarters of the hoop. The hoop’s fit and edge finishing matter as much as the motif, which makes banners without a round frame a useful contrast.
How Can a Geometric Banner Give a Room a Modern Look?
A narrow banner with two or three crisp color blocks can bring a modern accent to a small stretch of wall. A rectangular or tapered shape gives you a clean silhouette without a round frame. Blocks, stripes, or repeated simple geometry can make the design feel planned without requiring a complex image.
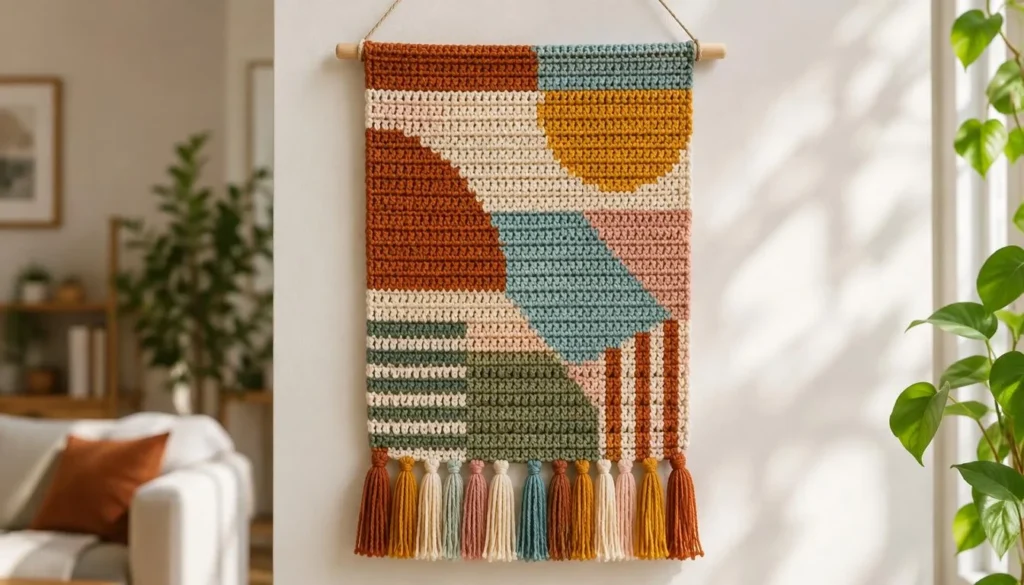
For a calm look, repeat a small number of colors across the banner. A sharp contrast between two shades makes the shapes stand out more. You can keep the layout symmetrical or offset one block for a less formal feel, while keeping the edges simple.
Basic stitches, such as single crochet, can make a crochet wall project approachable if you have some crochet experience. Textured stitches and color changes may take extra practice, especially when you need to keep the edges even. Check the skill notes and construction details in a modern crochet wall hanging free pattern before choosing a project.
A hanging pattern may shape the top edge or leave it straight, and that choice affects the banner’s overall look. Look for clear directions on where to begin each row and how to attach the piece to its top support. If the pattern uses several techniques, make a small test section before committing to the full design.
The same silhouette can suit a desk nook, a narrow spot beside a bookcase, or a small entry wall. You can also adjust the banner’s proportions, as long as the pattern supports that change. Straight-sided geometry gives way to circular designs that build their impact through a centered motif.
How Can a Crochet Mandala Become a Focal Point?
Repeated shapes radiating from a center make a mandala easy to notice even on a busy wall. A circular motif draws your eye outward through its rounds, while a fan-shaped piece can suggest the same expanding movement with a different outline.
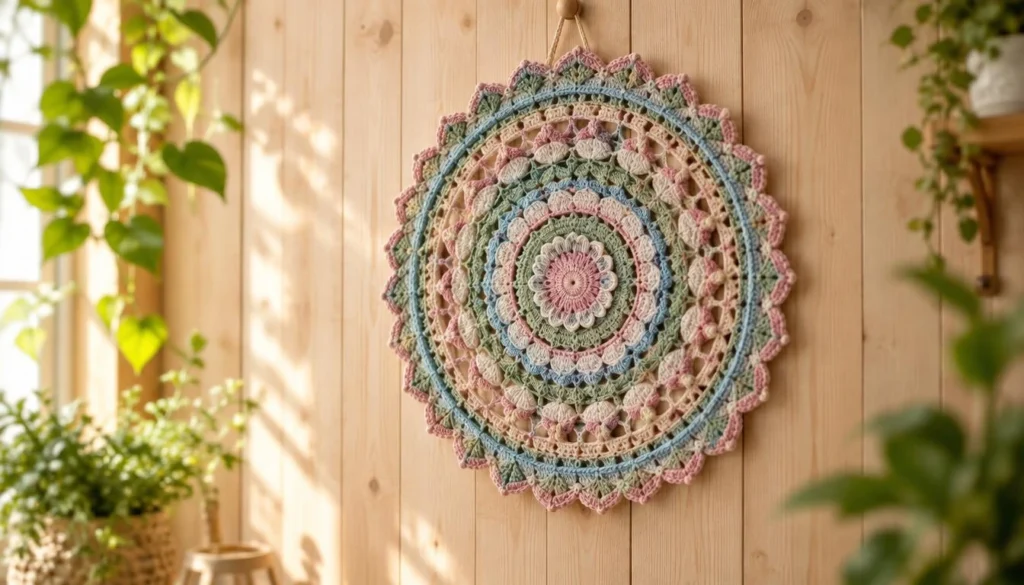
A Crochet Mandala wall hanging can use different construction methods, so do not assume every pattern is worked in the round. Some designs build repeating rounds; others form a fan or a half-circle. The repeated stitch pattern creates the focal point, even when the color stays simple.
Choose a motif direction that fits the room and the shape you want to make:
- Floral center with petal-like rounds
- Geometric rings with repeating shapes
- Sunburst spokes that spread from the middle
- Small heart-centered variation for a personal accent
Color changes can make each ring easier to see and give the piece a layered effect. In a single-color design, stitch texture can lead instead. Double crochet can create open spaces or a defined round, depending on the pattern, while tighter stitches give the motif a denser surface.
Check the instructions for each round or section, especially where stitch counts change. A missed increase can pull the edge inward, while extra stitches can make it ripple. If the pattern uses a stitch you have not tried, make a small sample before working the full motif.
The finished shape can sit alone or become the center of a larger display. Pick a size that has enough space around it to remain visible, rather than letting furniture or nearby wall decor crowd its outline. A flat, symmetrical motif can now give way to raised flowers and vines that bring texture away from the wall.
Could a Botanical Piece Add Three-Dimensional Texture?
A crocheted flower that casts a small shadow can make a simple wall display feel more dimensional. Raised petals, leaves, and curling vines add depth that a flat motif cannot, while still letting you keep the overall arrangement light.
Build the design from flowers, leaves, and vines
You can arrange crocheted flowers along a stem, scatter leaves across a panel, or let vines trail down from a top edge. Tassels can add a separate accent, but the plant forms can also carry the whole composition. These are design approaches, not fixed pattern requirements.
A single prominent bloom gives the eye one clear place to land. A cascading botanical composition feels fuller, with several flowers and leaves connected by winding lines. For a boho wall hanging, you can place the forms loosely rather than lining them up like a formal border.
Think about how the piece will read from across the room. A flower with raised petals may stand out on a plain background, while several small shapes can need more space around them. Vines can link separate details, but too many crossing lines may make the surface hard to follow.
Choose a natural support and place raised details with care
A natural wood branch can support a loosely arranged design and suit its organic shapes. Keep the raised elements spaced so each flower and leaf stays distinct. If their edges overlap too much, separate forms can merge into one busy patch rather than a clear plant-inspired arrangement.
An abundance of raised flowers may feel crowded in a narrow space, so a small motif or simple vine can be a better fit. You can also leave more open fabric around one large bloom. This lets the texture show without making every part of the wall hanging compete for attention.
Consider how the piece looks from the side as well as straight on. Thick details may project farther than you expect, especially if you add several layers of petals. A restrained arrangement can give a small room a tactile focal point without extending too far into the visual space around it.
Use the support and spacing to suit the design, rather than forcing every flower into a set layout. Organic shapes now hand off to a picture-like design built from color blocks and charted rows.
Which Crochet Wall Tapestry Suits a Landscape?
A charted mountain silhouette can turn a plain rectangle into a small landscape scene. Tapestry crochet and graph-style designs can also show sunsets, animals, or modern geometric imagery, making the image itself the focus of the wall piece.
A Crochet wall tapestry can hang from a wooden dowel or branch, depending on the pattern’s shape and support instructions. A tapestry needle can help you weave in ends neatly after changing colors. Before choosing a chart, compare its subject and details with the scale of the wall you want to decorate.
| Subject | Image treatment | Good design choice |
|---|---|---|
| Mountains | Layered peaks and a clear skyline | Choose for a landscape that reads from a distance |
| Sunsets | Broad bands or a fading sky | Choose for a simple scene built from color areas |
| Animals | Silhouette or defined features | Choose a chart with details that suit the finished size |
| Geometric shapes | Repeated blocks, lines, or angles | Choose for a graphic image without a natural subject |
Read the chart before you begin. A detailed picture can be hard to recognize if the finished tapestry is too small, while many colors can add extra changes row after row.
- Image scale: check whether the main shapes will be clear at the finished size.
- Color count: note how many yarn colors the chart calls for.
- Row-by-row readability: make sure you can follow each row without guessing.
- Finished width: compare the planned width with the wall space.
Charts vary in how they show color changes and stitch counts, so follow the pattern’s key. If you prefer a quicker, simpler color statement, a small rainbow can offer a clear image with less visual complexity.
How Can a Crochet Rainbow Brighten a Small Wall?
A small arch in a few bright shades can add a lively accent without taking over a whole wall. You can make a rainbow as a narrow banner or a small hoop accent, with its curved outline doing much of the visual work.
Optional clouds, tassels, or a short fringe can add detail, but a plain arch keeps the motif easy to read. A few coordinated shades can feel calm, while a broader spectrum reads as more playful. Choose the number of colors to suit the room and the size of the finished piece.
Curved shaping can take attention even in a small project. A simple version can be a better first attempt than adding several details at once. Check the instructions for how the pattern forms and joins each arch, since the curve can affect the finished shape.
A Simple crochet wall hanging free pattern is easier to follow when it gives clear shaping instructions and shows how the arches fit together. Read the pattern notes before you choose yarn, then check whether it calls for separate strips, joined rounds, or another method. Those steps can change how much time the work takes.
You can vary the proportions to fit a narrow space, but follow the pattern’s shaping notes if you adjust the size. A very small arch may need fewer details to stay clear. A larger rainbow can carry clouds or a longer fringe without losing its simple outline.
Use the curved motif as a small point of color above a shelf or beside a doorway. If you prefer a crisp, contained presentation, move from an unframed motif to crochet displayed in a frame.
Can You Frame Crochet Art for a Clean Finish?
A small crochet motif in a frame can look more like a carefully composed art print than a hanging textile. Framing works best when the finished piece sits flat and fits the frame without force.
Pick a piece that sits flat behind a frame
Choose a flat motif or small textile that can lie evenly against its backing. Thick, dimensional stitches may be compressed or obscured behind glazing. A piece with a simple outline and tidy edges is often easier to arrange than one with bulky texture.
Before placing the crochet in the frame, weave ends securely and check that the surface is smooth. Do not stretch the fabric so tightly that the stitches distort. The frame should not press raised stitches so tightly that their texture is lost.
Some crochet wall art in a frame can sit behind glazing, while other pieces may look clearer without it. The frame and backing should hold the crochet in place without flattening its stitch pattern. Test the layout before closing the frame, so you can adjust the position or backing if needed.
Use the frame to create contrast or a gallery-style display
A contrasting backing can help a pale motif show against a light wall, or let a dark design stand out on a softer background. You can also leave a visible border around the crochet, giving the piece room to breathe inside the frame.
A group of smaller framed motifs can form a gallery-style display. Keep the spacing between frames consistent if you want a more orderly arrangement, or vary the sizes for a less formal wall. A repeated border or backing color can link separate pieces without making them identical.
Framed crochet art can suit a small motif that might otherwise be hard to display on its own. Choose a frame that matches the finished size, not one that requires you to fold or bunch the crochet. From display-only decor, you can move to a design that also holds a light, small item.
What Can a Mini Pocket Wall Hanging Hold?
A small pocket stitched onto a hanging panel can keep a note visible while adding another layer of texture. A mini pocket wall hanging can hold a note or a lightweight dried stem, but it is not made for heavy objects or load-bearing use.
The pocket may be shaped like an envelope, a pouch, or a folded rectangle attached to a hanging base. Each shape creates a different opening and depth, so think about the item you want to place inside. A narrow pocket might suit a note, while a deeper one could hold a lightweight stem.
Check the pattern uses and attachment details before you begin. The instructions should explain how the pocket joins the base and whether the shape needs extra rows or seams. You may need to adjust the pocket depth to the intended item, but follow the pattern’s construction method when changing its size.
A shallow pocket can keep a note visible without hiding the main panel. A deeper fold gives more room, though the pocket may stand farther from the wall. Keep the design light, and do not treat the crochet as a place to store keys, tools, or other weighty items.
Some hanging patterns include a pocket as part of the design, while others use a separate piece attached afterward. Check how the top support holds the finished work, since added layers can change how the panel sits. A small pocket offers a practical detail without turning the wall hanging into a storage device.
If you are unsure whether an item is too heavy, leave it out. A note or lightweight dried stem keeps the pocket decorative and avoids putting strain on the stitches. From a functional pocket, move to designs where surface texture and loose ends provide the decorative interest.
How Do Texture and Fringe Change a Wall Display?
Even a plain rectangle can look distinctive when alternating ridges catch the light. Openwork creates gaps and softer lines, while fringe adds movement below the panel. These choices can change the mood of a simple crochet wall hanging without changing its basic shape.
Use ridges for a more defined surface, or open stitches when you want some lightness. Fringe can make a short panel feel longer, but it also adds loose ends that need to hang evenly. A row of knots or uneven spacing can make the bottom edge look less tidy.
Check your work as you go so the finished piece stays balanced:
- Count stitches periodically to keep the edges straight.
- Watch for tension changes, and take breaks when your hands tire.
- Pull yarn from the center of the skein when practical.
- Weave in ends and block the piece if its edges need help lying flat.
Self-striping or ombré yarn can create color variation without frequent changes. A practice swatch can help you try a new color-change method before it reaches the full piece. If the stitches do not show clearly in the swatch, a different yarn or simpler texture may suit the design better.
Pay attention to the edges after several rows. A change in tension can make one side pull inward or flare outward, even when you have the right stitch count. Small checks during the work are easier than trying to correct a large uneven area at the end.
Fringe can be short and restrained or long enough to become a major part of the shape. Use the pattern’s instructions for attachment and trim only after the strands hang as you want. Turn from texture choices to a final motif idea that can suit a nursery, seasonal display, or handmade gift.
What Makes a Heart or Seasonal Hanging a Personal Gift?
A small heart or seasonal symbol can make a handmade wall accent feel chosen for one person or one moment. A heart, leaf, or star on a small banner can personalize a bedroom, nursery, or gift without making the design hard to display.
Choose a symbol that connects to the room or occasion, then consider the yarn and scale. Cotton and acrylic are common choices for wall decor. DK and worsted weights are frequent options, while thinner yarn creates a more delicate look and bulky yarn makes a bolder statement.
| Yarn choice | Visual effect | Useful consideration |
|---|---|---|
| Cotton | Defined stitches and a clear shape | Common option for wall-hanging yarn |
| Acrylic | Versatile finish for small decor | Common option; check pattern quantities |
| Bulky yarn | Bolder, thicker surface | Use when the pattern supports the larger scale |
Scrap yarn can work well for decor pieces, since they do not take much wear. Lion Brand 24/7 Cotton, Red Heart Super Saver, and Lion Brand Wool-Ease Thick & Quick are examples of yarn options. The names are examples, not a reason to choose one over a yarn that fits your pattern.
The yarn you may need depends on the pattern and fringe length. Use the stated quantities rather than assuming a fixed amount, especially if you plan to change the size or add loose ends. A small design may need little yarn, but its exact amount still depends on its stitches and dimensions.
A seasonal symbol can be changed for another occasion, or you can make a small banner as a one-time gift. Check the pattern’s finished size against the intended wall, and consider whether the person has room to display it. Pick a motif and materials that fit the room, then take a simple next step.
Conclusion
The best choice is the design that fits both your wall and the time you want to spend making it. Shape and mounting affect the room’s look, while choosing a pattern within your comfort level makes finishing more manageable.
Start by choosing the wall and measuring the space you want to fill. Save a suitable design to your Pinterest boards before gathering supplies, so you can compare its size with the area you measured. A crochet Facebook group can also be an optional place to share pictures and get feedback.
Measure your chosen space and save one idea before starting the project.
FAQ
How much yarn do you need for a crochet wall hanging?
The amount depends on the finished dimensions, stitch pattern, and fringe. The Aura half-circle example uses about 55 yards of its main color and 20 yards of contrast, excluding fringe. Check the pattern’s stated quantities and allow for any planned size changes. If you add fringe, confirm whether the pattern includes those yards or lists them separately.
Can you crochet a wall hanging without a hoop?
Yes, many designs use a flat banner attached to a dowel or branch instead of a hoop. The right support depends on the pattern’s shape and construction. A straight top edge may suit a dowel, while a loosely arranged design can hang from a branch. Follow the pattern’s attachment directions so the finished piece stays balanced.
What crochet stitches are easiest for a beginner wall hanging?
Single crochet and double crochet are approachable starting stitches for a beginner wall hanging. A simple panel lets you practice even tension and straight edges before adding more techniques. Increases, chain spaces, and color changes can raise the difficulty. Read the pattern’s skill notes and try an unfamiliar stitch in a small swatch first.
Do crochet wall hangings need to be blocked?
No, not every crochet wall hanging needs blocking. Blocking can help a piece lie flat or straighten uneven edges, especially when the finished fabric curls. Follow the yarn label and pattern guidance before applying water or heat. If the piece already hangs evenly and its shape looks right, blocking may not be needed.
Can you use leftover yarn for wall decor?
Yes, leftover yarn can work well for a low-wear decor project. Check that you have enough for the pattern’s dimensions, color changes, and any planned fringe. Scrap yarn can be useful for a small motif, but different yarn weights may change the finished size. Use yarn that suits the pattern’s stated gauge where gauge is given.
How do you keep a crochet wall hanging from sagging?
Keep the fabric evenly tensioned, secure it along a suitable support, and avoid adding weight the design was not made to carry. A panel that hangs from only a small point may distort, so follow the pattern’s support method. Check that the top edge is level and that the crochet is spread evenly before you display it.